# Manage Teams Meetings

## 1. Create a Teams Meeting

1. Open a Web Browser and navigate to [https://teams.microsoft.com/](https://teams.microsoft.com/)
    - You can also use the Desktop App version of Microsoft Teams
2. Login using your @lions.piedmont.edu credentials
3. Navigate to the **Calendar** column   
    [![TeamsCalendar.png](https://wiki.piedmont.edu/uploads/images/gallery/2026-01/scaled-1680-/L0ECOsO3XNNApc4E-teamscalendar.png)](https://wiki.piedmont.edu/uploads/images/gallery/2026-01/L0ECOsO3XNNApc4E-teamscalendar.png)
4. Select **New  
    [![NewTeamsMeeting.png](https://wiki.piedmont.edu/uploads/images/gallery/2026-01/scaled-1680-/BAcIHXIS02ePbyB2-newteamsmeeting.png)](https://wiki.piedmont.edu/uploads/images/gallery/2026-01/BAcIHXIS02ePbyB2-newteamsmeeting.png)**
5. The **New Event** popup appears, Fill out the fields for **Add Title, Invite Required Attendees,** and be sure to Toggle **Teams Meeting**
    - <span style="color: rgb(45, 194, 107);">The Event Title will generally be the name of the Class .</span>
    - <span style="color: rgb(53, 152, 219);">For the **Invite Required Attendees** field, type in the student's Lions email address to add them to the meeting.</span>
    - <span style="color: rgb(230, 126, 35);">For the **Scheduler** Field, select the Date &amp; Time for when the meeting will take place. </span>
    - \[OPTIONAL\]: Add a meeting room/location if you're hosting a hybrid meeting of in-person and online guests. *(Example: DanielHall-310)*
    - <span style="color: rgb(185, 106, 217);">Be sure to Toggle **Teams Meeting**, so that a URL for the meeting is created.</span>
    - Finally, select Save in the top-right corner to create the meeting  
        [![CreateTeamsMeeting.png](https://wiki.piedmont.edu/uploads/images/gallery/2026-01/scaled-1680-/hTi3CkqyCwZu5DIl-createteamsmeeting.png)](https://wiki.piedmont.edu/uploads/images/gallery/2026-01/hTi3CkqyCwZu5DIl-createteamsmeeting.png)
    - A Meeting will be created and invites will be sent to the participants.

---

## 2. Join a Teams Meeting

<p class="callout info align-left">A meeting created with Attendees will send an email invite to the participant's Outlook but you can also view the invite on the Teams Calendar</p>

1. Open a Web Browser and navigate to [https://teams.microsoft.com/](https://teams.microsoft.com/)
    - You can also use the Desktop App version of Microsoft Teams
2. Login using your @lions.piedmont.edu credentials
3. Navigate to the **Calendar** column   
    [![TeamsCalendar.png](https://wiki.piedmont.edu/uploads/images/gallery/2026-01/scaled-1680-/L0ECOsO3XNNApc4E-teamscalendar.png)](https://wiki.piedmont.edu/uploads/images/gallery/2026-01/L0ECOsO3XNNApc4E-teamscalendar.png)
4. Scroll to the Date/Time that the Teams Meeting would take place, you should see the meeting on your Teams Calendar.   
    [![TeamsMeetingExample.png](https://wiki.piedmont.edu/uploads/images/gallery/2026-01/scaled-1680-/6SGlRjU107OC2Da5-teamsmeetingexample.png)
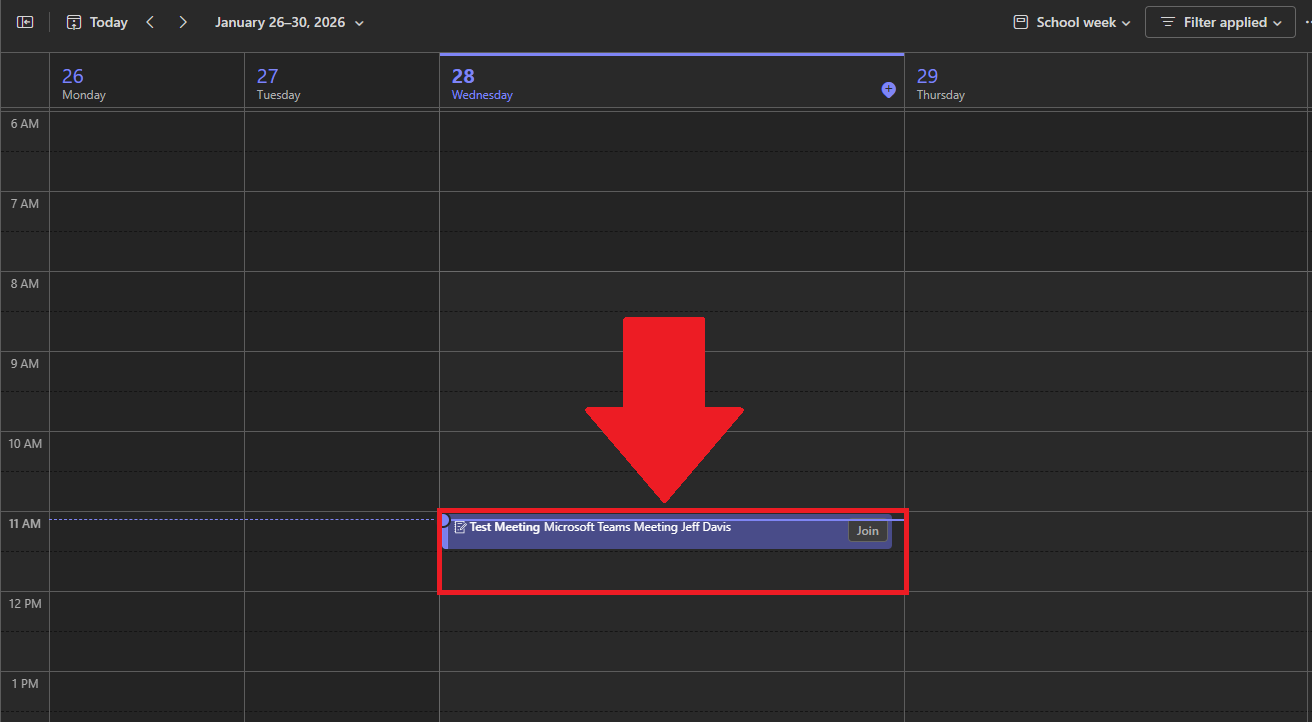
](https://wiki.piedmont.edu/uploads/images/gallery/2026-01/6SGlRjU107OC2Da5-teamsmeetingexample.png)
5. Select the Meeting, and select **Join**  
    [![JoinTeamsMeeting.png](https://wiki.piedmont.edu/uploads/images/gallery/2026-01/scaled-1680-/06XHz1k3cgwCTDMz-jointeamsmeeting.png)
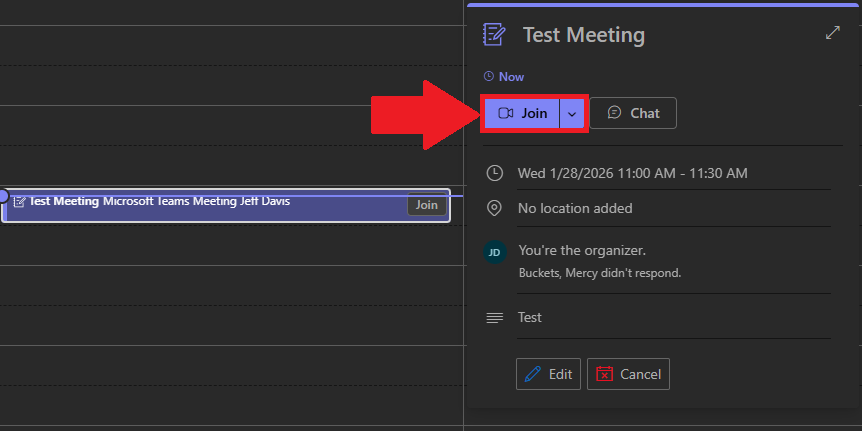
](https://wiki.piedmont.edu/uploads/images/gallery/2026-01/06XHz1k3cgwCTDMz-jointeamsmeeting.png)
6. Follow through the on-screen prompts to select your Audio and Video equipment as you would normally do so if you were using Zoom.

---

## 3. Meeting ID and Passcode

<p class="callout success">You can complete the following as either a host or attendee</p>

1. You can obtain the Meeting Link/URL by selecting the Drop-down arrow next to **Join** Meeting on your Teams Calendar.   
    [![CopyMeetingInvite.png](https://wiki.piedmont.edu/uploads/images/gallery/2026-01/scaled-1680-/d4Ad0iDJqc8dO2Yy-copymeetinginvite.png)
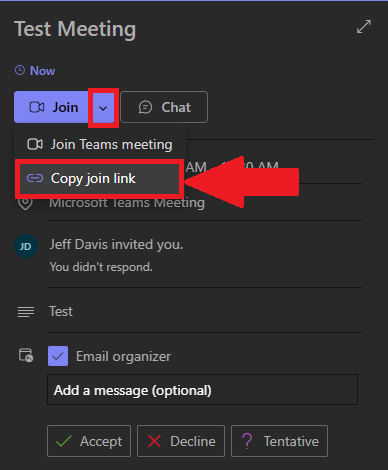
](https://wiki.piedmont.edu/uploads/images/gallery/2026-01/d4Ad0iDJqc8dO2Yy-copymeetinginvite.png)
2. If you Double-Click a meeting on your Calendar, you can see the **Meeting ID and Passcode**   
    [![TeamsMeetingPasscode.png](https://wiki.piedmont.edu/uploads/images/gallery/2026-01/scaled-1680-/N3vbf3whnBwDCMfL-teamsmeetingpasscode.png)
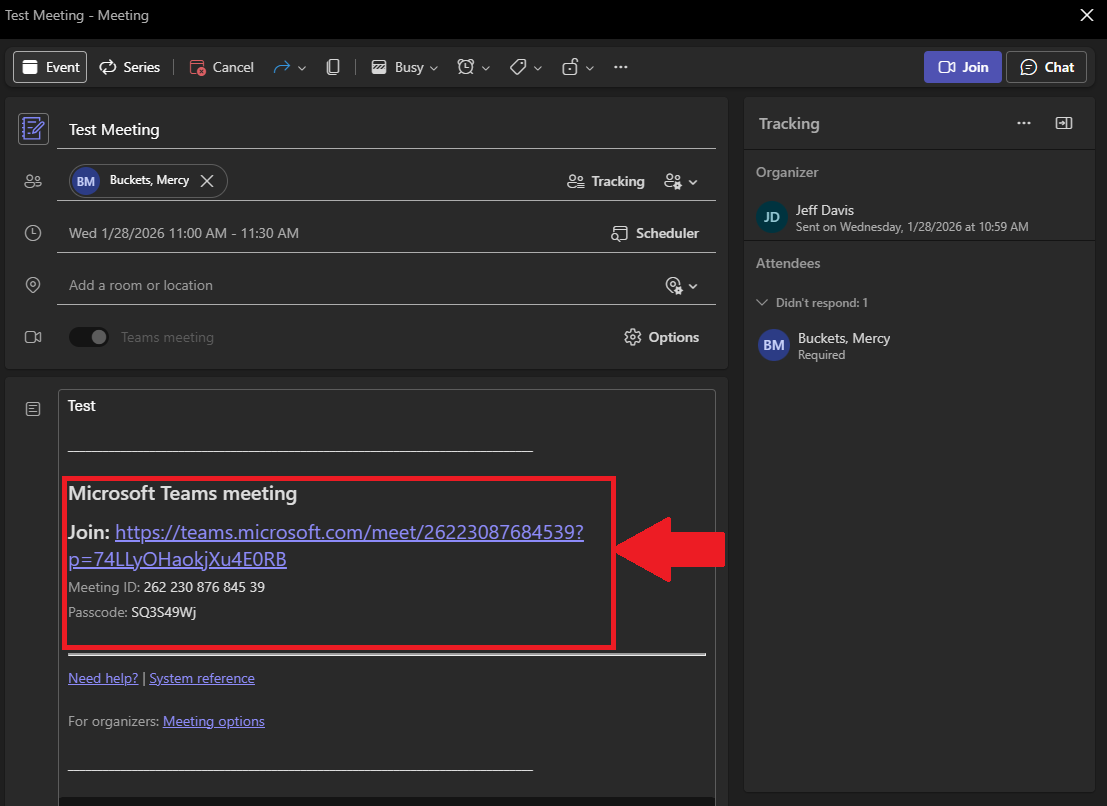
](https://wiki.piedmont.edu/uploads/images/gallery/2026-01/N3vbf3whnBwDCMfL-teamsmeetingpasscode.png)

---

## 4. Advanced Options

<p class="callout warning">The following section can only be completed by the host or co-hosts of a Teams Meeting</p>

1. Navigate to Teams Calendar, the following options can be performed on New Meetings, before they're created, or afterwards for existing Teams Meetings.
2. Select the **Options** button when editing or creating a Team Meeting[![TeamsAdvancedOptions.png](https://wiki.piedmont.edu/uploads/images/gallery/2026-01/scaled-1680-/iecXoxgVDy86Z3U3-teamsadvancedoptions.png)
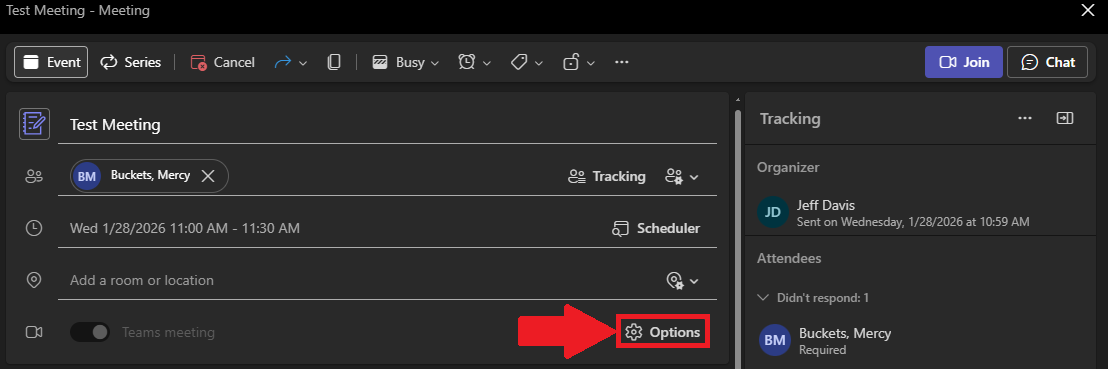
](https://wiki.piedmont.edu/uploads/images/gallery/2026-01/iecXoxgVDy86Z3U3-teamsadvancedoptions.png)
3. In this menu, you can manage **Meeting Access** and **Roles**
    - **Meeting Access:** Here you can manage the basic permissions of attendees in the meetings.  
        [![TeamsMeetingsAccess.png](https://wiki.piedmont.edu/uploads/images/gallery/2026-01/scaled-1680-/lZlhgJmSKk5iPhOd-teamsmeetingsaccess.png)
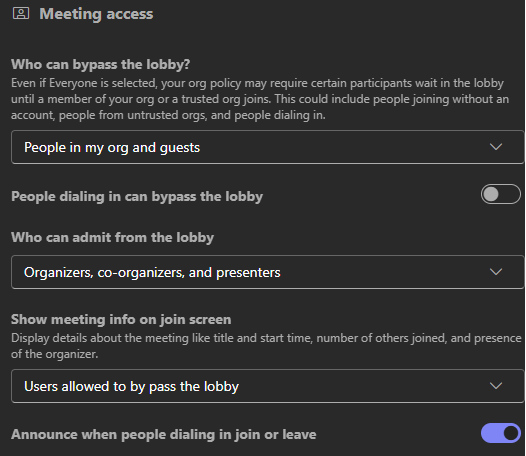
](https://wiki.piedmont.edu/uploads/images/gallery/2026-01/lZlhgJmSKk5iPhOd-teamsmeetingsaccess.png)
    - **Roles**: Here you can manage co-hosts and presenting permissions for participants.

[![TeamsMeetingRoles.png](https://wiki.piedmont.edu/uploads/images/gallery/2026-01/scaled-1680-/2F2spLD2bp9VpAtn-teamsmeetingroles.png)
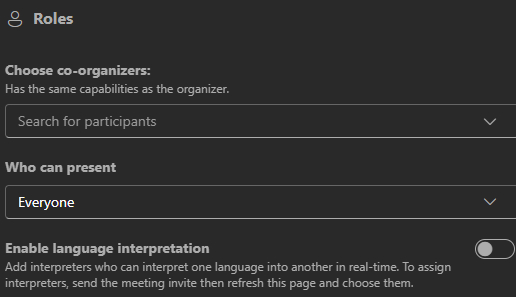
](https://wiki.piedmont.edu/uploads/images/gallery/2026-01/2F2spLD2bp9VpAtn-teamsmeetingroles.png)

---