| **Network Name** | **Who Should Use This** | **Typical Devices** | **Instructions** |
| **Lions** | Faculty, Staff, and Students | Personal Laptops, Phones, and Tablets | [Get Connected - Lions Wi-Fi](https://wiki.piedmont.edu/books/network-connectivity/page/get-connected-lions-wi-fi "Get Connected - Lions Wi-Fi") |
| **Lions Guest** | Campus visitors and event guests | Any visitor device | [Get Connected - Campus Visitor](https://wiki.piedmont.edu/books/network-connectivity/page/get-connected-campus-visitor "Get Connected - Campus Visitor") [Get Connected - Event Guest](https://wiki.piedmont.edu/books/network-connectivity/page/get-connected-event-guest "Get Connected - Event Guest") |
| **Lions Secure** | University-owned devices | Work laptops, desktops, and managed devices | [Get Connected - Lions Secure](https://wiki.piedmont.edu/books/network-connectivity/page/get-connected-lions-secure "Get Connected - Lions Secure") |
Don't forget to review the [Recommended Wi-Fi Settings](https://wiki.piedmont.edu/books/network-connectivity/page/recommended-wifi-settings "Recommended WiFi Settings")!
--- # Recommended WiFi SettingsRandomized MAC addresses are a privacy feature designed to prevent device tracking across networks. While this is useful in public or unsecured networks, it creates problems on campus networks like Piedmont University's. Please complete this on your Mac or PC and iPhone or Android before joining the network.
## 1. Disable MAC Randomization (iOS) 1. Open Settings 2. Connect to the desired Wi-Fi network, then tap the info i icon next PC-WiFi 3. Select Private Wi-Fi Address and select the OFF option. 4. Additionally, Limit IP Address Tracking should be OFF. - This disables Apple’s Private Relay for the Lions network specifically.If 'Limit IP Address Tracking' is enabled, the WebPrint website will not load.
[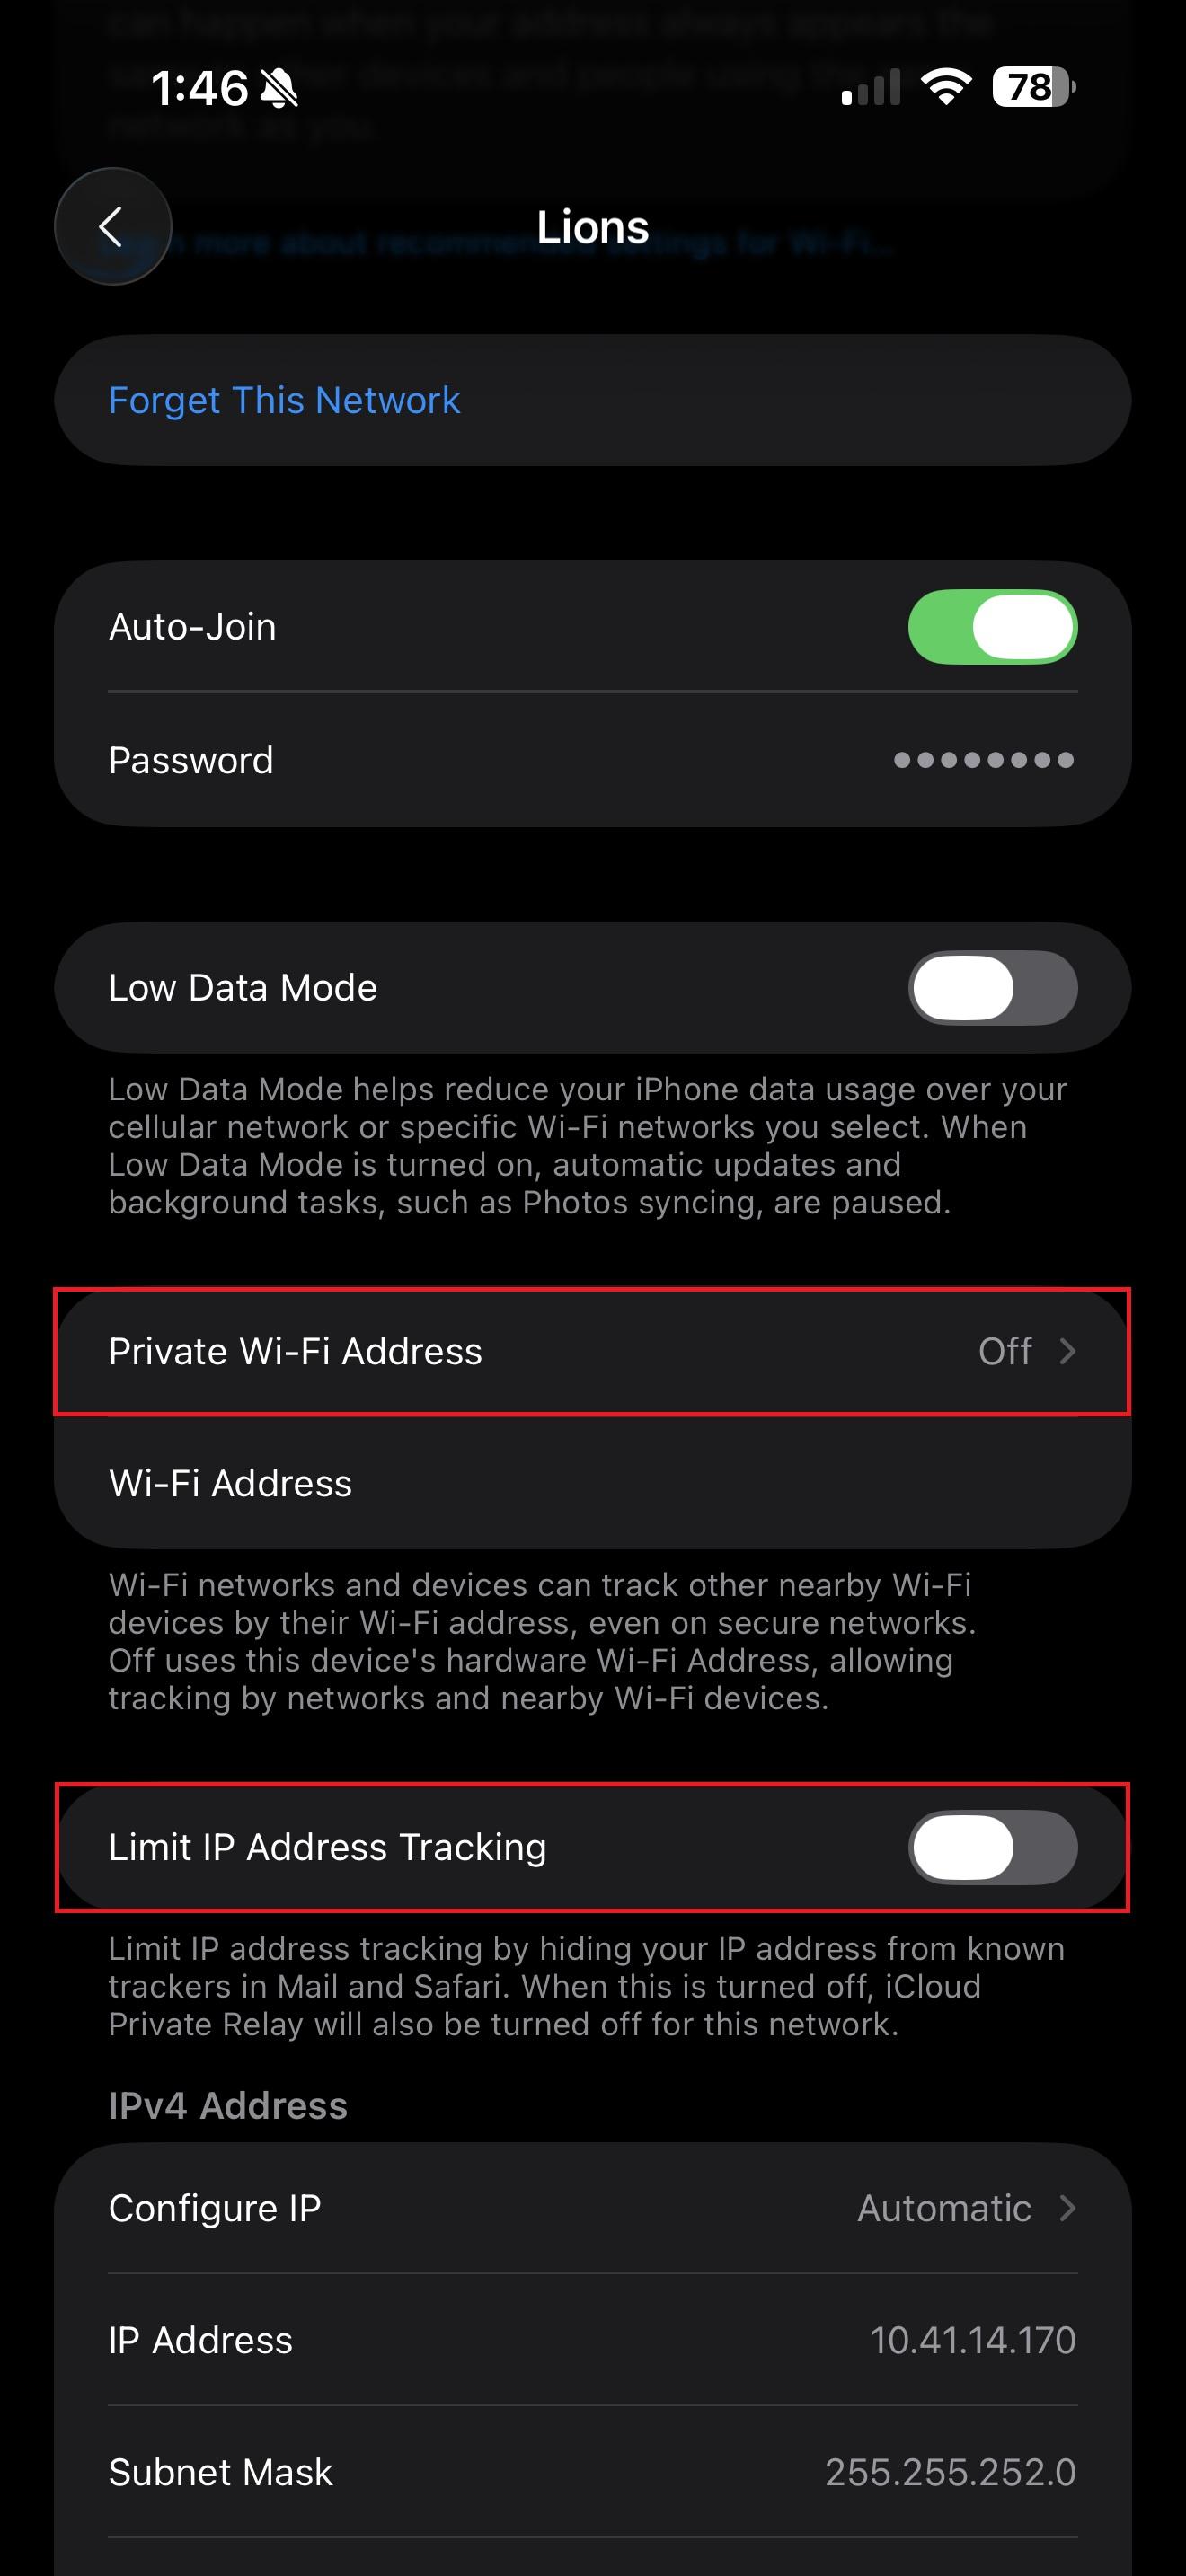](https://wiki.piedmont.edu/uploads/images/gallery/2026-03/8V7bB82hRZmSEwLw-wifisettingsiphone.jpg) - --- ## 2. Disable MAC Randomization (Android) 1. Open Settings 2. Connect to the desired Wi-Fi network, then tap the settings gear icon next to PC-WiFi 3. Select the dropdown menu next to Advanced 4. Under MAC Address type, ensure **Device MAC** or Tablet MAC is selected. [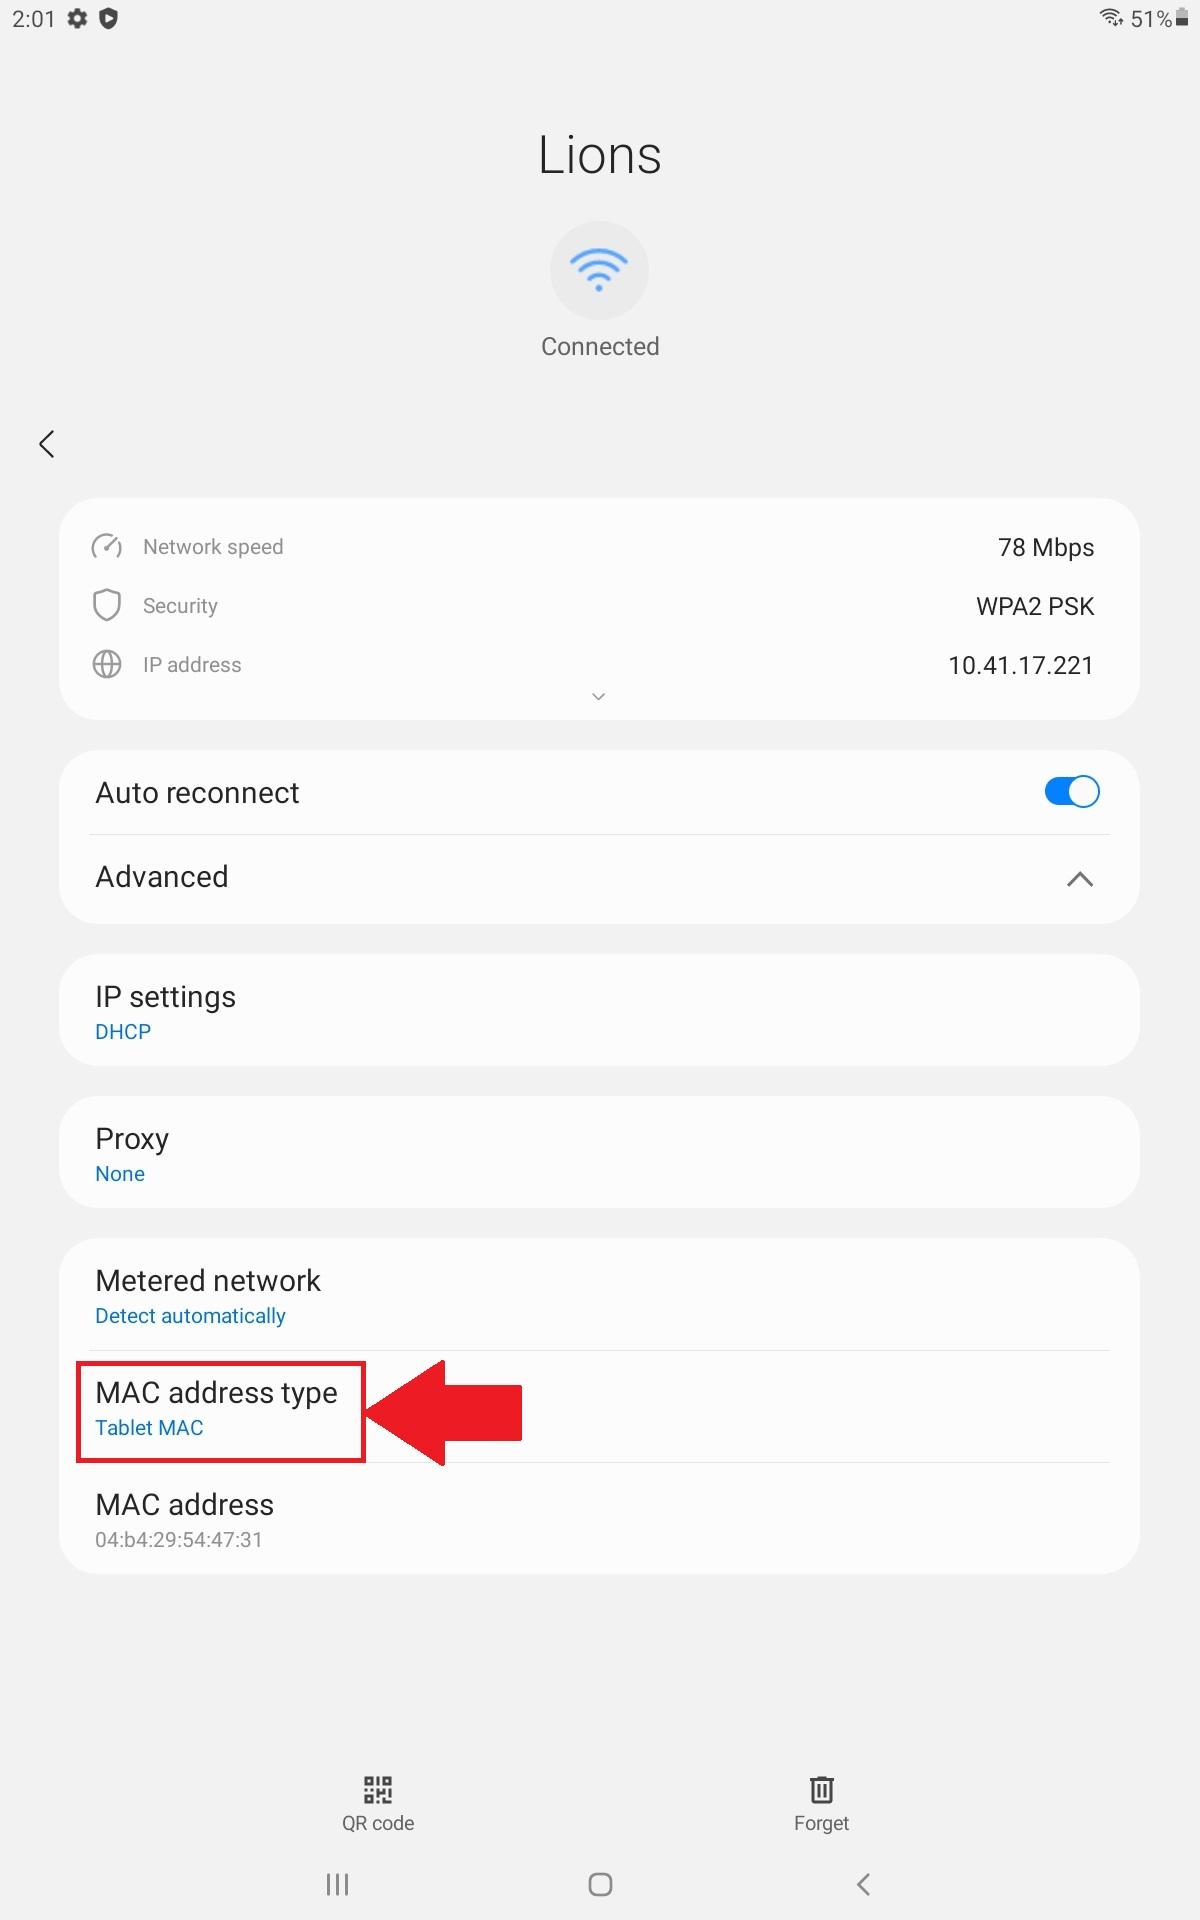](https://wiki.piedmont.edu/uploads/images/gallery/2026-03/KHz19FyS8UFwPIHy-androidwifisettings.jpg) --- ## 3. Disable Rotating Mac Address (MacOS) 1. Open **Settings** 2. Select **WiFi** 3. Connect to the desired Wi-Fi network, then tap the info 'i' icon next to ***Lions*** 4. Select **Private Wi-Fi Address** 5. Toggle to **OFF [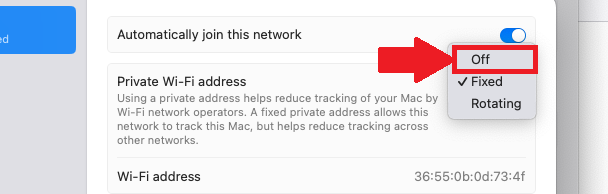](https://wiki.piedmont.edu/uploads/images/gallery/2026-03/vx4SFNuGIXyHvgTx-disable-private-mac-address.png)** --- ## 4. Disable Private Wi-Fi Address (Windows) 1. Open **Settings** 2. Select **Network & Internet** 3. Select **Wi-Fi** 4. Select ***Lions*** 5. Ensure the Drop-down next to **Random Hardware** **Addresses** is set to **OFF [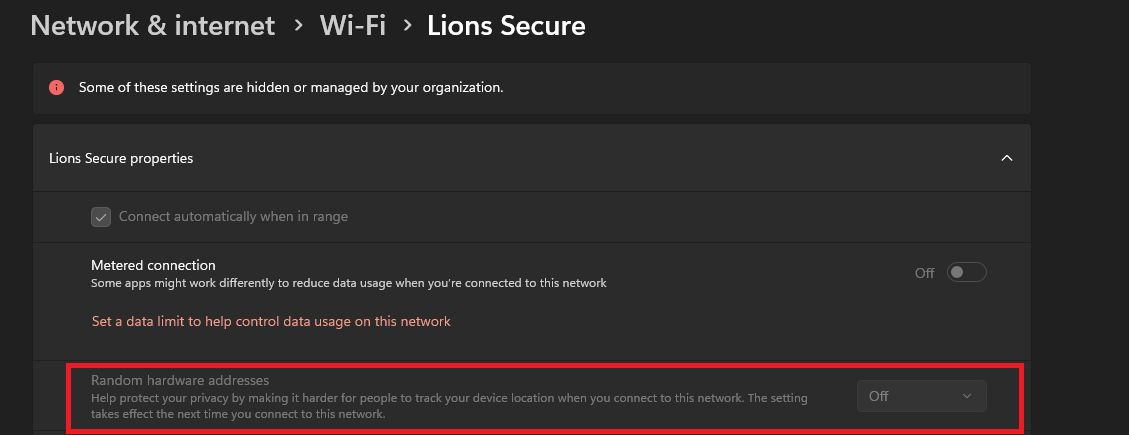](https://wiki.piedmont.edu/uploads/images/gallery/2026-03/ftq12I2ZBNJVScs1-disable-private-wifi.png)** --- ## **Need Help?**If you encounter an error or need assistance with this guide, please contact the IT Department and include a screenshot with a brief description of the issue. [**Contact the IT Department Here**](https://wiki.piedmont.edu/books/student-resources/chapter/contact-it "Contact IT!")
# iPhone VPN SettingsIf you're experiencing connectivity issues, it may be due to personal hotspots or VPNs interfering with our network. Follow these simple steps to disable your VPN on iOS and Android devices to restore seamless access to campus Wi-Fi.
[](https://wiki.piedmont.edu/uploads/images/gallery/2025-06/81adm9nwojmka63y-applelogo.png) 1. Open **Settings** 2. Under **VPN**, toggle the active VPN connection to **OFF** [](https://wiki.piedmont.edu/uploads/images/gallery/2025-06/JxJqERxzI5HuJxc3-iphonevpn.jpg) --- ## **Need Help?**If you encounter an error or need assistance with this guide, please contact the IT Department and include a screenshot with a brief description of the issue. [**Contact the IT Department Here**](https://wiki.piedmont.edu/books/student-resources/chapter/contact-it "Contact IT!")
# iPhone Hotspot SettingsAt Piedmont University, we utilize a Wireless Intrusion Prevention System (WIPS) to ensure secure and reliable Wi-Fi connectivity across campus. If you're experiencing connectivity issues, it may be due to personal hotspots or VPNs interfering with our network. Follow these simple steps to disable your hotspot on iOS and Android devices to restore seamless access to campus Wi-Fi.
[](https://wiki.piedmont.edu/uploads/images/gallery/2025-06/81adm9nwojmka63y-applelogo.png) 1. Open **Settings** 2. Tap **Personal Hotspot** 3. Toggle **Allow Others to Join** switch to **OFF** **[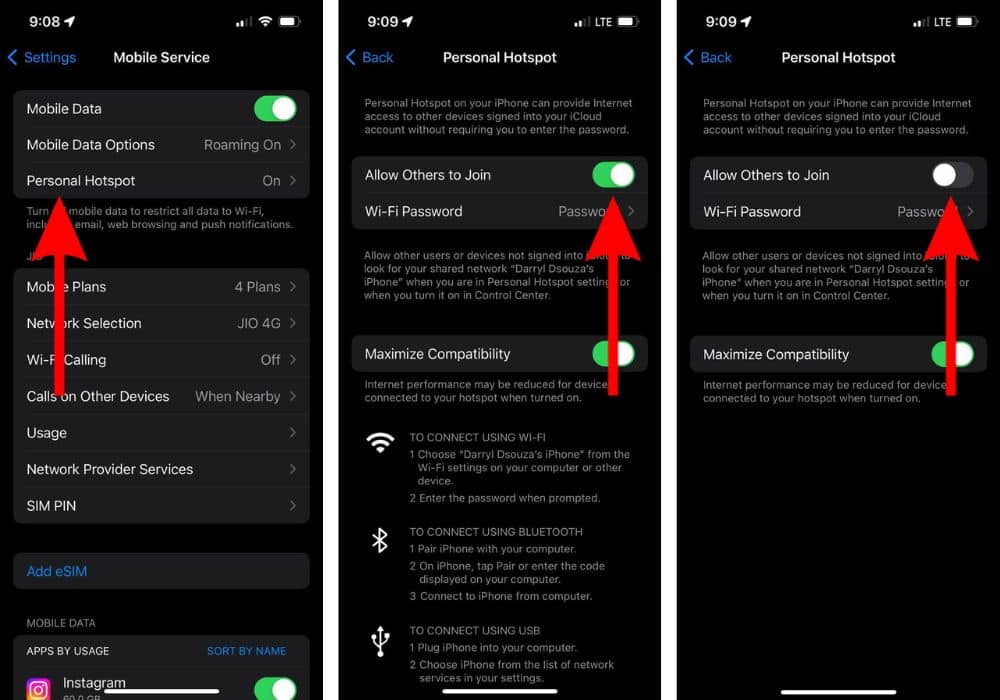](https://wiki.piedmont.edu/uploads/images/gallery/2025-06/UZvpJAv4xC61iXtm-iphonehotspot.jpg)** --- ## **Need Help?**If you encounter an error or need assistance with this guide, please contact the IT Department and include a screenshot with a brief description of the issue. [**Contact the IT Department Here**](https://wiki.piedmont.edu/books/student-resources/chapter/contact-it "Contact IT!")
# Get Connected - Lions Wi-Fi ## 1. Personal Wi-Fi PasswordIf you need WiFi during this process, connect to the ***Lions Guest*** network using the instructions above.
You can enroll up to 8 Devices on the ***Lions*** Network. If you need to remove/reset the amount of devices that you have, please contact the IT Helpdesk!
##### Mobile Instructions (iOS/Android) 1. Scan the QR Code OR Open a Web browser and visit [https://cloudpath.piedmont.edu/](https://cloudpath.piedmont.edu/) 2. Review the **Terms and Conditions,** Check the box next to **I agree to the Terms & Conditions**, should you agree. 3. Select **Start** 4. Login using your @piedmont.edu or @lions.piedmont.edu credentials 5. The **Personal WiFi Password** is shown on the next page, you can use this WiFi password as the Network password in the Network Settings section of your device. 6. Your phone will now be connect to **Lions**Whenever you connect, a copy of your WiFi password will be sent to your Piedmont or LIONS email address
If you do not disable MAC Randomization, you will quickly use your 8 slots for enrolled network devices.
Please review the recommended WiFi settings to disable 'MAC Randomization' after completing these steps. [How to disable MAC Randomization](https://wiki.piedmont.edu/books/student-resources/page/recommended-wifi-settings)
##### Laptop Instructions (PC/MacOS) 1. Open a Web browser and visit [https://cloudpath.piedmont.edu/](https://cloudpath.piedmont.edu/) (you may do this from your phone/tablet as well) 2. Review the **Terms and Conditions,** Check the box next to **I agree to the Terms & Conditions**, should you agree. 3. Select **Start** 4. Login using your @piedmont.edu or @lions.piedmont.edu credentials 5. Underneath the QR code that is displayed, you will be provided a **Personal WiFi Password** 6. Open the Network Settings on your Mac or PC device; Select the ***Lions*** network, and enter your **Personal WiFi Password** 7. Press **Connect/Join,** you will now be connected to **Lions**Whenever you connect, a copy of your WiFi password will be sent to your Piedmont or LIONS email address
##### Console Instructions (Xbox/Playstation/Switch) 1. Open the Network Settings on your console 2. Complete the steps above to obtain your **Personal WiFi Password** 3. Enter your **Personal WiFi Password** as the network password. 4. You will now be connected to ***Lions*** on your console. --- ## **Need Help?**If you encounter an error or need assistance with this guide, please contact the IT Department and include a screenshot with a brief description of the issue. [**Contact the IT Department Here**](https://wiki.piedmont.edu/books/student-resources/chapter/contact-it "Contact IT!")
# Get Connected - Event Guest ## Lions Guest - Event Guest***Lions*** ***Guest*** Network connection will expire after 5 days. After this, you will need to re-enroll your device.
##### How to Connect: 1. Navigate to the WiFi section of your system settings 2. Join the Network labeled ***Lions Guest*** 3. A webpage will open, review the **Terms and Conditions,** Check the box next to **I agree to the Terms & Conditions**, should you agree. 4. Select **Start** 5. The next screen will prompt, **Have you been provided an access code for an event, class, etc.?** - **No - Register as Guest** - Type in the WiFi password you were given in the **Voucher** field and select **Continue** - You will now be connected to ***Lions Guest*** - **Yes - I have a code** - Proceed to step 6 - **I have a Piedmont Email** - Proceed to Section 3 - *Connecting to the Lions Network* **[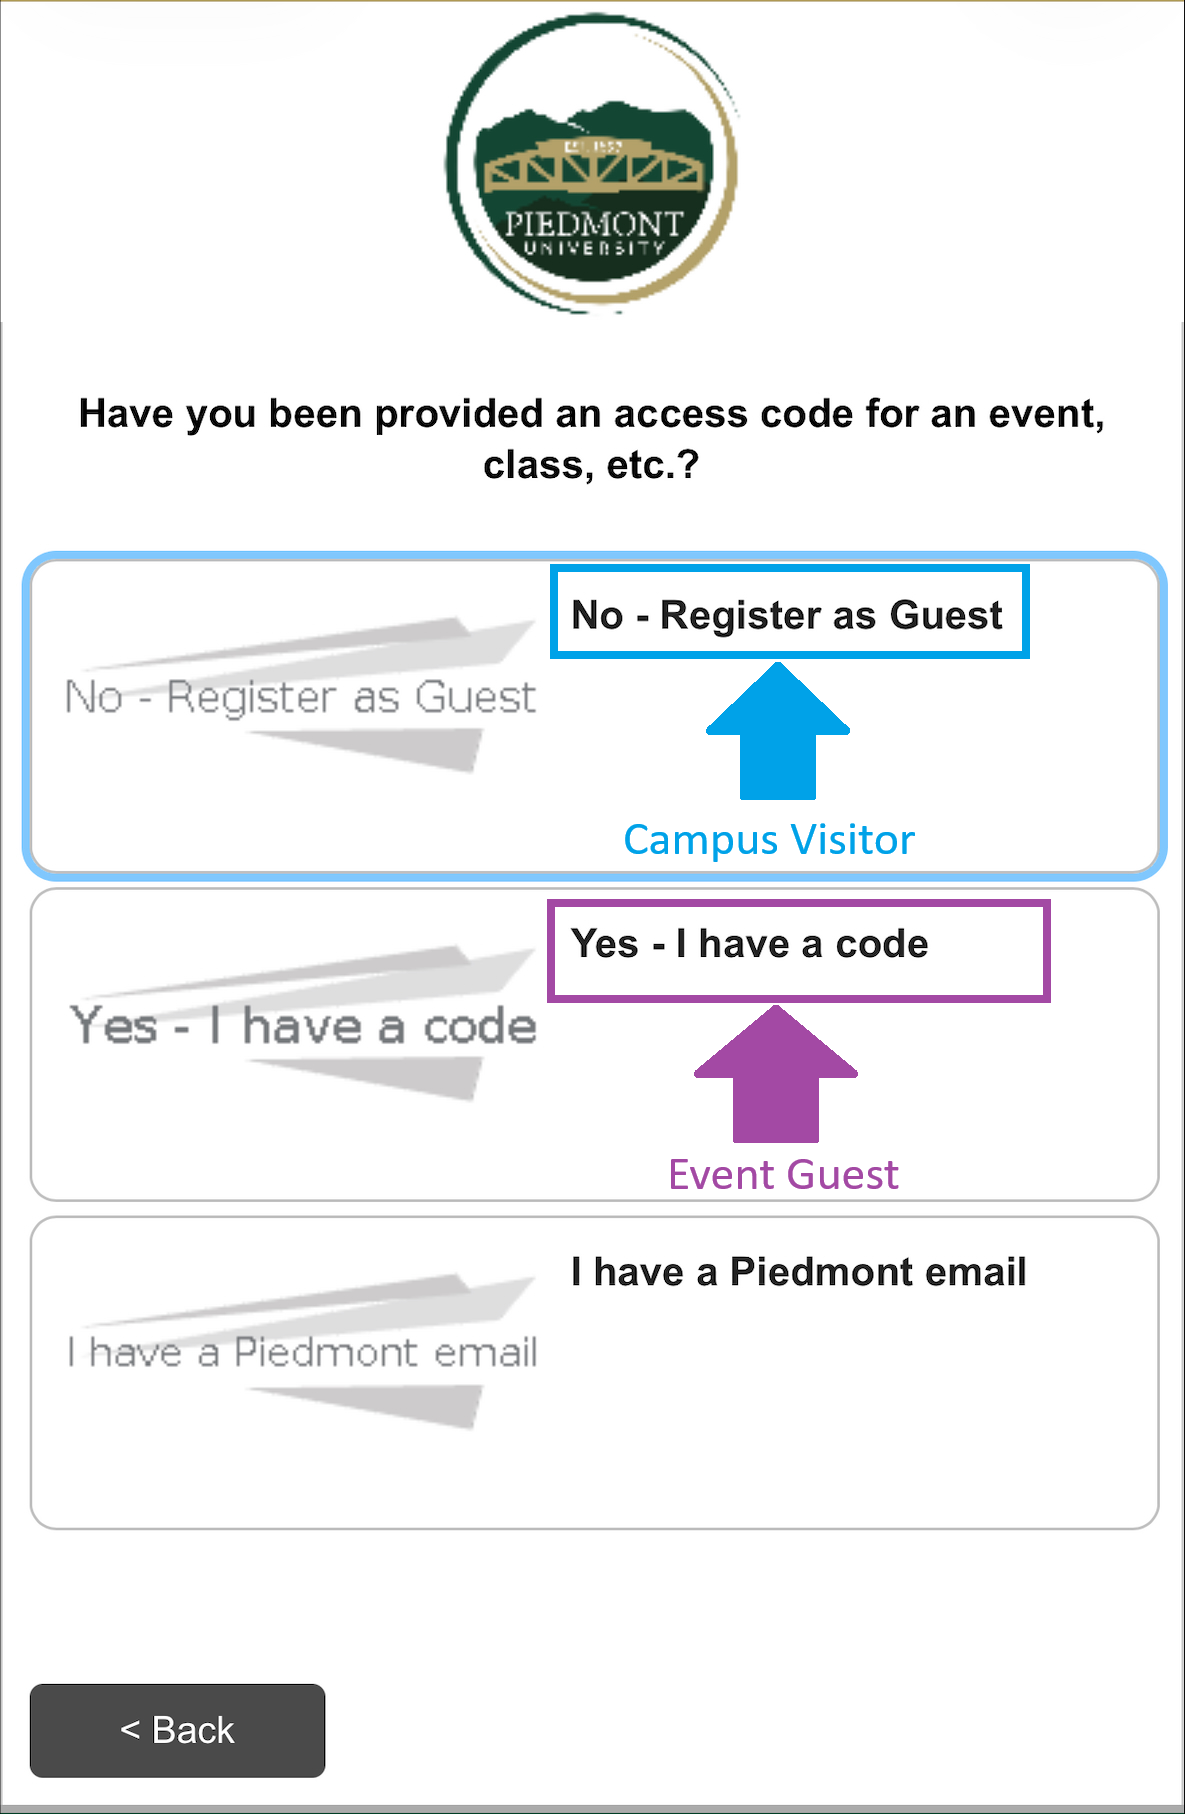](https://wiki.piedmont.edu/uploads/images/gallery/2026-02/zlhRetPU2BFGDKHs-guestwifiaccess.png)** 6. Enter an email address or Phone number where you will receive a security code. 7. After entering your information, please solve the **Captcha** 8. Select **Send**Should you leave the webpage, copy the **Wireless Verification Code** sent to your email or text message, Rejoin the ***Lions Guest*** network and select **I already have a verification code**.
9. Enter your **Wireless Verification Code,** solve the **Captcha**, and select **Continue** 10. You will now be connected to ***Lions Guest***Please review the recommended WiFi settings to disable 'MAC Randomization' after completing these steps. [How to disable MAC Randomization](https://wiki.piedmont.edu/books/student-resources/page/recommended-wifi-settings)
--- # Get Connected - Campus Visitor ## Lions Guest - Visitor Access***Lions*** ***Guest*** Network connection will expire after 24 hours. After this, you will need to re-enroll your device.
##### How to Connect: 1. Navigate to the WiFi section of your system settings 2. Join the Network labeled ***Lions Guest*** 3. A webpage will open, review the **Terms and Conditions,** Check the box next to **I agree to the Terms & Conditions**, should you agree. 4. Select **Start** 5. Enter an email address where you will receive a security code. 6. After entering your information, please solve the **Captcha** 7. Select **Send**Should you leave the webpage, copy the **Wireless Verification Code** sent to your email, Rejoin the ***Lions Guest*** network and select **I already have a verification code**.
8. Enter your **Wireless Verification Code,** solve the **Captcha**, and select **Continue** 9. You will now be connected to ***Lions Guest***Please review the recommended WiFi settings to disable 'MAC Randomization' after completing these steps. [How to disable MAC Randomization](https://wiki.piedmont.edu/books/student-resources/page/recommended-wifi-settings)
--- # Android VPN SettingsIf you're experiencing connectivity issues, it may be due to personal hotspots or VPNs interfering with our network. Follow these simple steps to disable your VPN on iOS and Android devices to restore seamless access to campus Wi-Fi.
[](https://wiki.piedmont.edu/uploads/images/gallery/2025-06/S3mA0vtLSRjt87BZ-androidlogo.png) 1. Open **Settings** 2. Tap **Connections** or **Network & Internet** 3. Select **VPN** (Or go to **Advanced > VPN**) 4. Tap the active VPN connection and select **Disconnect** or toggle it to **OFF** [](https://wiki.piedmont.edu/uploads/images/gallery/2025-06/kt3emvvlOg8b92X3-androidvpn.jpg) # Android Hotspot SettingsAt Piedmont University, we utilize a Wireless Intrusion Prevention System (WIPS) to ensure secure and reliable Wi-Fi connectivity across campus. If you're experiencing connectivity issues, it may be due to personal hotspots or VPNs interfering with our network. Follow these simple steps to disable your hotspot on iOS and Android devices to restore seamless access to campus Wi-Fi.
[](https://wiki.piedmont.edu/uploads/images/gallery/2025-06/S3mA0vtLSRjt87BZ-androidlogo.png) 1. Open **Settings** 2. Tap **Connections** or **Network & Internet** (Varies by device) 3. Select **Mobile Hotspot and Tethering** 4. Toggle **Mobile Hotspot** to **OFF** [](https://wiki.piedmont.edu/uploads/images/gallery/2025-06/xTvqPLxwnZZKybjs-androidhotspot.jpg) # Change your Password This user-friendly guide provides step-by-step instructions for resetting your Piedmont University password through Microsoft's platform. Whether you've forgotten your password or simply need to update it, this guide will walk you through the process effortlessly, ensuring seamless access to all University services and resources. # Password Reset ## 1. Change your PasswordManage your Piedmont email by visiting [https://myaccount.microsoft.com](https://myaccount.microsoft.com)
1. Sign in with your LIONS Piedmont Email Address 2. Expand the arrow next to **Security Info** [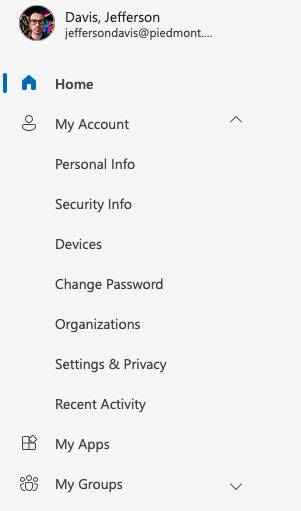](https://wiki.piedmont.edu/uploads/images/gallery/2026-06/pGtm6z72EYjn5xL1-image.png) 3. You will be prompted to complete MFA on your account 4. Select **Change** next to **Password** **[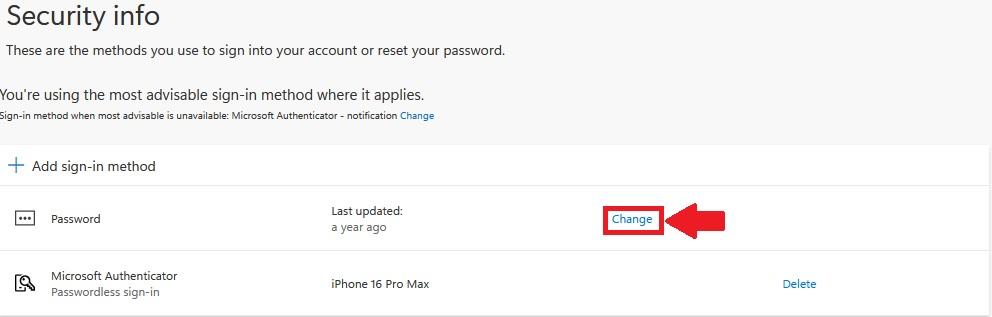](https://wiki.piedmont.edu/uploads/images/gallery/2025-06/jZ60f4s6T2Y2HwFh-passwordchange.jpg)** 4\. Enter your **Old Password** 5\. Enter your **new password** 6\. Confirm your **new password**[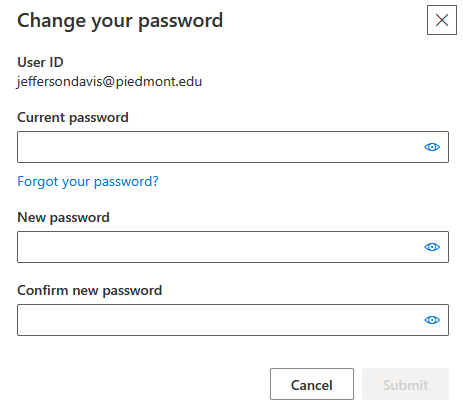](https://wiki.piedmont.edu/uploads/images/gallery/2025-06/2m2ICi8M8f1w1jeh-passwordupdate.png) 7\. Select **Submit** to change your passwordWhen creating a password you may receive an error about Password Complexity Requirements. This means your password does not meat one of the below requirements:
**Password Requirements** Must be at least 12 characters long. Must have at least one capital letter. Must have at least one lower case letter. Must have at least one number. Special characters are optional. (Example - !, @, #, $, %, ^) Must have a minimum age of 1 day before it can be changed. Users cannot use the last 24 passwords they have used. Passwords are non-expiring.
--- # Contact IT! This guide provides instructions for submitting an IT ticket to the university's IT Help Desk. It includes steps for accessing the Help Desk portal, logging in, submitting a ticket, and providing detailed information. The guide also outlines alternative contact methods and how to check the status of submitted tickets, helping users efficiently communicate their IT support needs. # By Email [](https://wiki.piedmont.edu/uploads/images/gallery/2025-06/Yh2cfNOYBeXvsoMb-email.png) - Send an email explaining your issue to **ITSupport@piedmont.edu** - Please provide a **very detailed** description of the issue. - If possible, please include **screenshots**. # By Phone [](https://wiki.piedmont.edu/uploads/images/gallery/2025-06/TJ2uuUxU0rLy8xe2-phone.png) - Call us at **(706) 894-4205** - Account/Login related issues **MUST** call the Helpdesk - You **cannot** submit Account/Login related issues on behalf of someone else - Please be prepared to provide personal/contact information # By Web [](https://wiki.piedmont.edu/uploads/images/gallery/2025-06/67Y2kZkSmDzrTNcI-web.png) - Open a web browser and visit: [https://itsupport.piedmont.edu](https://itsupport.piedmont.edu) - Enter your full **@Piedmont.edu** or **@Lions.Piedmont.edu** email and password - Select **Log in** - Select **Create a Case** - Please enter your **contact information** and **issue description** # Exit Windows S Mode This document provides a detailed guide for students on how to exit Windows S Mode on their devices. It includes step-by-step instructions for navigating the Microsoft support page, accessing the Microsoft Store, and successfully switching out of S Mode. Additionally, it addresses common issues such as the absence of the 'Get' button, with troubleshooting steps to disconnect from a work or school account, allowing students to complete the process independently. # Exiting Windows S Mode 1. Open a Web Browser and visit [https://support.microsoft.com/en-US/Windows/Experience/Platform-variants/switching-out-of-s-mode-in-windows](https://support.microsoft.com/en-US/Windows/Experience/Platform-variants/switching-out-of-s-mode-in-windows) 2. Choose your **Operating System** (Windows 10/Windows 11) 3. Select **Open Microsoft Store [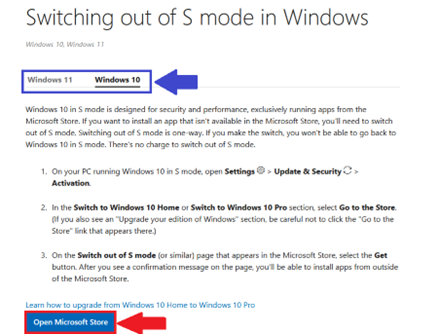](https://wiki.piedmont.edu/uploads/images/gallery/2025-06/b9s6POKyPDsbAWK9-windowssmodeintro.png)** 4. Select **Get** to switch out of Windows S mode [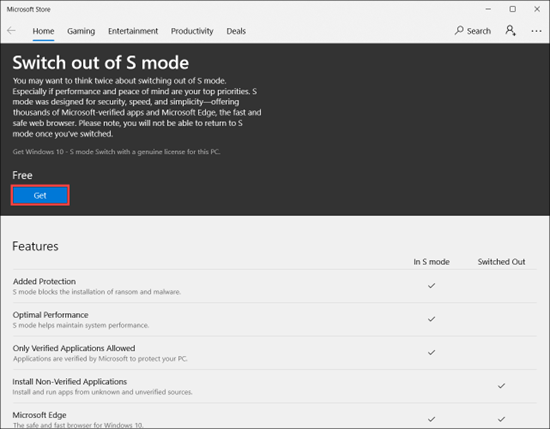](https://wiki.piedmont.edu/uploads/images/gallery/2025-06/Xz8CDEiyrIbuyjhs-exitwindowsmode.png) --- ## **Need Help?**If you encounter an error or need assistance with this guide, please contact the IT Department and include a screenshot with a brief description of the issue. [**Contact the IT Department Here**](https://wiki.piedmont.edu/books/student-resources/chapter/contact-it "Contact IT!")
# Troubleshooting ## ‘Get’ button does not appear If you see a message: **Check with your IT or system Administrator,** please follow the steps below.[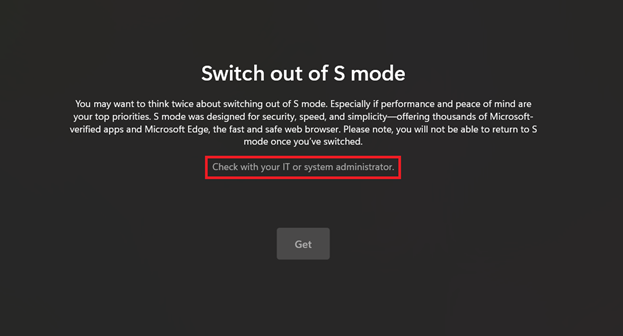](https://wiki.piedmont.edu/uploads/images/gallery/2025-06/It8ejMQQxH84w0yM-smodetroubleshooting.png) 1. Open **Windows Settings** 2. Select **Accounts** 3. Select **Access Work or School** 4. Select the drop-down next to **piedmont.intr** 5. Select **Disconnect [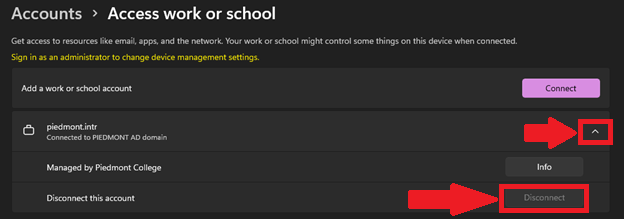](https://wiki.piedmont.edu/uploads/images/gallery/2025-06/dY2AcLuoNQLy8yei-disconnectaccount.png)** 6. Please proceed to try the first section again. --- ## **Need Help?**If you encounter an error or need assistance with this guide, please contact the IT Department and include a screenshot with a brief description of the issue. [**Contact the IT Department Here**](https://wiki.piedmont.edu/books/student-resources/chapter/contact-it "Contact IT!")
# Student Software This document provides step-by-step instructions on how to install Office 365 applications on various devices. The guide is designed to make the installation process simple and straightforward, ensuring that all faculty/staff/students can access the necessary tools for their academic work. # Adobe Portfolio Setup**Note:** Use a personal email address to create a free account with Adobe
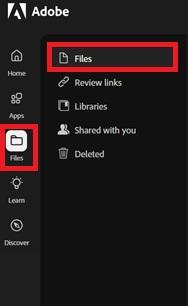
1. On a tablet, smartphone, or PC, visit [https://www.adobe.com/files/cloud-documents](https://www.adobe.com/files/cloud-documents) 2. Sign in with the same email address you used to sign in to Adobe Creative Cloud. 3. In the left column, select **Files**. 4. Here you can view and manage the items in your portfolio.**Note:** We strongly recommend *against* using your student email. This ensures continued access to Adobe Creative Cloud services and projects after leaving the university!
[](https://wiki.piedmont.edu/uploads/images/gallery/2025-06/Ob4uuLYPOF3ntySy-adobe1.jpg) --- ## **Need Help?**If you encounter an error or need assistance with this guide, please contact the IT Department and include a screenshot with a brief description of the issue. [**Contact the IT Department Here**](https://wiki.piedmont.edu/books/student-resources/chapter/contact-it "Contact IT!")
# Office365 Install (Windows 11) 1. In a web browser of your choice, visit `www.office.com` 2. Select **Sign in [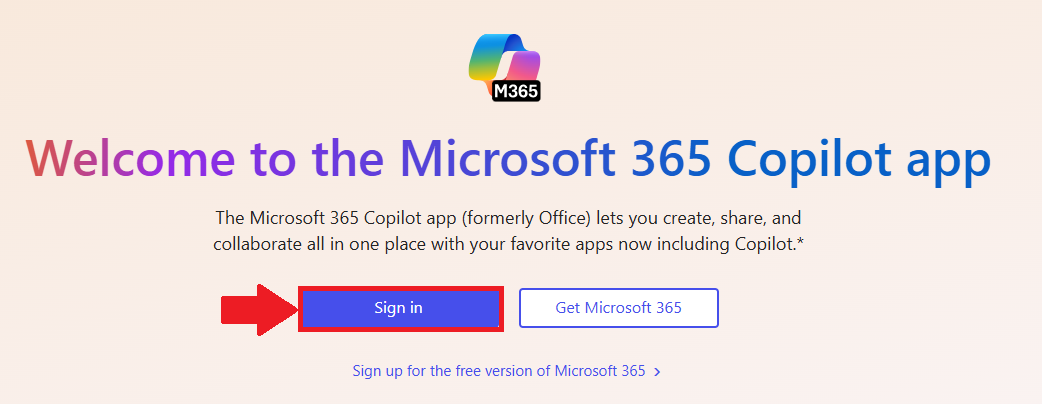](https://wiki.piedmont.edu/uploads/images/gallery/2025-06/7QO6k3bMWswuey4T-office365homepage.png)** 3. Login with your `@lions.piedmont.edu` email 4. Select **Apps** from the column on the left of the screen [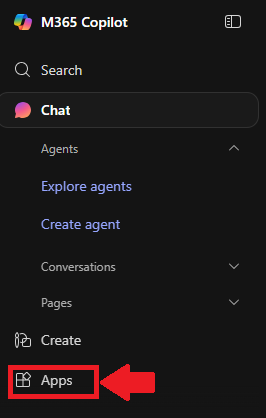](https://wiki.piedmont.edu/uploads/images/gallery/2025-06/xJ5FFo2HYeFA3RVM-office365apps.png) 5. In the top-right corner, select **Install Apps** 6. Select **Microsoft 365 Apps [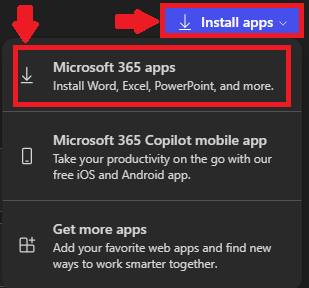](https://wiki.piedmont.edu/uploads/images/gallery/2025-06/IpKvaZlSCJtgseO1-office365install.png)** 7. A new tab will open, select **Install Office [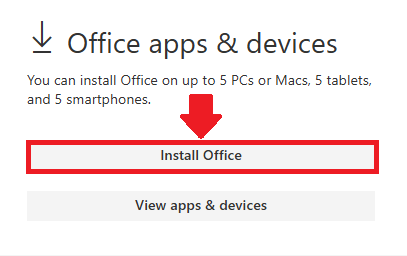](https://wiki.piedmont.edu/uploads/images/gallery/2025-06/JgKtZ6VqTSwGsDrm-office365download.png)** 8. Your computer will now download **OfficeSetup.exe** 9. Launch the file from your **Downloads** folder and select **Yes** to any prompts that appear [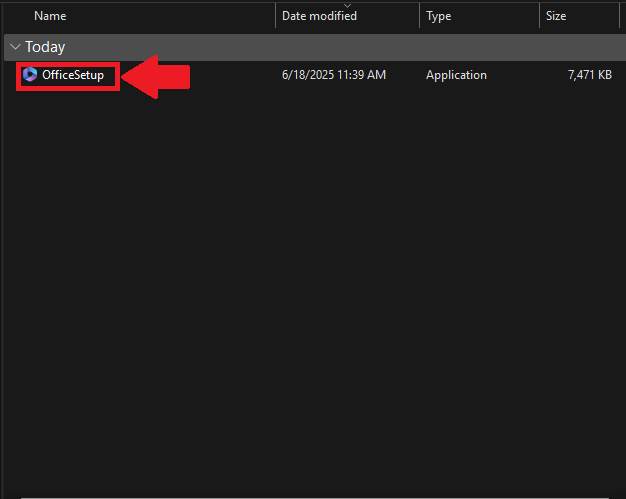](https://wiki.piedmont.edu/uploads/images/gallery/2025-06/jx21Xr3Odqe7mFGZ-office365installer.png) 10. Office 365 will now install # Piedmont App Download the Piedmont University App to stay connected with campus life. Access campus events, important announcements, and essential resources—right from your mobile device. Stay informed and engaged, wherever you are. # Piedmont App (Android) **1. Open the Google Play Store:** - Locate the Google Play Store icon on your Android device and tap to open it. **2. Access the Search Function:** - Tap on the magnifying glass icon (Search) at the top of the screen. - A search bar will appear. **3. Search for the App:** - Enter “Piedmont University” into the search bar. - Tap the search icon on the keyboard to initiate the search. **4. Install the App:** - Find the Piedmont University app in the search results and tap on it to view its details. - Tap “Install” to begin downloading the app. - You may need to accept the app permissions request to proceed with the installation. **5. Open the App:** - After installation, you can open the app directly from the Google Play Store by tapping “Open,” or locate the app icon on your device’s home screen or app drawer and tap to launch it. [](https://wiki.piedmont.edu/uploads/images/gallery/2025-06/hTe7CFyGEm7WUxvL-piedmontappqrandroid.png) # Piedmont App (iOS) 1. **Open the App Store:** - Locate the App Store icon on your iOS device and tap to open it. **2. Access the Search Function:** - Tap on the "Search" tab at the bottom of the App Store. - A search bar appears at the top of the screen. **3. Search for the App:** - Type “Piedmont University” into the search bar. Press "Search" on your keyboard. **4. Install the App:** - Locate the Piedmont University app in the search results. - Tap the app to view its details. - Tap “Install” to begin downloading the app. You might be prompted to enter your Apple ID password or to use Face ID/Touch ID to authorize the installation. **5. Open the App:** - Once installed, you can open the app directly from the App Store by tapping “Open,” - or find the app icon on your device’s home screen and tap to launch. [](https://wiki.piedmont.edu/uploads/images/gallery/2025-06/izF4oK1bUFmzLWyA-piedmont-app-qr-ios.png) # Multi-Factor Authentication (MFA) This guide provides step-by-step instructions for users on how to reset their multi-factor authentication (MFA) using the Microsoft Authenticator app. It offers a user-friendly walkthrough, ensuring a seamless and secure process to regain access to their accounts while maintaining the highest level of security. # Setting Up Microsoft Authenticator When signing in you may see this message. [](https://wiki.piedmont.edu/uploads/images/gallery/2025-06/asqm9kZDJ6D8mIIT-mfasecuritywarning.png) This message indicates that you must reconfigure your Multi-Factor Authentication. Follow through the on-screen prompts until you reach a page with a QR Code [](https://wiki.piedmont.edu/uploads/images/gallery/2025-06/Cf0Hi001oyAF14Mo-mfaqrcode.png) Once you reach this page, please proceed to the next steps on your **mobile device**. [](https://wiki.piedmont.edu/uploads/images/gallery/2025-06/7I33fMTpVG0tYr4O-mfaappicon.png) --- ## Delete previous sign-in methodThis section is only necessary if you have **previously set up Microsoft Authenticator**.
1. To set up MFA again you must **delete the previous account** to receive MFA notifications. 2. Open **Microsoft Authenticator** 3. Select your `@piedmont.edu` or `@lions.piedmont.edu` account [](https://wiki.piedmont.edu/uploads/images/gallery/2025-06/nsImhJhuvDdbidi6-mfa-accounts.jpeg) 4. Select the **gear icon** in the top right corner [](https://wiki.piedmont.edu/uploads/images/gallery/2025-06/6xCyY1EBGXS0ED1p-mfaaccountsettings.jpeg) 5. Select **Remove Account [](https://wiki.piedmont.edu/uploads/images/gallery/2025-06/SucGlYpgAg5YmWCx-mfaaccountremove.jpeg)** 6. Press **Continue** and/or **This app only** to finish removing the account [](https://wiki.piedmont.edu/uploads/images/gallery/2025-06/0TabZHpRSA9Pu96N-mfaaccountdelete.jpeg) --- ## Set up Microsoft Authenticator 1. Open the **Microsoft Authenticator** app on your iOS or Android device - If you do not have Microsoft Authenticator installed, please download it from the **iOS App Store** or **Google Play Store** 2. Open the app, **allow notifications** (if prompted) 3. Select **Add account** from the '+' icon in the upper-right 4. Then select **Work or school account**On your Computer:
5. On the **Set up your account** page, select **Next [](https://wiki.piedmont.edu/uploads/images/gallery/2025-06/asqm9kZDJ6D8mIIT-mfasecuritywarning.png)** 6. The **Scan the QR code** page appears [](https://wiki.piedmont.edu/uploads/images/gallery/2025-06/Cf0Hi001oyAF14Mo-mfaqrcode.png) 7. Use your mobile device to scan the **provided QR code** with the Microsoft Authenticator app 8. Select **Next** on your computer 9. A 2 digit number is displayed on the computerOn your Mobile Device:
9. A notification is sent to your mobile device prompting for a 2 digit number 10. On your mobile device, **enter the 2 digit number, show on the computer,** in the Microsoft Authenticator app 11. Select **Done** on your computer 12. Your security info is now updated to use the Microsoft Authenticator app by default to verify your identity when using two-step verification or password reset.Our Helpdesk Team is happy to provide assistance with this process! Just give us a call at 706-894-4205!
--- ## Next Steps Once you've set up Microsoft Authenticator, we recommend reviewing our documentation for Passkeys which you can find [here](https://wiki.piedmont.edu/books/student-resources/page/mfa-passkeys "MFA Passkeys")! --- ## **Need Help?**If you encounter an error or need assistance with this guide, please contact the IT Department and include a screenshot with a brief description of the issue. [**Contact the IT Department Here**](https://wiki.piedmont.edu/books/student-resources/chapter/contact-it "Contact IT!")
# MFA Passkeys ## 1. What is a Passkey?A passkey is a modern, phishing-resistant way to sign in without using a password!
- Instead of something *you know* (like a password), a **passkey** uses something *you have* (your phone or device) and something *you are* (Face ID, Fingerprint, or device PIN) - The credential is stored securely on your device and is never shared with the website or service that you're signing into. Because of this, passkeys can't be reused, stolen by fake websites, or guessed. - Passkeys are based on industry security standards (FIDO2). Your device proves to Microsoft that it's really you, without ever sending a password across the internet. - If the site is not legitimate, the passkey simply won't work, and there's nothing for the attacker to steal. - Your device becomes your key, and your identity stays locked inside it! [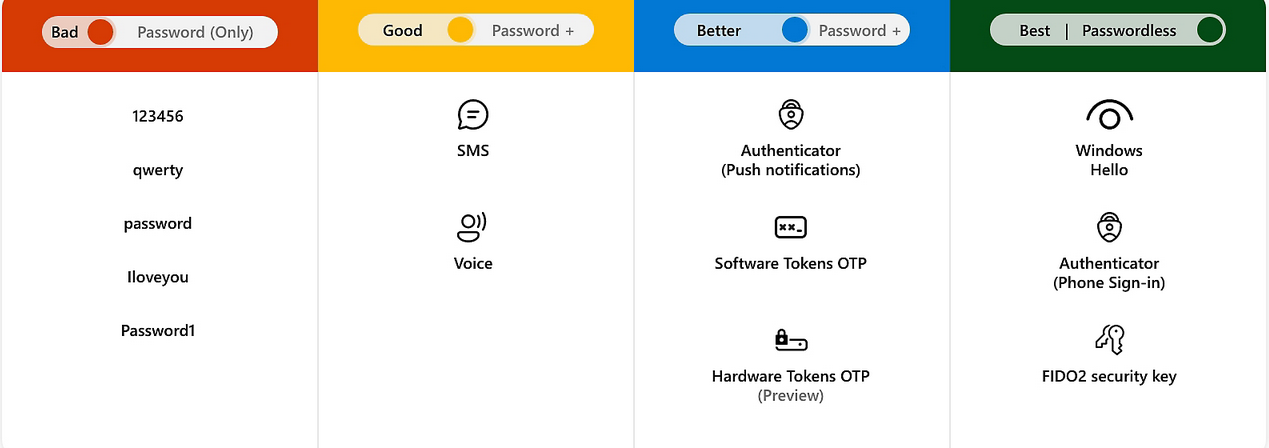](https://wiki.piedmont.edu/uploads/images/gallery/2026-02/Plyx3vVtrQtRQFmu-passwordlesssecurity.png) - Did you know that passwords are the weakest link in modern security? They are often: - Reused - Phished - Leaked in breaches - Guessed - Microsoft's goal with passwordless sign-in is to: - **Eliminate passwords as an attack target** - No passwords means nothing to phish, reuse, or brute-force. - **Reduce account takeovers and phishing** - Passkeys only work on the real Microsoft sign-in and approved services. Fake sites can't trick your device into handing over a credential. - **Make sign-ins faster and simpler** - Approving with Face ID, fingerprint, or a device PIN is quicker than typing passwords and codes. - **Improve both security and user experience** - Stronger security without extra steps, fewer account lockouts.Passkeys are part of Microsoft's move to a passwordless future where accounts are protected by your device and biometrics instead of passwords that can be stolen, guessed, or phished
--- ## 2. Syncable PasskeysA passkey lets you sign in without typing your password each time. It uses your device's built-in security, such as Face ID, fingerprint, screen lock, or device PIN.
We recommend saving your passkey to: - Apple Passwords (if you use iPhone) - Google Password Manager (if you use Android)
--- ## 3. Before you Begin| Make sure you have: | Do **not** create a passkey on: |
| Your Piedmont email address | A public computer |
| Your current password | A shared family computer |
| You current MFA method | A classroom or lab computer |
| A personal phone or computer that **only you use** | A friend's phone |
If your passkey does not appear, you will need to [Contact IT ](https://wiki.piedmont.edu/books/student-resources/chapter/contact-it "Contact IT!")for assistance.
--- ## 9. Security Notes - Your passkey is only as secure as your Apple or Google account. Use a password manager! - Use a strong password on your Apple or Google account. Do not reuse passwords! - Keep account recovery options up to date on your Apple or Google account - Never share your phone PIN, Apple password, Google password, or Device unlock code - Do not save passkeys on shared or public devices --- ## 10. Next Steps Review what you can do to help keep Piedmont secure [here](https://wiki.piedmont.edu/books/student-resources/page/keep-piedmont-secure "Keep Piedmont Secure!")! --- ## **Need Help?**If you encounter an error or need assistance with this guide, please contact the IT Department and include a screenshot with a brief description of the issue. [**Contact the IT Department Here**](https://wiki.piedmont.edu/books/student-resources/chapter/contact-it "Contact IT!")
# Lost Phone / Can't Access Account ## 1. Can't login due to MFAIf you lost or replaced your phone or no longer have access to your MFA method, you may not be able to Sign in to your Piedmont account.
This guide explains how to manage your sign in methods so that you can access your account.
- This guide is helpful when: 1. You lost your phone 2. You got a new phone 3. Your phone was stolen 4. Your phone was reset or wiped 5. You deleted Microsoft Authenticator 6. Microsoft Authenticator no longer show your Piedmont account 7. You changed phone numbers 8. You do not receive a text field to enter the 2-digit MFA number in Microsoft Authenticator 9. You cannot access any of your sign-in methods --- ## 2. Manage your sign in MethodsYou can only complete this section if you have access to at least 1 MFA method. (Passkey or Authenticator)
- You can add or remove MFA sign in methods by visiting [https://myaccount.microsoft.com](https://myaccount.microsoft.com) and logging in using your Piedmont email. 1. Visit [https://myaccount.microsoft.com](https://myaccount.microsoft.com) and login using your Piedmont email 2. In the left column, expand **My Account** 3. Select **Security Info** 4. You will be prompted to login using MFAIf you do not have access to your MFA method you will be required to contact the IT Department so that we may assist you.
5. Here you can manage your Sign-in Methods. If you got a new phone, you would need to delete the method labeled 'Microsoft Authenticator'. 6. Once deleted, select **Add Sign-in Method** and follow the on-screen instructions to add the Microsoft Authenticator App to your new device. 7. You can find instructions for setting up Microsoft Authenticator [here](https://wiki.piedmont.edu/books/student-resources/page/setting-up-microsoft-authenticator "Setting Up Microsoft Authenticator")! --- ## 3. Submit a Ticket to ITIf you cannot access your MFA methods you must submit a ticket to IT so that we may assist you in accessing your account again.
- When submitting a ticket, please include 1. Your Full name 2. Your Piedmont Email address 3. a brief explanation of what happened 4. Any screenshots of errors that you may receive. --- ## **Need Help?**If you encounter an error or need assistance with this guide, please contact the IT Department and include a screenshot with a brief description of the issue. [**Contact the IT Department Here**](https://wiki.piedmont.edu/books/student-resources/chapter/contact-it "Contact IT!")
# BACK TO SCHOOL! Get ready for a successful semester with the Piedmont IT Department! # Laptop Recommendations [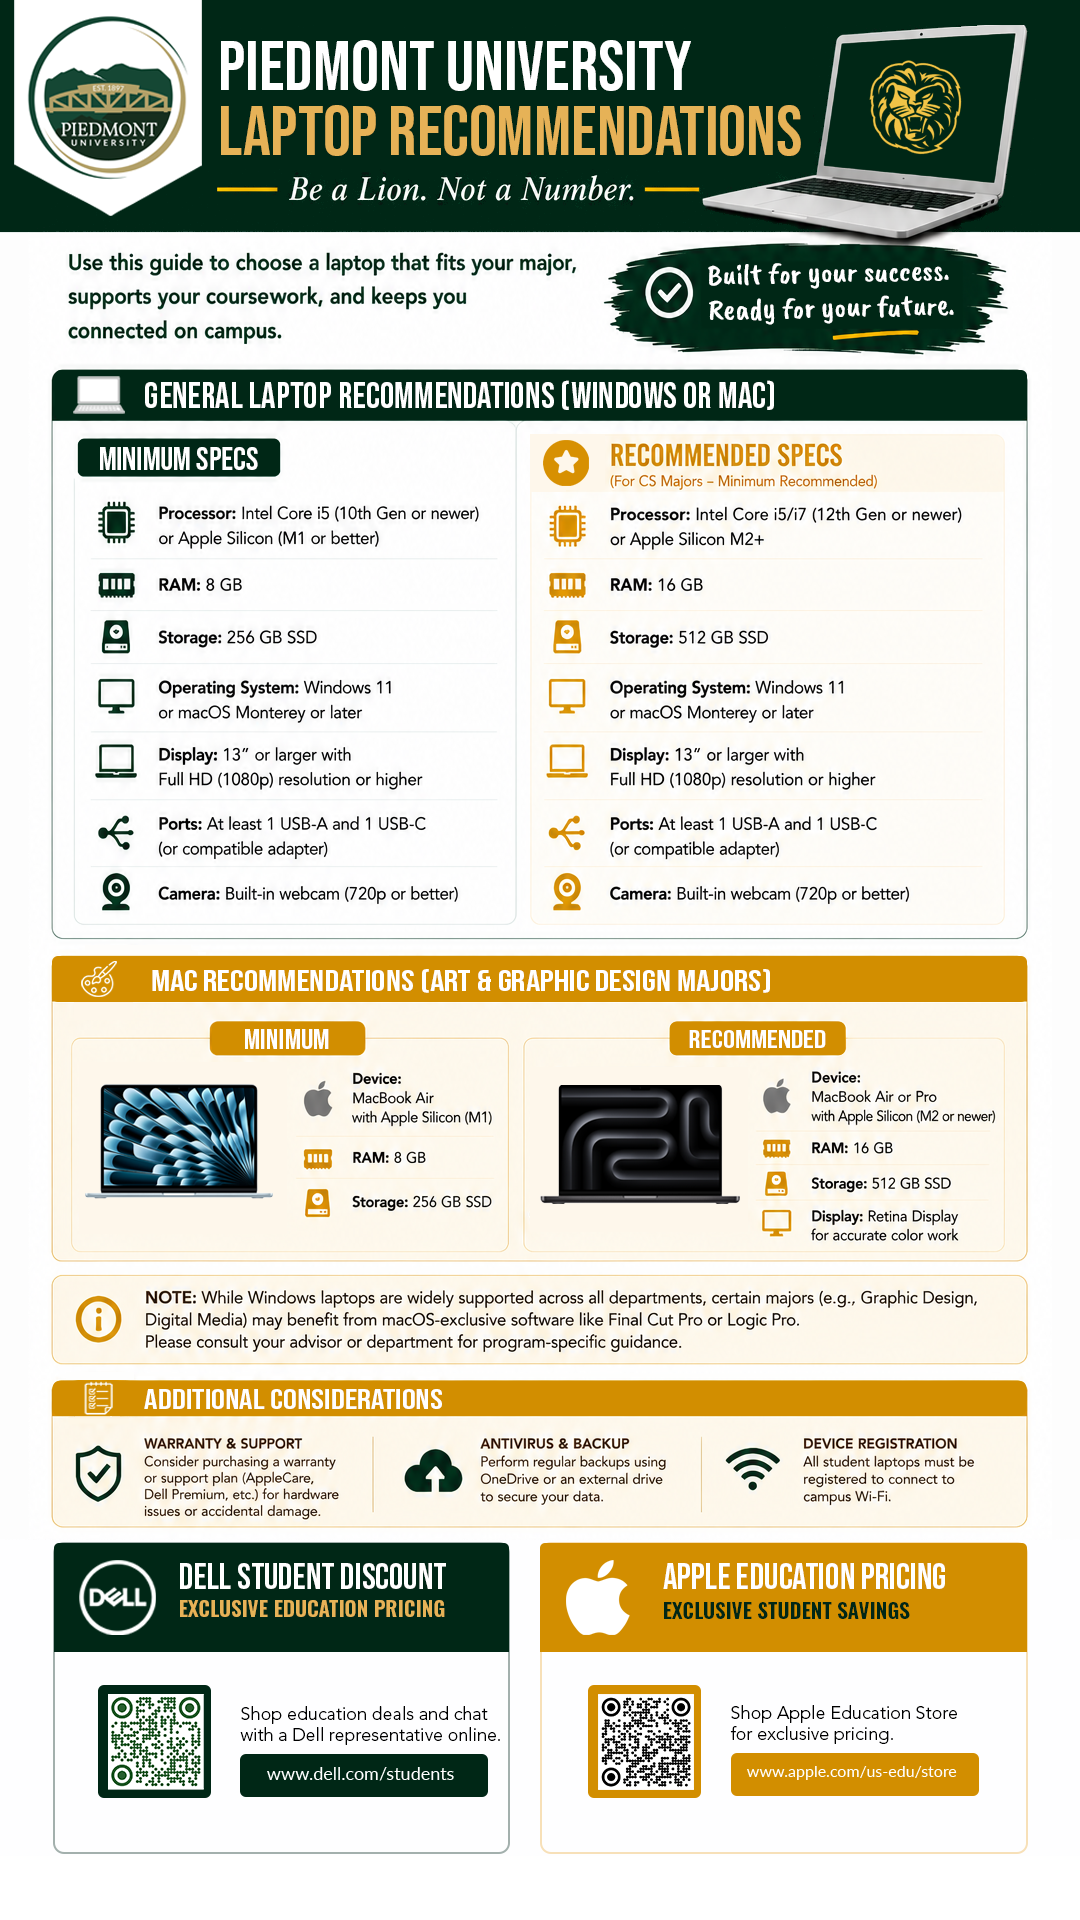](https://wiki.piedmont.edu/uploads/images/gallery/2026-06/DRcrDQXE5Rls1eJO-laptoprecommendations.png) # Student Checklist [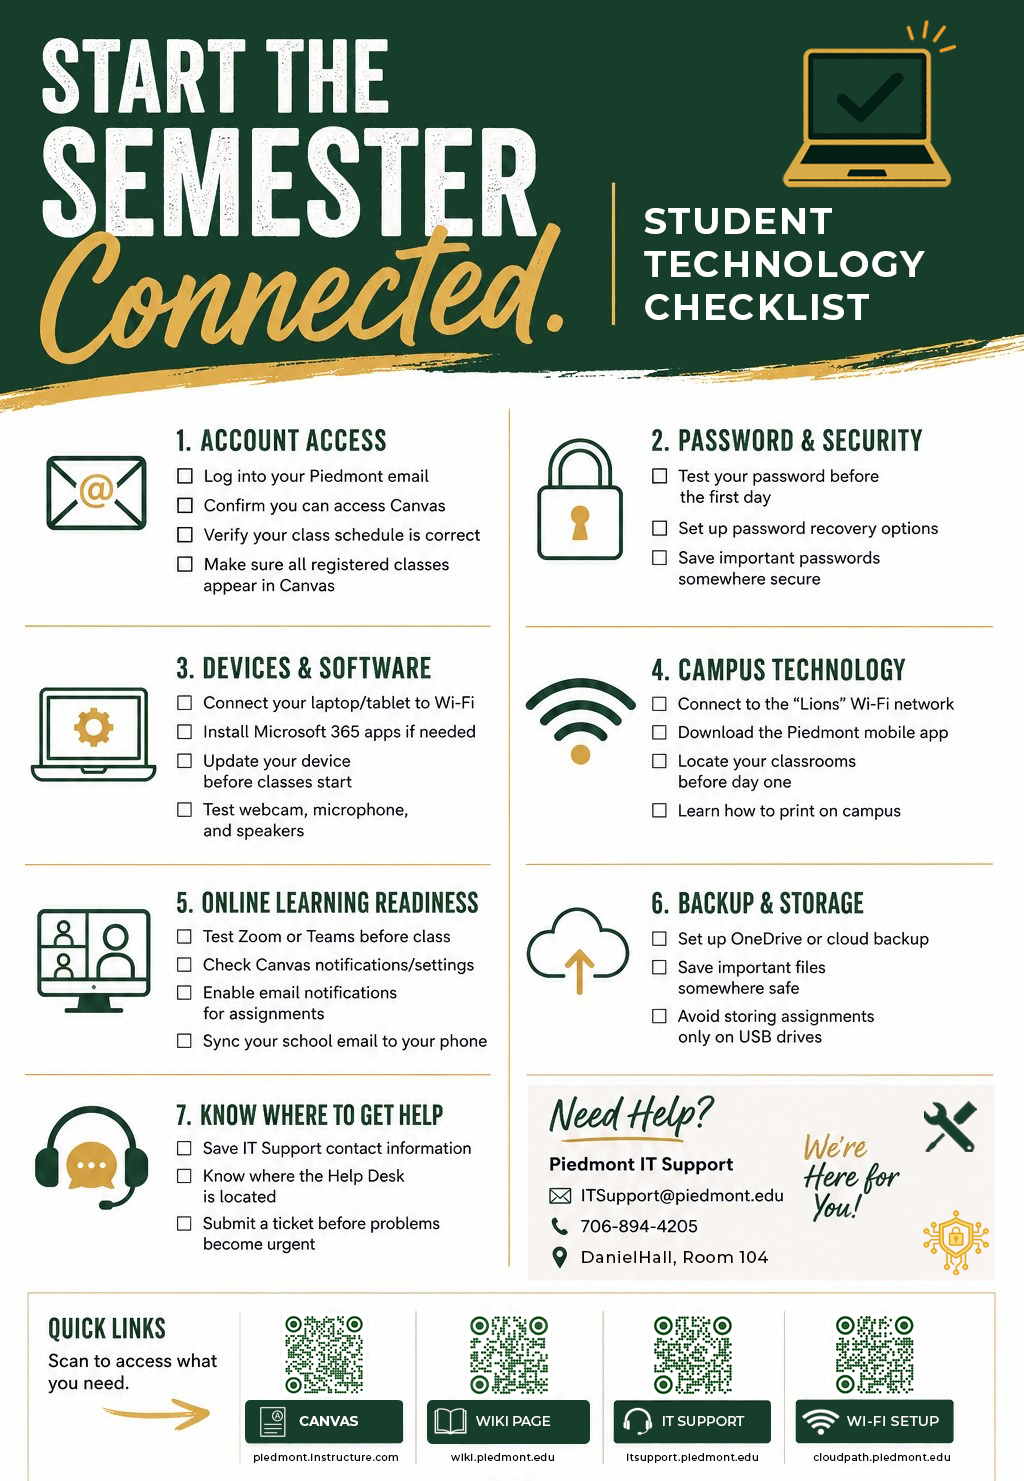](https://wiki.piedmont.edu/uploads/images/gallery/2026-06/t1exOsbPrvTTurTF-studenttechchecklist.png) # Keep Piedmont Secure! [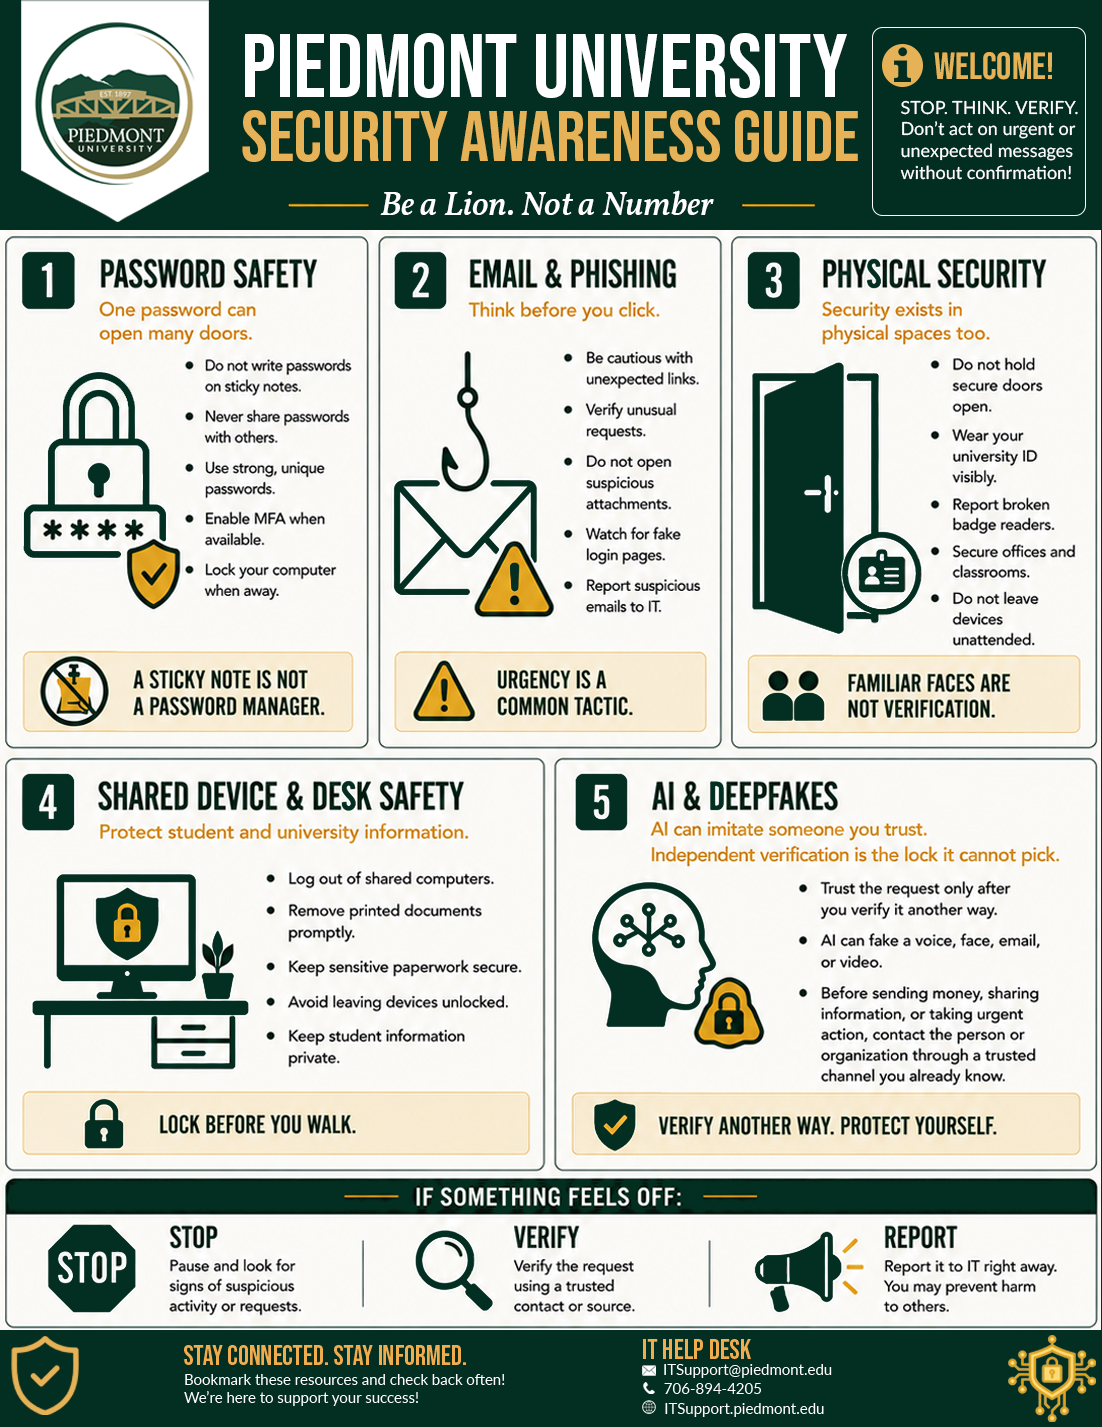](https://wiki.piedmont.edu/uploads/images/gallery/2026-06/T448pJSoD3G62wRs-securityawareness.png) # IT Assistance [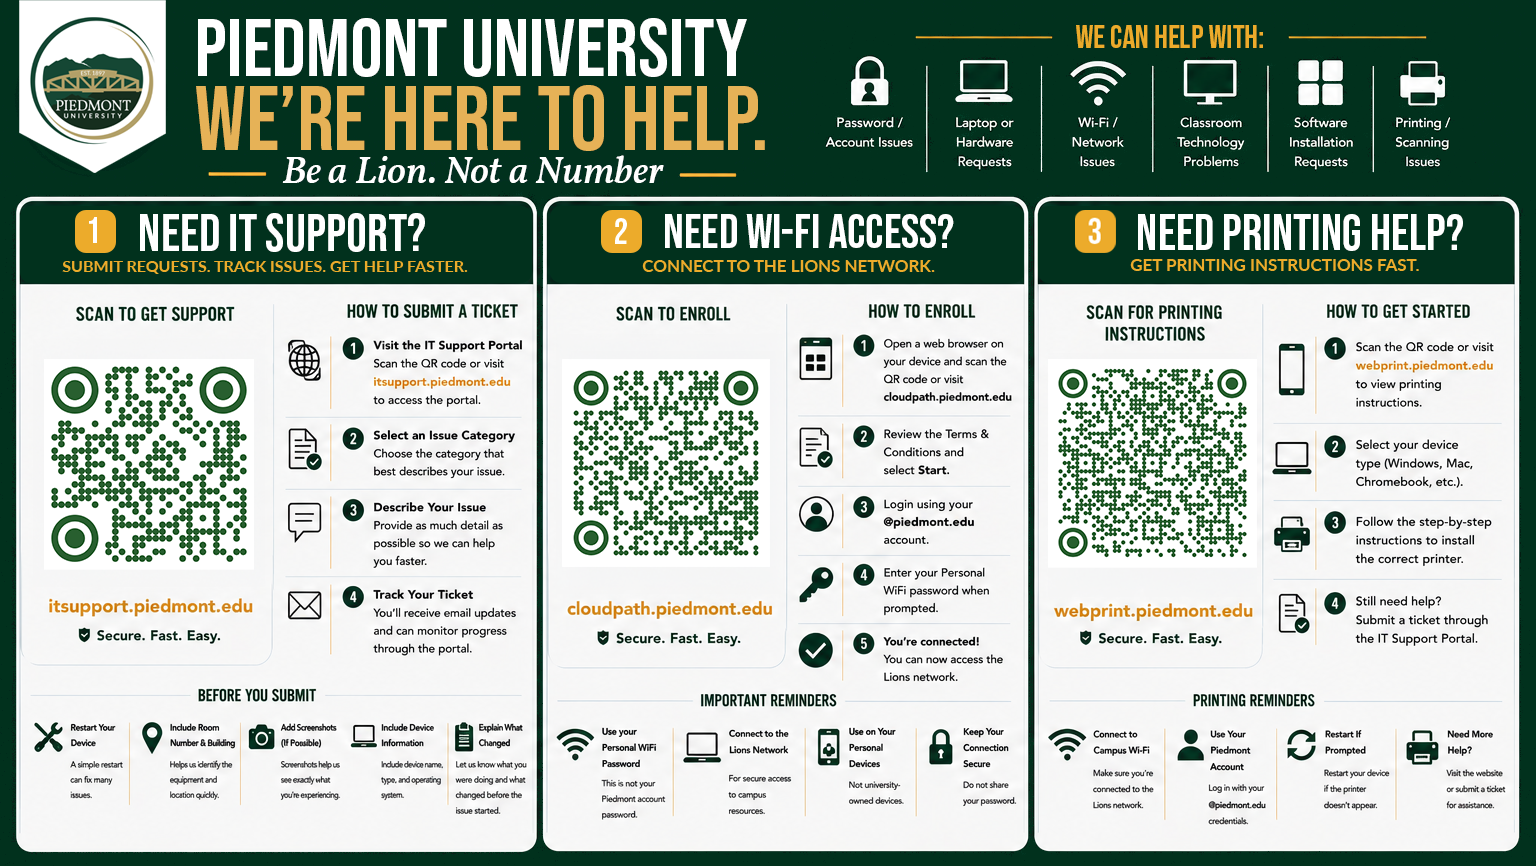](https://wiki.piedmont.edu/uploads/images/gallery/2026-06/fTEYLYoAmxm76705-dormposter.png) # Quick Links [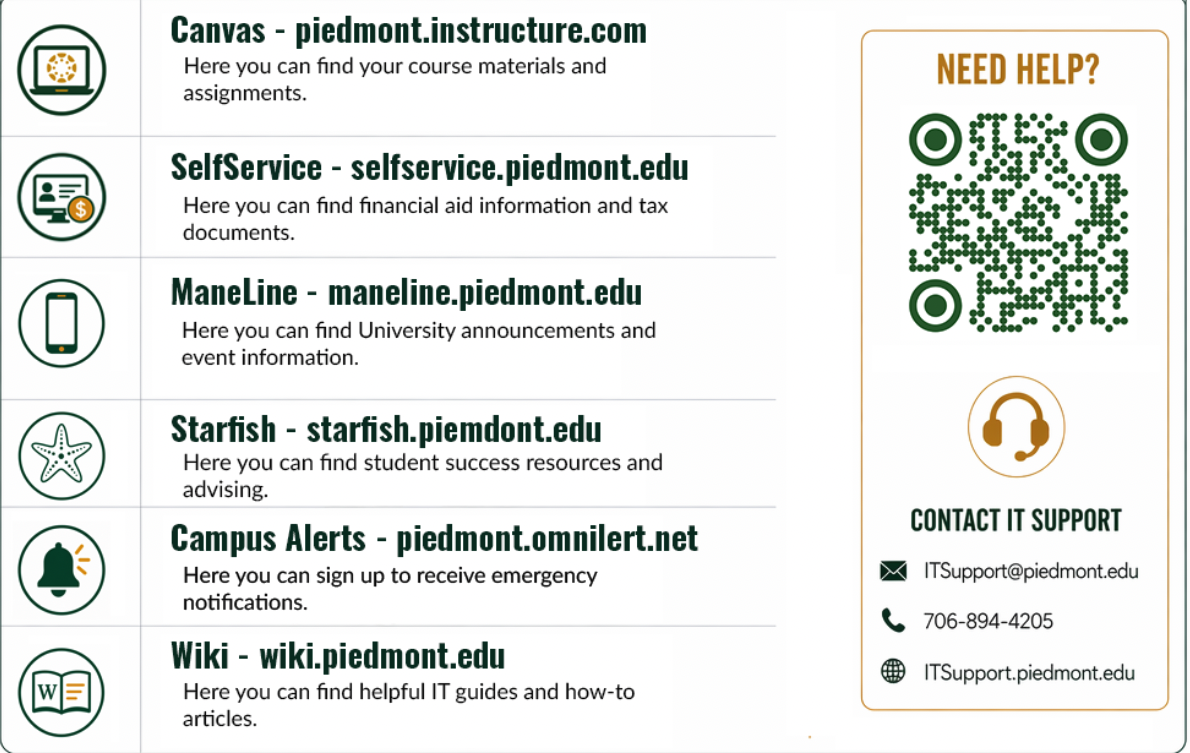](https://wiki.piedmont.edu/uploads/images/gallery/2026-06/Zq7lDySyTe1ycRXO-image.png) # Manage your Lions Email A quick-start guide for new students at Piedmont University, covering email setup, login instructions, password information, and essential campus resources. # Activating your LIONS Account ## Your Email and User name All current students must log in to their SSO before using other Piedmont sites and services. Your **email address** is made up of the first initial of your first name followed by your complete last name, the month and day of your birth, and `@lions.piedmont.edu` at the end. The birthdate will always be 4 digits — whether it's `0106` (January 6th) or `1217` (December 17th). Your Piedmont **username** is the local part of your email address — that is, the part that precedes the `@lions.piedmont.edu`.**Example:** The user `jsmith0106@lions.piedmont.edu` has the username `jsmith0106`.
--- ## Your Password Initial passwords have been set to the **last four digits** of the student’s **SSN** with `'Piedmont'` at the end. The `'P'` in `'Piedmont'` is capitalized. If you do not have an SSN, your password will include the **last four digits of your Student ID**.**Example:** If the last four digits of your SSN are `1234`, your password is `1234Piedmont`
You will be required to **change your password upon logging in for the first time**.
**Password Requirements** Must be at least 12 characters long. Must have at least one capital letter. Must have at least one lower case letter. Must have at least one number. Special characters are optional. (Example - !, @, #, $, %, ^) Must have a minimum age of 1 day before it can be changed. Users cannot use the last 24 passwords they have used. Passwords are non-expiring.
--- ## Logging In 1. On a **laptop, PC, or tablet**, visit: `https://www.office.com` 2. Select **Sign in** 3. Enter your **full Piedmont Email address** 4. Enter your **Initial Password** and select **Login** 5. If you don't have an SSN or your password isn't working, please **contact the IT Helpdesk** 6. You will be prompted to **Update your password** 7. Follow through the on-screen prompts to create your own password 8. After you change your password you will be prompted that **More information is Required** 9. Select **Next** and follow through the on-screen prompts to set up **Microsoft Authenticator** --- # Student Printing Instructions Welcome to WebPrint. This How-To document contains step-by-step instructions on using our Student Printing Services, WebPrint, through the web-based interface. # How to Print Like a Lion**IMPORTANT NOTE:** You cannot access WebPrint from an off-campus location. Your device must be connected to the Piedmont network.
--- ## 1. Log onto WebPrint - Open any browser (Edge, Chrome, Firefox, etc.) and go to: [webprint.piedmont.edu](https://webprint.piedmont.edu/)If the webpage does not load, you may need to review your [device Wi-Fi settings](https://wiki.piedmont.edu/books/student-resources/page/recommended-wifi-settings "Recommended WiFi Settings")
Printing is not supported from a mobile device.
##### On the Login Page - Choose a Login Method: (Recommended) Click the **“Sign in With Microsoft”** button to use Single-Sign-On using your Piedmont Email. [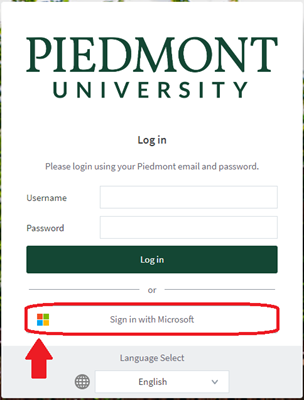](https://wiki.piedmont.edu/uploads/images/gallery/2025-06/n974TYL1dfLwqt3u-webprintlogin.png) - Enter your full `@lions.piedmont.edu` email address and password*Once you log in, your home screen will be displayed. On the home screen, the left-side navigation panel contains six links. The links are:* **Summary**: Lists summary statistics for your account **Transfers**: Transfer printing funds to another Piedmont student **Transaction History**: View a detailed list of all transactions **Recent Print Jobs**: View details of all recent print jobs **Jobs Pending Release**: View status of print jobs **Web Print**: Upload a document into the WebPrint queue
--- ## 2. Print a Document - In the Left Column, click the **“Web Print”** link [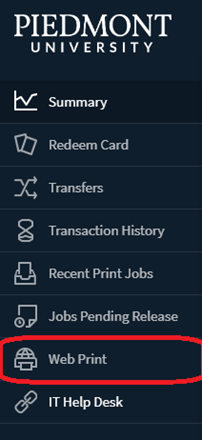](https://wiki.piedmont.edu/uploads/images/gallery/2025-06/dTmXpuLewzHphAIV-webprintbutton.png) - Click the **“Submit a job”** button [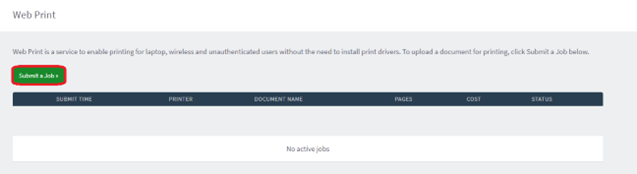](https://wiki.piedmont.edu/uploads/images/gallery/2025-06/xezp2BkGaAEincP7-webprintsubmitjob.png) ##### On the “Select a printer” screen: - Toggle the button next to the printer’s name you want to use If unsure, refer to the informational poster displayed with each student-use printer - Choose based on your printing requirements: - Printers labeled **B&W** are for black-and-white - Printers labeled **Color** are for colorEach semester, Students receive $25 in printing credit: **B&W** = $0.05 per page **Color** = $0.25 per page
- Once you've chosen a printer, click **“Print Options and Account Selection”** [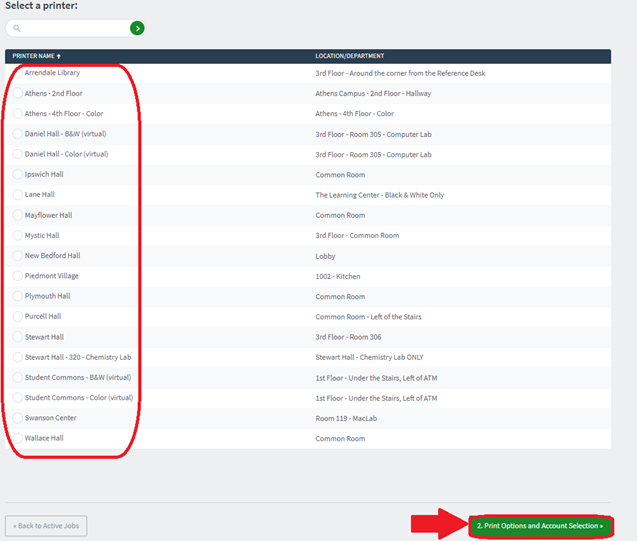](https://wiki.piedmont.edu/uploads/images/gallery/2025-06/2jCXi3LsXxWY0nkY-webprintselectprinter.png) - On the “Options” page - Select number of copies - Click **“Upload Documents”** [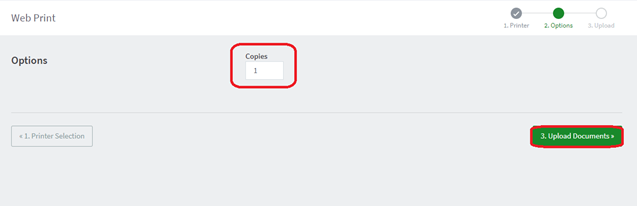](https://wiki.piedmont.edu/uploads/images/gallery/2025-06/ZN2brlqQke5TYkji-webprintupload.png) - On the “Upload” page - Upload a document from your computer - Once upload is complete, the document icon will display - Click **“Upload & Complete” [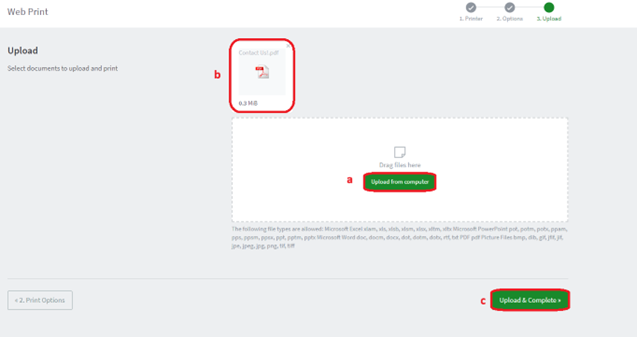](https://wiki.piedmont.edu/uploads/images/gallery/2025-06/SVTQnPVYfwqNsSqN-webprintuploadcomplete.png)** - On the “Web Print” page - Verify print info is correct: printer location, document name, “Held in a queue” - Status will change to **“Queueing” [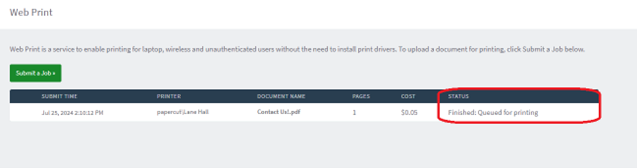](https://wiki.piedmont.edu/uploads/images/gallery/2025-06/ZYuJwfo1fMx9Dl88-webprintqueue.png)** - Once printing is complete, the page will auto-refresh and the print job row will disappear [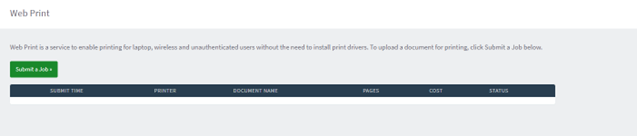](https://wiki.piedmont.edu/uploads/images/gallery/2025-06/IIvqycs2kT21HuTe-webprintcomplete.png) ---At this point, you will have successfully printed your document. You may now log out of your WebPrint account.
# Suspicous Emails (Phishing) This guide provides clear, step-by-step instructions for identifying and reporting phishing emails using Microsoft Outlook (2016, 2024, and Outlook Web App). It outlines the proper use of the built-in reporting tools, explains how to safely handle suspicious messages, and offers best practices to protect yourself and the university from email-based threats. # Handling Suspicious Emails > **“I think I’ve received a Phishing email! What should I do?!”**Do not click on Links or open Attachments
Avoid Interacting with any content in the email
Verify the Sender
Use the Report Phishing button in Outlook to report phishing emails to the IT Department [Outlook (New)](https://wiki.piedmont.edu/books/student-resources/page/outlook-new "Outlook (New)") Click this link to view instructions
Remove the phishing email from your inbox and trash folders after reporting it to IT
--- # Identifying Phishing ## [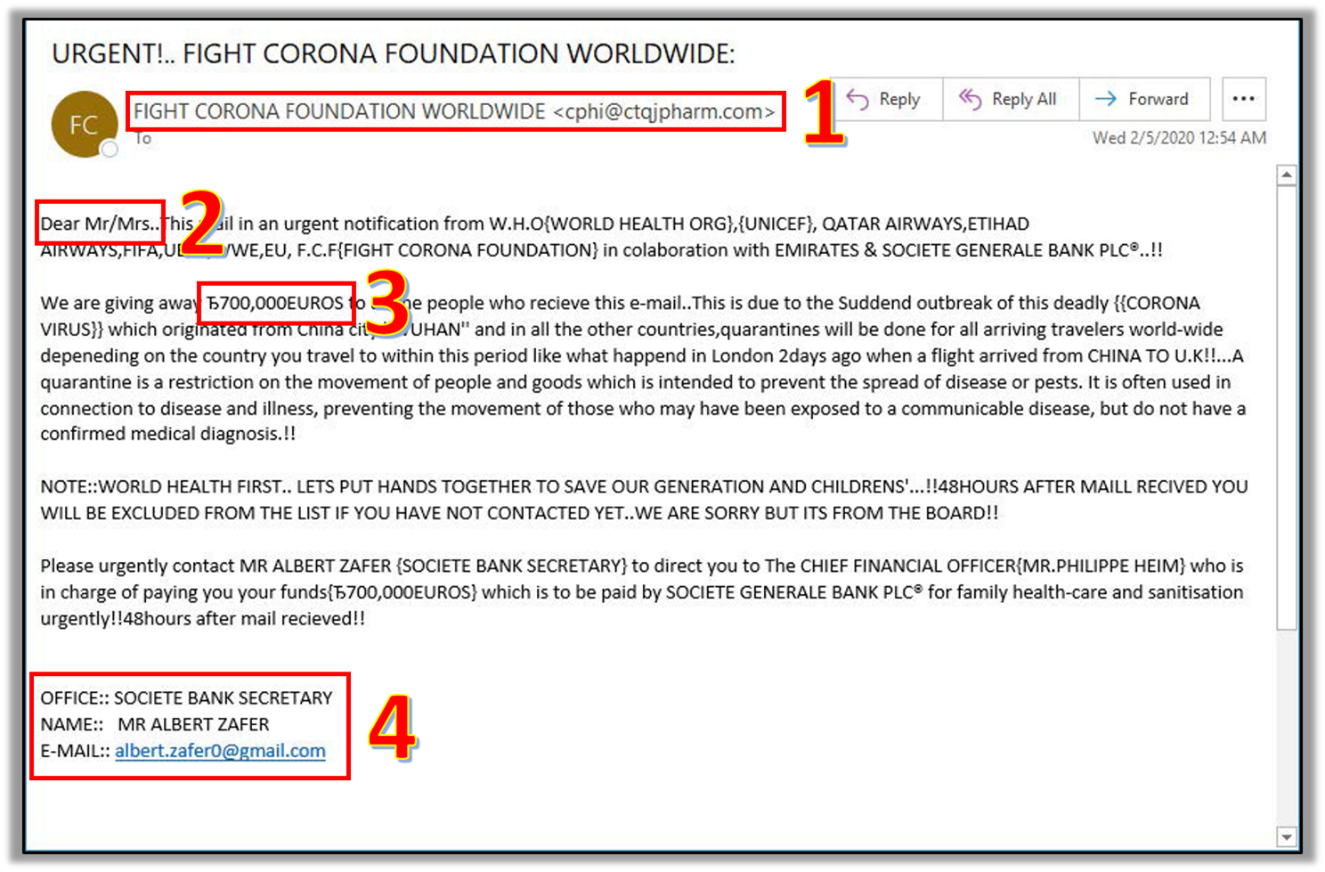](https://wiki.piedmont.edu/uploads/images/gallery/2025-06/FLATDcPHRaJxCG8Z-phishing1.png) ## 1. Suspicious Senders - Check the Sender’s email address - Look for subtle misspellings or unusual domain names ## 2. Generic Greetings - Be cautious of generic greetings - Phishing emails often use greetings like “Dear Customer” instead of your actual name ## 3. Urgent or Threatening Language - Beware of emails that create a sense of urgency or fear - Phrases like“Your account will be suspended,”
“Immediate action required,” or
“URGENT”
- May also promise rewards of some kind ## 4. Mismatched URLs - Ensure the URLs in the email match the legitimate website - Hover over links to see the actual URL --- ## [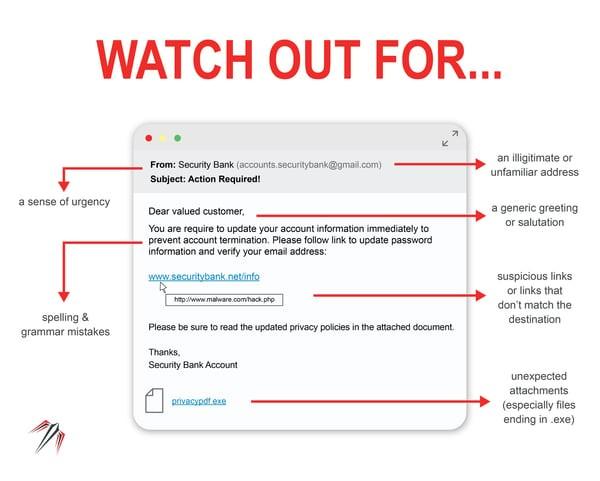](https://wiki.piedmont.edu/uploads/images/gallery/2025-06/F2DY3gWa90SwFudu-phishing2.jpg)Poor Grammar and Spelling - Look for spelling and grammatical errors - Phishing emails often contain typos and awkward phrasing - This is often due to attackers using Google Translate to translate into English ## Unexpected Attachments or Links - Do not open unexpected attachments or click on suspicious links - A link might say ‘www.yourbank.com’ but actually lead to a different website - Do not open an attachment if it is a `.exe` (Windows) or `.dmg` (MacOS) ## Request for Personal Information - Legitimate organizations will not ask for sensitive information via email - Emails asking for passwords, Social Security numbers, or credit card details are likely phishing attempts ## If you Suspect an email is Phishing If you suspect that an email is a phishing attempt, please refer to [Handling Suspicious Emails](https://wiki.piedmont.edu/books/student-resources/page/handling-suspicious-emails "Handling Suspicious Emails") and follow the instructions to report the email to the IT Department. # Outlook (Classic) [](https://wiki.piedmont.edu/uploads/images/gallery/2025-06/FB8t2p3zN5syWMBH-outlook2016icon.png) 1. Navigate to **Inbox** 2. Select the email you wish to report, and ensure the email is highlighted 3. Under the **Home** tab, In the far-right corner, select **Phish Alert Report** 4. The email is reported to the IT Department for review [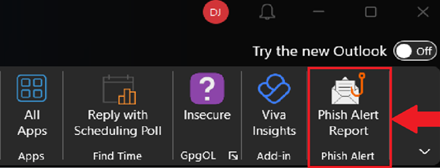](https://wiki.piedmont.edu/uploads/images/gallery/2025-06/sPL39IbIrZuHxAO6-reportphishing2016.png) # Outlook (New) [](https://wiki.piedmont.edu/uploads/images/gallery/2025-06/GLXaI8PnRhCulBVM-outlook2024icon.png) 1. Navigate to **Inbox** 2. Select the email you wish to report, and ensure the email is highlighted 3. Select the **Home** tab 4. Use the **Report** button (located next to Reply) to report the email 5. A popup will appear asking if you’re sure you’d like to report the email. Select **Report** 6. The email is reported to the IT Department for review 7. These instructions also apply to **Outlook Web Online (OWA) [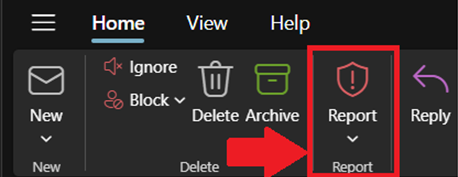](https://wiki.piedmont.edu/uploads/images/gallery/2025-06/09ZeANy2DNuzHHX9-reportphishing2024.png)** # Security Awareness [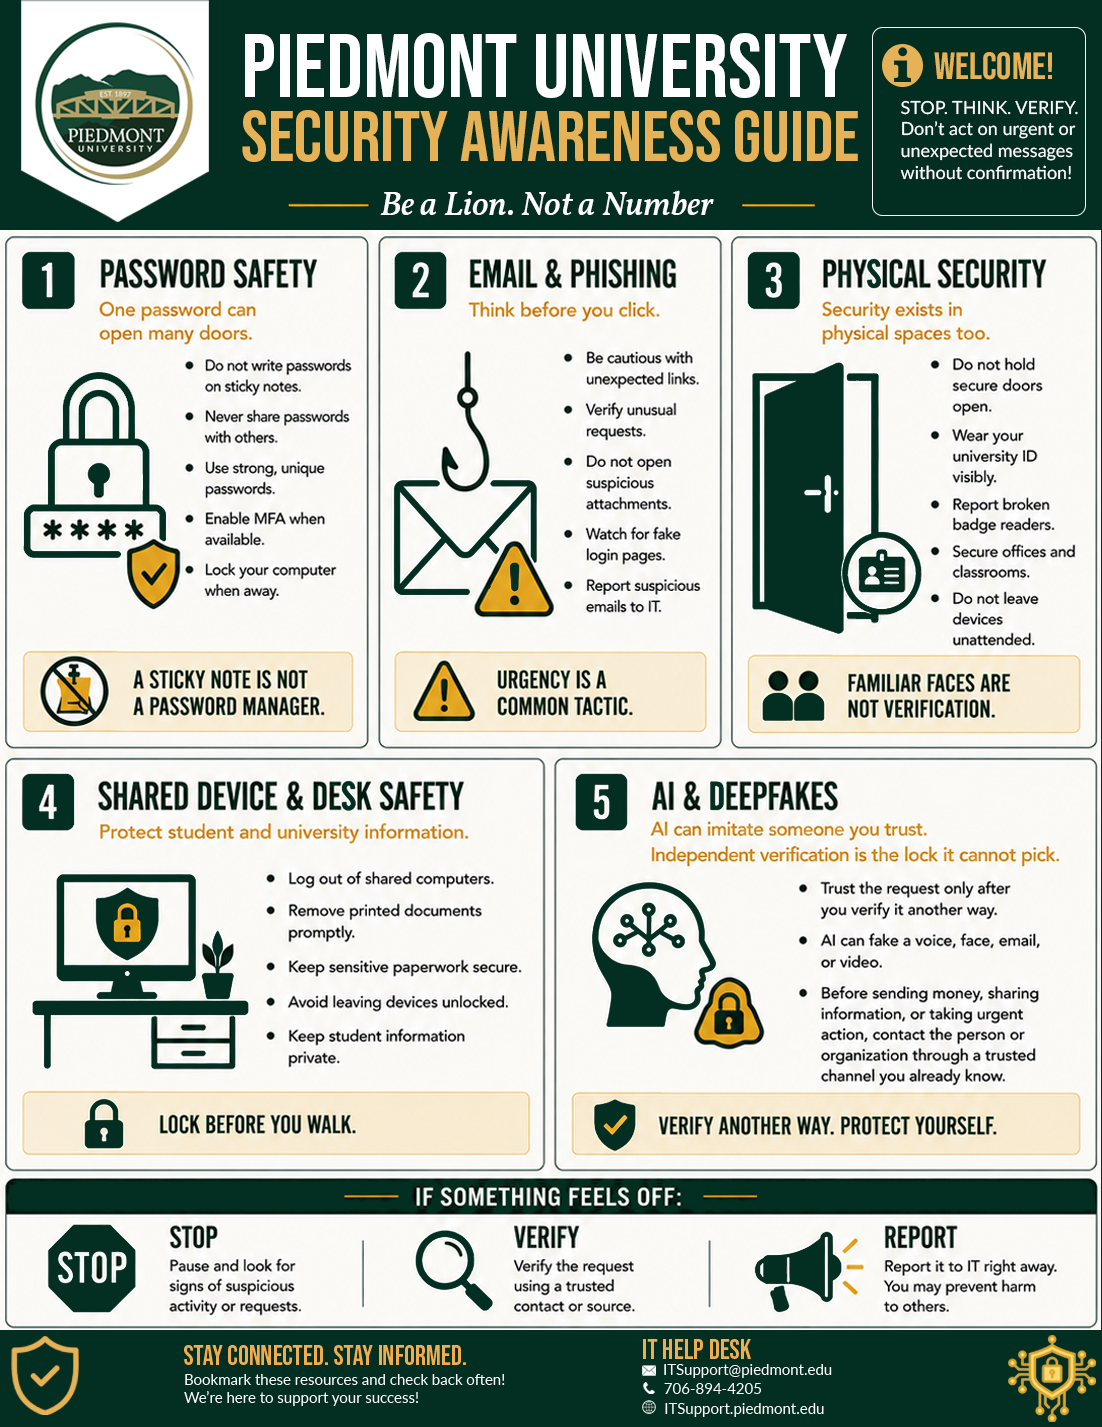](https://wiki.piedmont.edu/uploads/images/gallery/2026-06/oarVVf3ags3Q0jjD-securityawareness.png) # Piedmont Computer Labs # Computer Lab Instructions ## 1. Logging in - Guest AccountAny files or changes made to this computer will be deleted at logoff. Please make sure you are logged in and saving your files to OneDrive.
- When using the Lab computers at Piedmont University, you will need to login using the **Guest** account. --- ## 2. Accessing your Files - OneDriveYou must login to OneDrive to save your files!
#### Windows Instructions 1. Open OneDrive from the Shortcuts toolbar, located in the bottom right corner, next to the date & time. [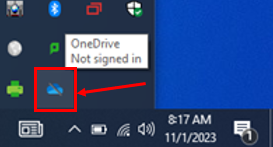](https://wiki.piedmont.edu/uploads/images/gallery/2025-08/bypVkDKo7EYDjocL-onedrivewindowsicon.png) 2. Select **Sign in** [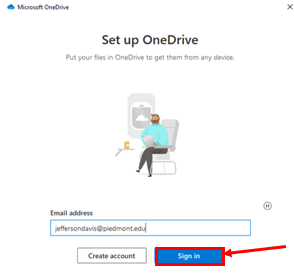](https://wiki.piedmont.edu/uploads/images/gallery/2025-08/8ZqAYdhXrHKSh2N4-onedrivewindowslogin.png) 3. Enter your full Lions email address and select **Sign in** 4. Follow through the on-screen prompts to finish signing in , Select **Start Backup** to complete the process - This ensures that you can access your files and that any files created on the lab computer will be saved. [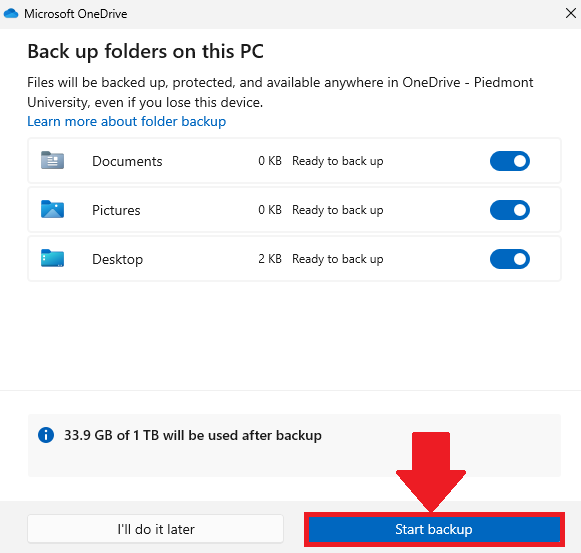](https://wiki.piedmont.edu/uploads/images/gallery/2025-08/ABqT8guc1Z0oTJ6g-onedrivewindowsbackup.png) #### MacOS Instructions 1. Open OneDrive from the menu bar, located at the top of the screen [](https://wiki.piedmont.edu/uploads/images/gallery/2025-08/Ysm3Vk1WyF6IxxcT-onedrivemacosicon.png) 2. Select **Sign in** [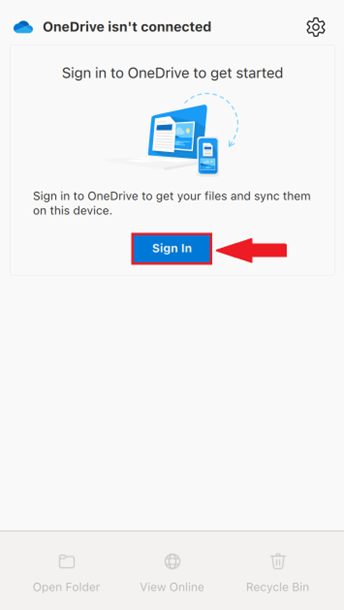](https://wiki.piedmont.edu/uploads/images/gallery/2025-08/0y7Hv1Uwki86Pupv-onedrivemacossignin.png) 3. Enter your full Lions email address and select **Sign in [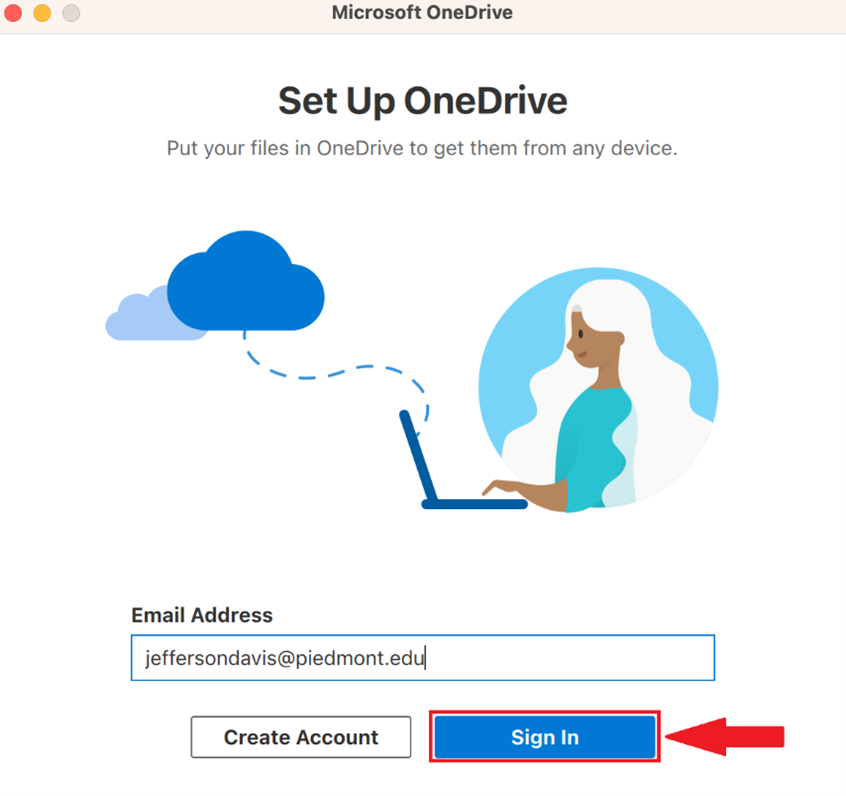](https://wiki.piedmont.edu/uploads/images/gallery/2025-08/kpJGhlrxdqi5fvDz-onedrivemacoslogin.png)** 4. Follow through the on-screen prompts to finish signing in , Select **Start Backup** to complete the process - This ensures that you can access your files and that any files created on the lab computer will be saved. [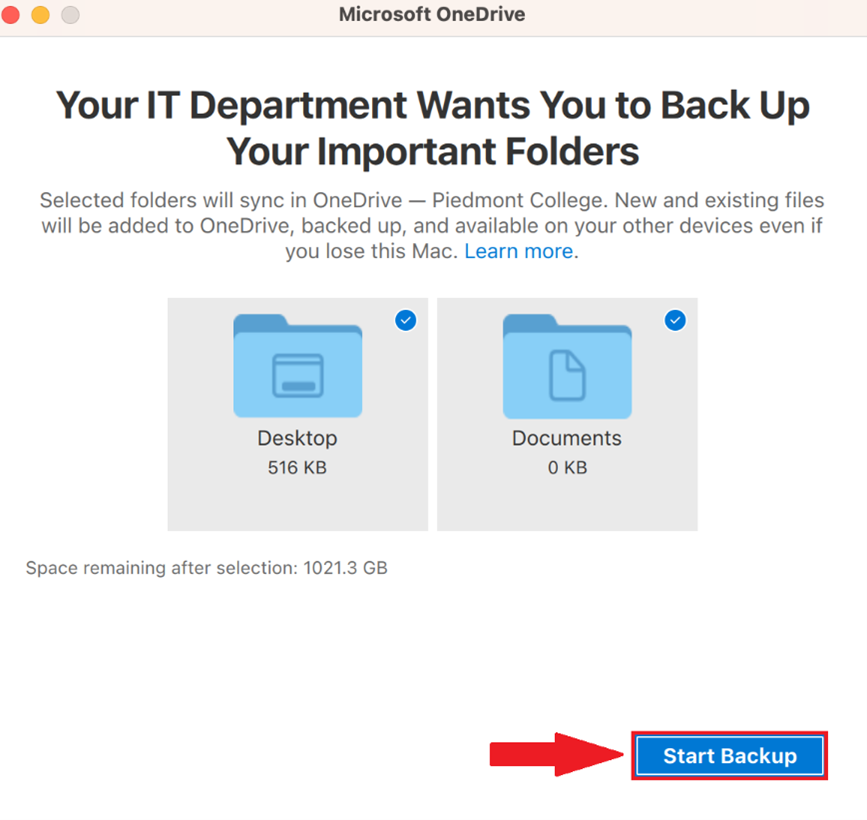](https://wiki.piedmont.edu/uploads/images/gallery/2025-08/yp5vApnNj6tW1XDH-onedrivemacosbackup.png) --- ## 3. Adobe ApplicationsLogin using your personal email address so that you can access your portfolio after you graduate!
#### Installing Applications (Photoshop/Lightroom/Etc.) 1. Open the **Adobe Creative Cloud** Desktop Application [ ](https://wiki.piedmont.edu/uploads/images/gallery/2025-08/CFhCTQWWUEgAaeLd-adobeccicon.png)[](https://wiki.piedmont.edu/uploads/images/gallery/2025-08/FPCmSXBjLhCvXxcv-adobecciconmac.png) 2. Launching Adobe Creative Cloud for the first time will open a web browser page asking you to sign in to Adobe. 3. Please sign in with your personal email address and select **Continue**You will need to create an Adobe account using a personal email if it is your first time using Adobe Creative Cloud
4. Return to Adobe Creative Cloud, Select **Apps** and scroll down to the section **Available in your plan.** 5. Select the **Install** button to begin downloading the application. #### Accessing your Portfolio 1. On a tablet, smartphone, or PC, visit: [https://assets.adobe.com/cloud-documents](https://assets.adobe.com/cloud-documents) 2. Sign in with the same email address you used to sign in to Adobe Creative Cloud. 3. In the left column, select **Files** - Here you can view and manage the items in your portfolio. --- ## 4. Logging Off - When you are done using the PC, don't forget to sign out of the guest account to remove your files from the lab computer. This prepares the lab computer for the next student and frees up some system resources! # Microsoft Teams # Manage Teams Meetings ## 1. Create a Teams Meeting 1. Open a Web Browser and navigate to [https://teams.microsoft.com/](https://teams.microsoft.com/) - You can also use the Desktop App version of Microsoft Teams 2. Login using your @lions.piedmont.edu credentials 3. Navigate to the **Calendar** column [](https://wiki.piedmont.edu/uploads/images/gallery/2026-01/L0ECOsO3XNNApc4E-teamscalendar.png) 4. Select **New [](https://wiki.piedmont.edu/uploads/images/gallery/2026-01/BAcIHXIS02ePbyB2-newteamsmeeting.png)** 5. The **New Event** popup appears, Fill out the fields for **Add Title, Invite Required Attendees,** and be sure to Toggle **Teams Meeting** - The Event Title will generally be the name of the Class . - For the **Invite Required Attendees** field, type in the student's Lions email address to add them to the meeting. - For the **Scheduler** Field, select the Date & Time for when the meeting will take place. - \[OPTIONAL\]: Add a meeting room/location if you're hosting a hybrid meeting of in-person and online guests. *(Example: DanielHall-310)* - Be sure to Toggle **Teams Meeting**, so that a URL for the meeting is created. - Finally, select Save in the top-right corner to create the meeting [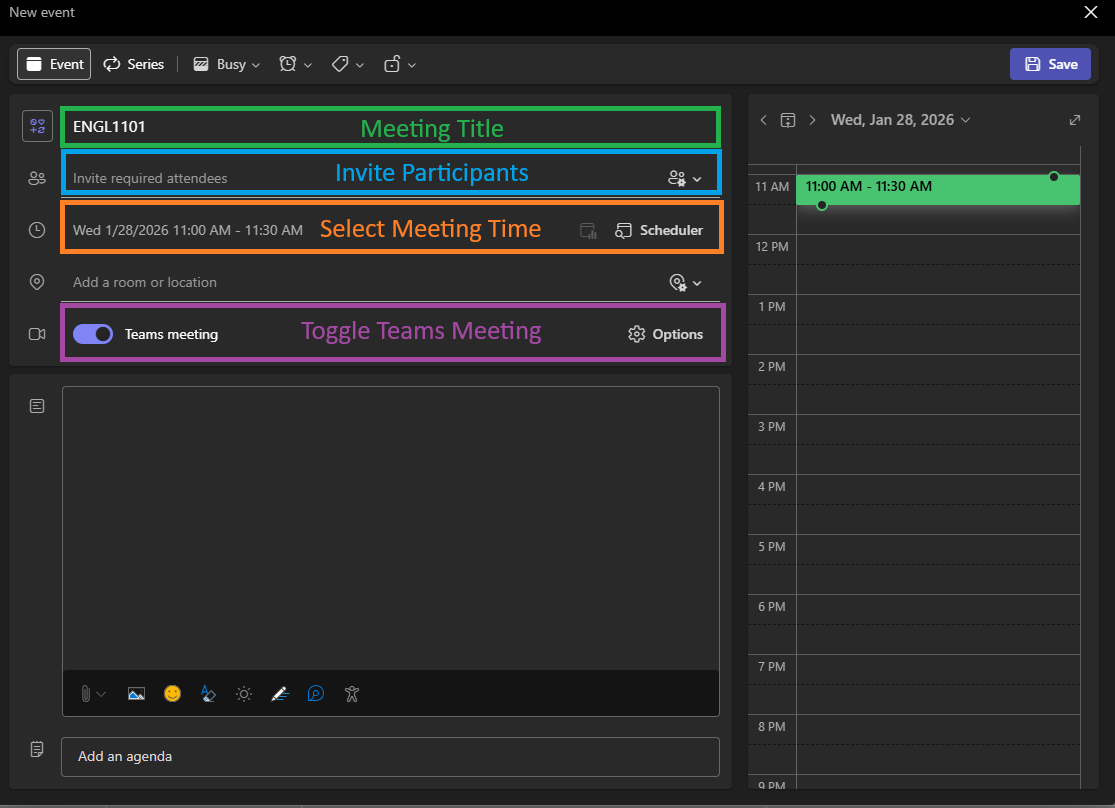](https://wiki.piedmont.edu/uploads/images/gallery/2026-01/hTi3CkqyCwZu5DIl-createteamsmeeting.png) - A Meeting will be created and invites will be sent to the participants. --- ## 2. Join a Teams MeetingA meeting created with Attendees will send an email invite to the participant's Outlook but you can also view the invite on the Teams Calendar
1. Open a Web Browser and navigate to [https://teams.microsoft.com/](https://teams.microsoft.com/) - You can also use the Desktop App version of Microsoft Teams 2. Login using your @lions.piedmont.edu credentials 3. Navigate to the **Calendar** column [](https://wiki.piedmont.edu/uploads/images/gallery/2026-01/L0ECOsO3XNNApc4E-teamscalendar.png) 4. Scroll to the Date/Time that the Teams Meeting would take place, you should see the meeting on your Teams Calendar. [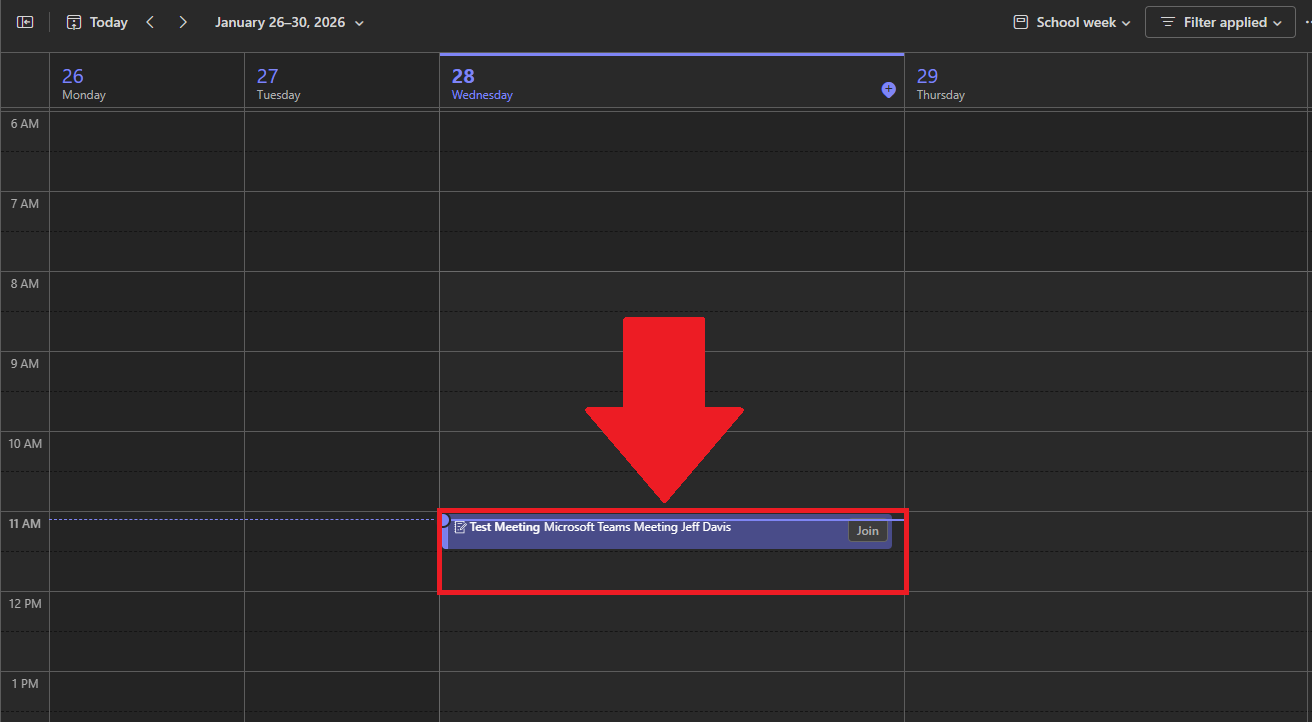](https://wiki.piedmont.edu/uploads/images/gallery/2026-01/6SGlRjU107OC2Da5-teamsmeetingexample.png) 5. Select the Meeting, and select **Join** [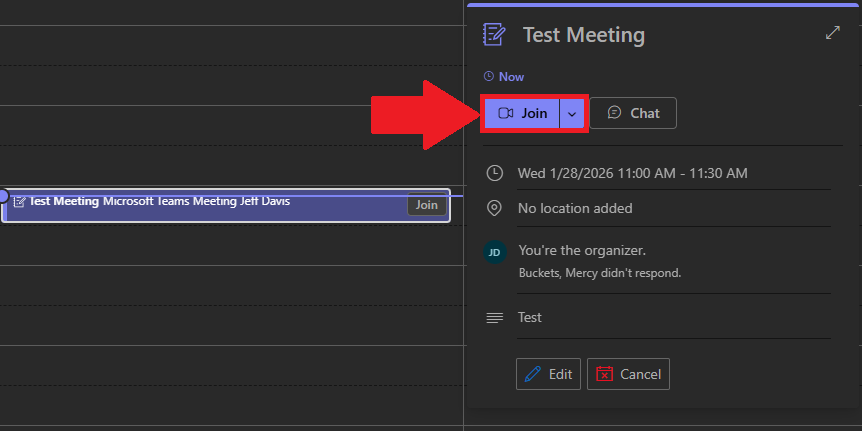](https://wiki.piedmont.edu/uploads/images/gallery/2026-01/06XHz1k3cgwCTDMz-jointeamsmeeting.png) 6. Follow through the on-screen prompts to select your Audio and Video equipment as you would normally do so if you were using Zoom. --- ## 3. Meeting ID and PasscodeYou can complete the following as either a host or attendee
1. You can obtain the Meeting Link/URL by selecting the Drop-down arrow next to **Join** Meeting on your Teams Calendar. [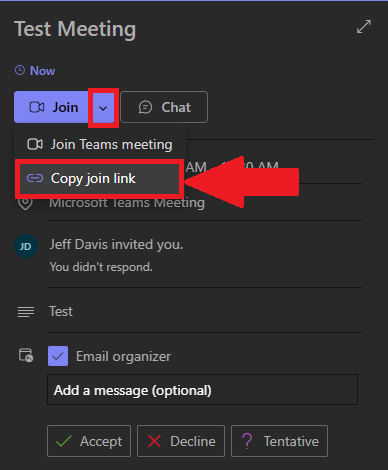](https://wiki.piedmont.edu/uploads/images/gallery/2026-01/d4Ad0iDJqc8dO2Yy-copymeetinginvite.png) 2. If you Double-Click a meeting on your Calendar, you can see the **Meeting ID and Passcode** [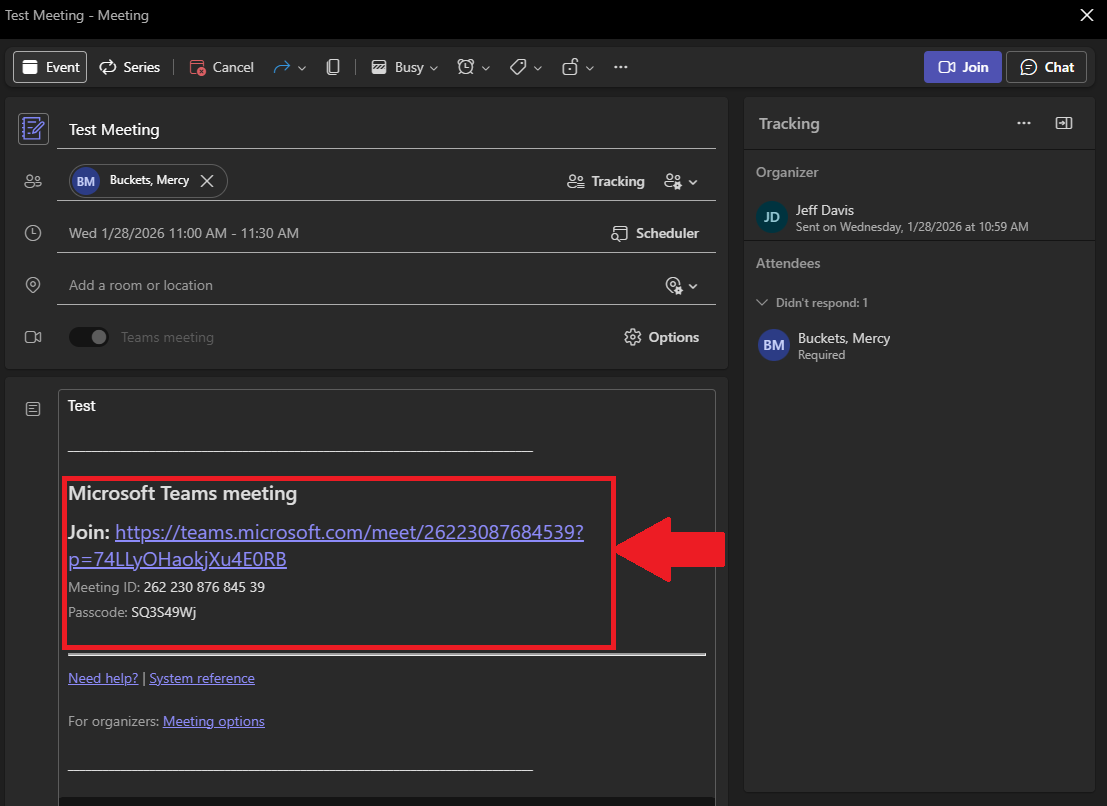](https://wiki.piedmont.edu/uploads/images/gallery/2026-01/N3vbf3whnBwDCMfL-teamsmeetingpasscode.png) --- ## 4. Advanced OptionsThe following section can only be completed by the host or co-hosts of a Teams Meeting
1. Navigate to Teams Calendar, the following options can be performed on New Meetings, before they're created, or afterwards for existing Teams Meetings. 2. Select the **Options** button when editing or creating a Team Meeting[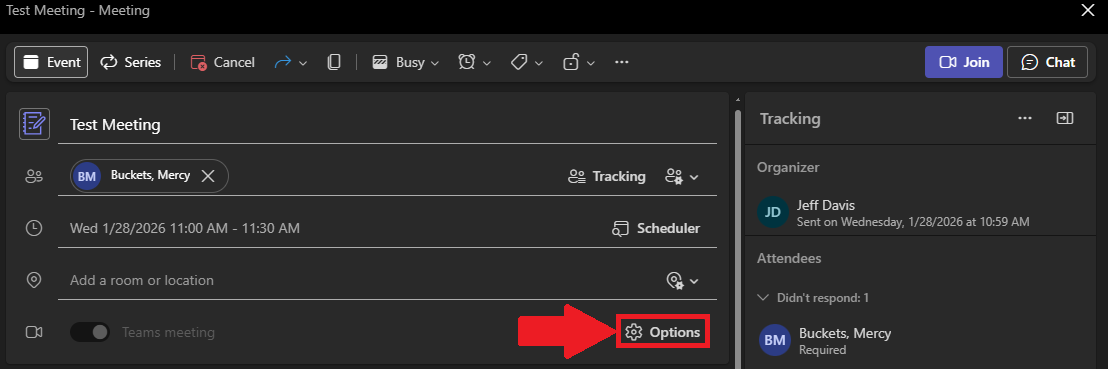](https://wiki.piedmont.edu/uploads/images/gallery/2026-01/iecXoxgVDy86Z3U3-teamsadvancedoptions.png) 3. In this menu, you can manage **Meeting Access** and **Roles** - **Meeting Access:** Here you can manage the basic permissions of attendees in the meetings. [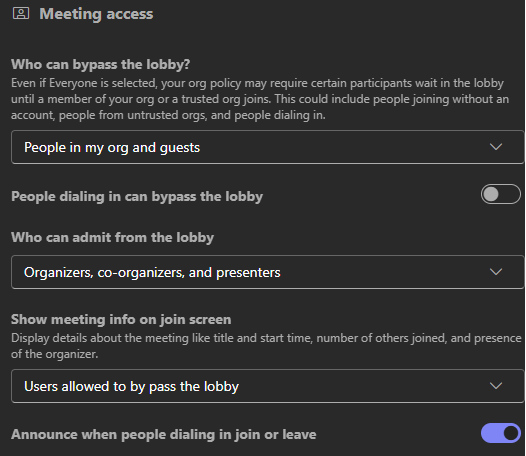](https://wiki.piedmont.edu/uploads/images/gallery/2026-01/lZlhgJmSKk5iPhOd-teamsmeetingsaccess.png) - **Roles**: Here you can manage co-hosts and presenting permissions for participants. [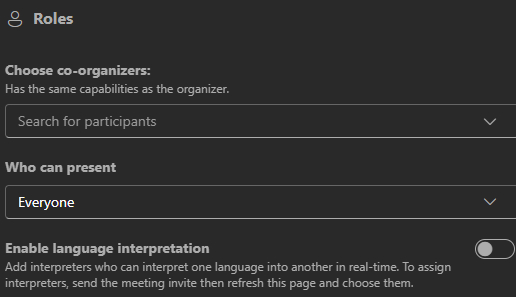](https://wiki.piedmont.edu/uploads/images/gallery/2026-01/2F2spLD2bp9VpAtn-teamsmeetingroles.png) ---