Multi-Factor Authentication (MFA)
This guide provides step-by-step instructions for users on how to reset their multi-factor authentication (MFA) using the Microsoft Authenticator app. It offers a user-friendly walkthrough, ensuring a seamless and secure process to regain access to their accounts while maintaining the highest level of security.
Setting Up Microsoft Authenticator
When signing in you may see this message.
This message indicates that you must reconfigure your Multi-Factor Authentication. Follow through the on-screen prompts until you reach a page with a QR Code
Once you reach this page, please proceed to the next steps on your mobile device.

Delete previous sign-in method
This section is only necessary if you have previously set up Microsoft Authenticator.
- To set up MFA again you must delete the previous account to receive MFA notifications.
- Open Microsoft Authenticator
- Select your
@piedmont.eduor@lions.piedmont.eduaccount
- Select the gear icon in the top right corner

- Select Remove Account

- Press Continue and/or This app only to finish removing the account


Set up Microsoft Authenticator
- Open the Microsoft Authenticator app on your iOS or Android device
- If you do not have Microsoft Authenticator installed, please download it from the iOS App Store or Google Play Store
- Open the app, allow notifications (if prompted)
- Select Add account from the '+' icon in the upper-right
- Then select Work or school account
On your Computer:
- On the Set up your account page, select Next

- The Scan the QR code page appears

- Use your mobile device to scan the provided QR code with the Microsoft Authenticator app
- Select Next on your computer
- A 2 digit number is displayed on the computer
On your Mobile Device:
- A notification is sent to your mobile device prompting for a 2 digit number
- On your mobile device, enter the 2 digit number, show on the computer, in the Microsoft Authenticator app
- Select Done on your computer
- Your security info is now updated to use the Microsoft Authenticator app by default to verify your identity when using two-step verification or password reset.
Our Helpdesk Team is happy to provide assistance with this process! Just give us a call at 706-894-4205!
Next Steps
Once you've set up Microsoft Authenticator, we recommend reviewing our documentation for Passkeys which you can find here!
Need Help?
If you encounter an error or need assistance with this guide, please contact the IT Department and include a screenshot with a brief description of the issue.
Contact the IT Department Here
MFA Passkeys
1. What is a Passkey?
A passkey is a modern, phishing-resistant way to sign in without using a password!
- Instead of something you know (like a password), a passkey uses something you have (your phone or device) and something you are (Face ID, Fingerprint, or device PIN)
- The credential is stored securely on your device and is never shared with the website or service that you're signing into. Because of this, passkeys can't be reused, stolen by fake websites, or guessed.
- Passkeys are based on industry security standards (FIDO2). Your device proves to Microsoft that it's really you, without ever sending a password across the internet.
- If the site is not legitimate, the passkey simply won't work, and there's nothing for the attacker to steal.
- Your device becomes your key, and your identity stays locked inside it!
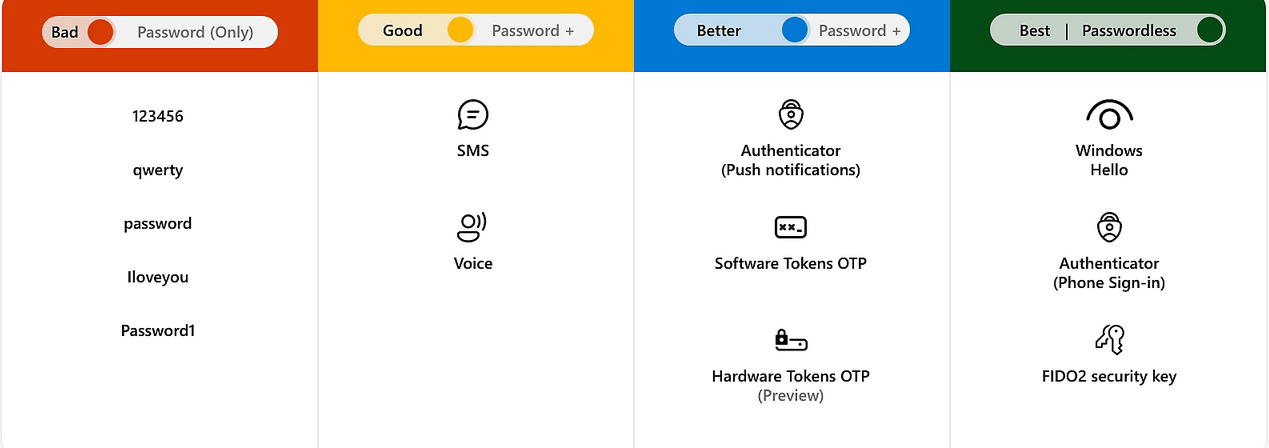
- Did you know that passwords are the weakest link in modern security? They are often:
- Reused
- Phished
- Leaked in breaches
- Guessed
- Microsoft's goal with passwordless sign-in is to:
- Eliminate passwords as an attack target - No passwords means nothing to phish, reuse, or brute-force.
- Reduce account takeovers and phishing - Passkeys only work on the real Microsoft sign-in and approved services. Fake sites can't trick your device into handing over a credential.
- Make sign-ins faster and simpler - Approving with Face ID, fingerprint, or a device PIN is quicker than typing passwords and codes.
- Improve both security and user experience - Stronger security without extra steps, fewer account lockouts.
Passkeys are part of Microsoft's move to a passwordless future where accounts are protected by your device and biometrics instead of passwords that can be stolen, guessed, or phished
2. Syncable Passkeys
A passkey lets you sign in without typing your password each time. It uses your device's built-in security, such as Face ID, fingerprint, screen lock, or device PIN.
We recommend saving your passkey to:
- Apple Passwords (if you use iPhone)
- Google Password Manager (if you use Android)
3. Before you Begin
| Make sure you have: | Do not create a passkey on: |
|
Your Piedmont email address |
A public computer |
|
Your current password |
A shared family computer |
|
You current MFA method |
A classroom or lab computer |
|
A personal phone or computer that only you use |
A friend's phone |
4. Enable Passkey Syncing (iOS/MacOS)
- Confirm your iCloud keychain is enabled
- Open Settings
- Select your Name / Apple ID at the top
- Tap iCloud
- Tap Passwords and Keychain
- Confirm that the setting Sync this iPhone or Sync this iPad is enabled
- On Mac:
- Open System Settings
- Click your Apple Account
- Click iCloud
- Ensure Passwords is set to Sync
5. Create a Passkey
- Open a web browser and visit https://myaccount.microsoft.com
- Expand My Account
- Select Security Info
- You will be prompted to login using MFA.
- Once logged in, select Add sign-in method
- Select Passkey
- Select Next and follow through the on-screen prompts
6. Sign in with Passkey
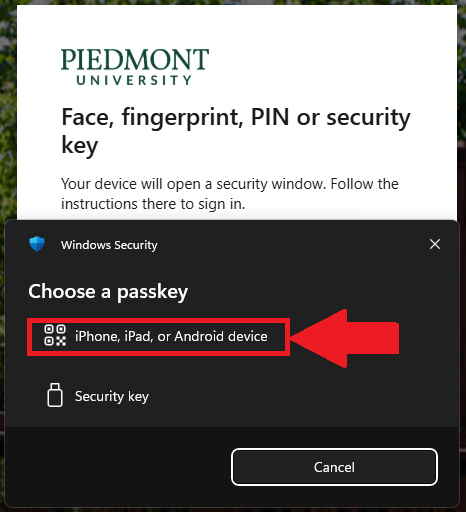
- When you login using your Piedmont credentials, you will receive a new popup window in place of Microsoft Authenticator

- Select iPhone, iPad, or Android device.
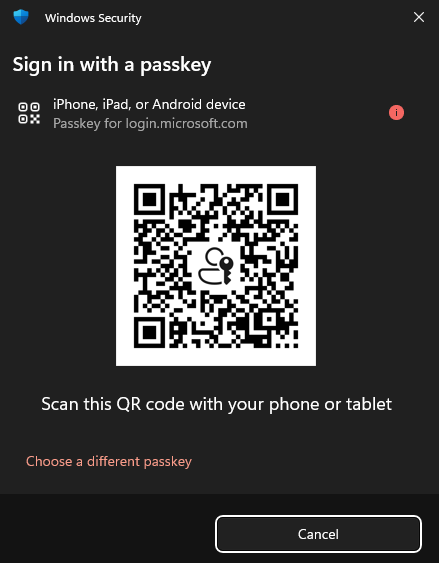
- Use your mobile device to scan the QR Code on your computer, select Sign in with Passkey

- On your mobile device, a message will appear "Sign in to login.microsoft.com" on the other device with your passkey for "@piedmont.edu" saved in Passwords?
- Choose Use Passkey
- Your mobile device will prompt for Face ID or biometrics.
7. Sign in using Microsoft Authentiactor
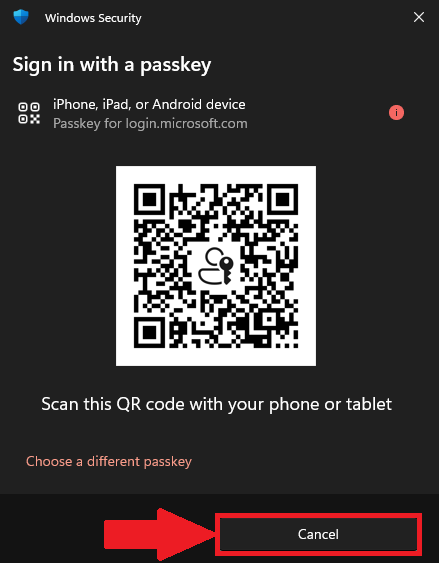
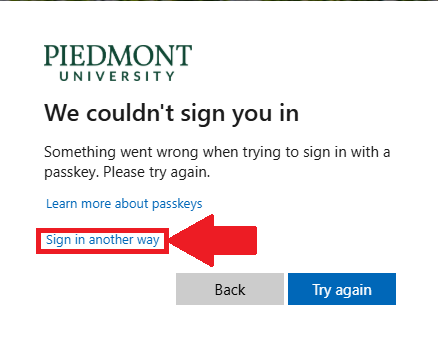
- In some cases you may need to use the original MFA through the Authenticator app, to do so, select the 'X' or 'Cancel' button and select Sign in Another way


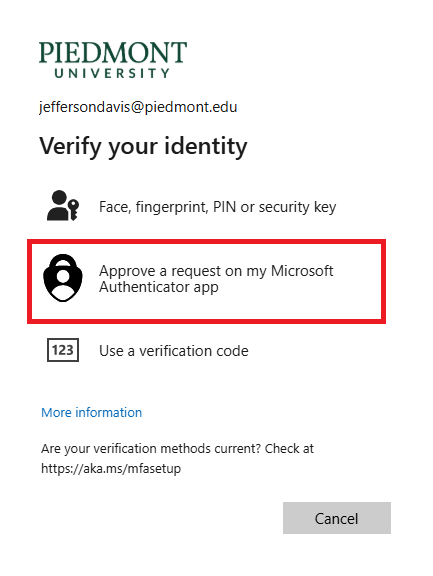
- Select Approve a request on my Microsoft Authenticator app to complete original MFA steps.

- Follow the on-screen instructions to approve the Authenticator request.
8. What happens when you get a new phone?
- If your passkey was saved to Apple Passwords or Google Password Manager, it may become available again after you:
- Sign into your new phone with the same Apple or Google account
- Enable iCloud Password or Google Password Manager sync
- Set up Face ID, fingerprint, screen lock, or device PIN
- Login to your Lions email using https://www.office.com or selfservice.piedmont.edu
- Select the saved passkey when prompted
If your passkey does not appear, you will need to Contact IT for assistance.
9. Security Notes
- Your passkey is only as secure as your Apple or Google account. Use a password manager!
- Use a strong password on your Apple or Google account. Do not reuse passwords!
- Keep account recovery options up to date on your Apple or Google account
- Never share your phone PIN, Apple password, Google password, or Device unlock code
- Do not save passkeys on shared or public devices
10. Next Steps
Review what you can do to help keep Piedmont secure here!
Need Help?
If you encounter an error or need assistance with this guide, please contact the IT Department and include a screenshot with a brief description of the issue.
Contact the IT Department Here
Lost Phone / Can't Access Account
1. Can't login due to MFA
If you lost or replaced your phone or no longer have access to your MFA method, you may not be able to Sign in to your Piedmont account.
This guide explains how to manage your sign in methods so that you can access your account.
- This guide is helpful when:
- You lost your phone
- You got a new phone
- Your phone was stolen
- Your phone was reset or wiped
- You deleted Microsoft Authenticator
- Microsoft Authenticator no longer show your Piedmont account
- You changed phone numbers
- You do not receive a text field to enter the 2-digit MFA number in Microsoft Authenticator
- You cannot access any of your sign-in methods
2. Manage your sign in Methods
You can only complete this section if you have access to at least 1 MFA method. (Passkey or Authenticator)
- You can add or remove MFA sign in methods by visiting https://myaccount.microsoft.com and logging in using your Piedmont email.
- Visit https://myaccount.microsoft.com and login using your Piedmont email
- In the left column, expand My Account
- Select Security Info
- You will be prompted to login using MFA
If you do not have access to your MFA method you will be required to contact the IT Department so that we may assist you.
- Here you can manage your Sign-in Methods. If you got a new phone, you would need to delete the method labeled 'Microsoft Authenticator'.
- Once deleted, select Add Sign-in Method and follow the on-screen instructions to add the Microsoft Authenticator App to your new device.
- You can find instructions for setting up Microsoft Authenticator here!
3. Submit a Ticket to IT
If you cannot access your MFA methods you must submit a ticket to IT so that we may assist you in accessing your account again.
- When submitting a ticket, please include
- Your Full name
- Your Piedmont Email address
- a brief explanation of what happened
- Any screenshots of errors that you may receive.
Need Help?
If you encounter an error or need assistance with this guide, please contact the IT Department and include a screenshot with a brief description of the issue.
Contact the IT Department Here