Account & Access
Guides related to logging in, account setup, authentication, and password resets.
- Bitlocker
- Change your Password
- Multi-Factor Authentication (MFA)
- Employee Account Activation
- Microsoft Teams
- OneDrive
Bitlocker
You can easily obtain your recovery key using Microsoft's online recovery key portal. Sudden loss of power, crashes, or improper shutdowns can cause BitLocker integrity checks to trigger recovery mode.
Recovery Key
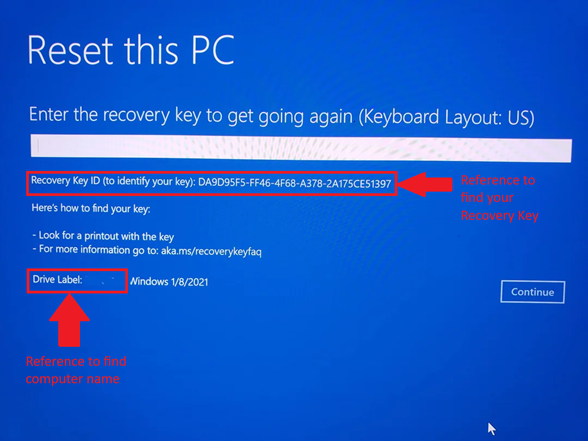
On a PC, Phone, or tablet, open a web browser and navigate tohttps://aka.ms/myrecoverykey
1. Sign in using your university email account.
2. Select Manage Devices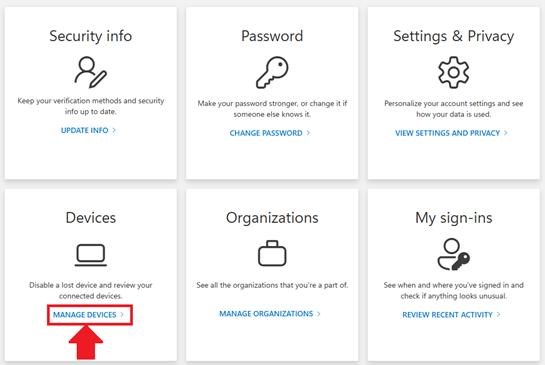
3. Select your computer from the list, your computer name should contain your name.
4. Once you find your device, select View Bitlocker Keys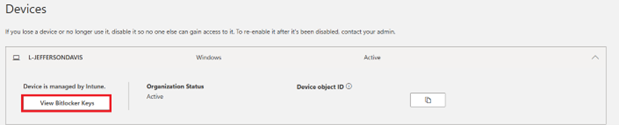
5.) Next, select Show Recovery Key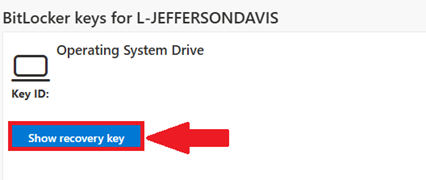
6. Finally, enter the recovery key into your locked device to regain access
7. Once you’ve typed in the Recovery Key, press Enter
💬 Support Contact Info
For any issues or questions regarding Bitlocker, please contact IT support by submitting a ticket through our helpdesk system.
📞 (706) 894-4205
✉️ ITSupport@piedmont.edu
🔗 https://itsupport.piedmont.edu/
Change your Password
This user-friendly guide provides step-by-step instructions for resetting your Piedmont University password through Microsoft's platform. Whether you've forgotten your password or simply need to update it, this guide will walk you through the process effortlessly, ensuring seamless access to all University services and resources.
Password Reset
Visit https://myaccount.microsoft.com/
1. Sign in with your Piedmont Email Address
2. Select Update Info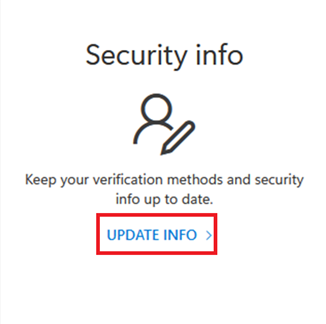
3. Select Change next to Password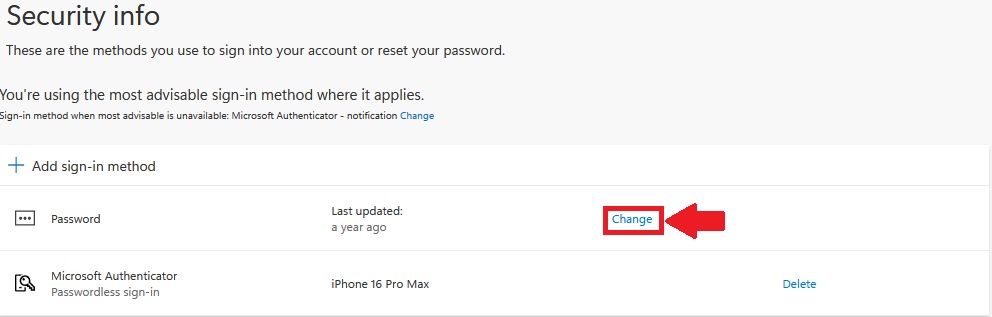
4. Enter your Old Password
5. Enter your new password
6. Confirm your new password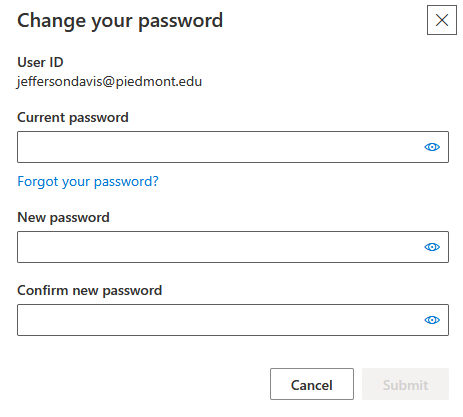
**Password Requirements** Must be at least 12 characters long. Must have at least one capital letter. Must have at least one lower case letter. Must have at least one number. Special characters are optional. (Example - !, @, #, $, %, ^) Must have a minimum age of 1 day before it can be changed. Users cannot use the last 24 passwords they have used. Passwords are non-expiring.
7. Select Submit to change your password
💬 Support Contact Info
For any issues or questions regarding your account password, please contact IT support by submitting a ticket through our helpdesk system.
📞 (706) 894-4205
✉️ ITSupport@piedmont.edu
🔗 https://itsupport.piedmont.edu/
Multi-Factor Authentication (MFA)
This guide provides step-by-step instructions for users on how to reset their multi-factor authentication (MFA) using the Microsoft Authenticator app. It offers a user-friendly walkthrough, ensuring a seamless and secure process to regain access to their accounts while maintaining the highest level of security.
Setting Up MFA
When signing in you may see this message.
This message indicates that you must reconfigure your Multi-Factor Authentication. Follow through the on-screen prompts until you reach a page with a QR Code
Once you reach this page, please proceed to the next steps on your mobile device.

Delete previous sign-in method
This section is only necessary if you have previously set up Microsoft Authenticator.
- To set up MFA again you must delete the previous account to receive MFA notifications.
- Open Microsoft Authenticator
- Select your
@piedmont.eduor@lions.piedmont.eduaccount
- Select the gear icon in the top right corner

- Select Remove Account

- Press Continue and/or This app only to finish removing the account


Set up Microsoft Authenticator
- Open the Microsoft Authenticator app on your iOS or Android device
- If you do not have Microsoft Authenticator installed, please download it from the iOS App Store or Google Play Store
- Open the app, allow notifications (if prompted)
- Select Add account from the '+' icon in the upper-right
- Then select Work or school account
On your Computer:
- On the Set up your account page, select Next

- The Scan the QR code page appears

- Use your mobile device to scan the provided QR code with the Microsoft Authenticator app
- Select Next on your computer
- A 2 digit number is displayed on the computer
On your Mobile Device:
- A notification is sent to your mobile device prompting for a 2 digit number
- On your mobile device, enter the 2 digit number, show on the computer, in the Microsoft Authenticator app
- Select Done on your computer
- Your security info is now updated to use the Microsoft Authenticator app by default to verify your identity when using two-step verification or password reset.
Login methods using MFA
Our Helpdesk Team is happy to provide assistance with this process! Just give us a call at 706-894-4205!
MFA Passkeys
1. What is a Passkey?
A passkey is a modern, phishing-resistant way to sign in without using a password!
- Instead of something you know (like a password), a passkey uses something you have (your phone or device) and something you are (Face ID, Fingerprint, or device PIN)
- The credential is stored securely on your device and is never shared with the website or service that you're signing into. Because of this, passkeys can't be reused, stolen by fake websites, or guessed.
- Passkeys are based on industry security standards (FIDO2). Your device proves to Microsoft that it's really you, without ever sending a password across the internet.
- If the site is not legitimate, the passkey simply won't work, and there's nothing for the attacker to steal.
- Your device becomes your key, and your identity stays locked inside it!
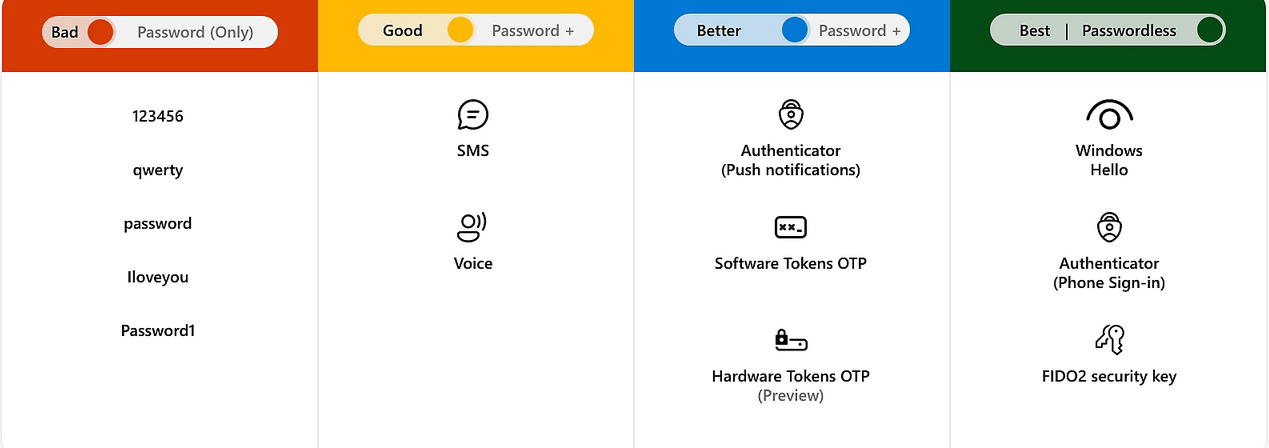
- Did you know that passwords are the weakest link in modern security? They are often:
- Reused
- Phished
- Leaked in breaches
- Guessed
- Microsoft's goal with passwordless sign-in is to:
- Eliminate passwords as an attack target - No passwords means nothing to phish, reuse, or brute-force.
- Reduce account takeovers and phishing - Passkeys only work on the real Microsoft sign-in and approved services. Fake sites can't trick your device into handing over a credential.
- Make sign-ins faster and simpler - Approving with Face ID, fingerprint, or a device PIN is quicker than typing passwords and codes.
- Improve both security and user experience - Stronger security without extra steps, fewer account lockouts.
Passkeys are part of Microsoft's move to a passwordless future where accounts are protected by your device and biometrics instead of passwords that can be stolen, guessed, or phished
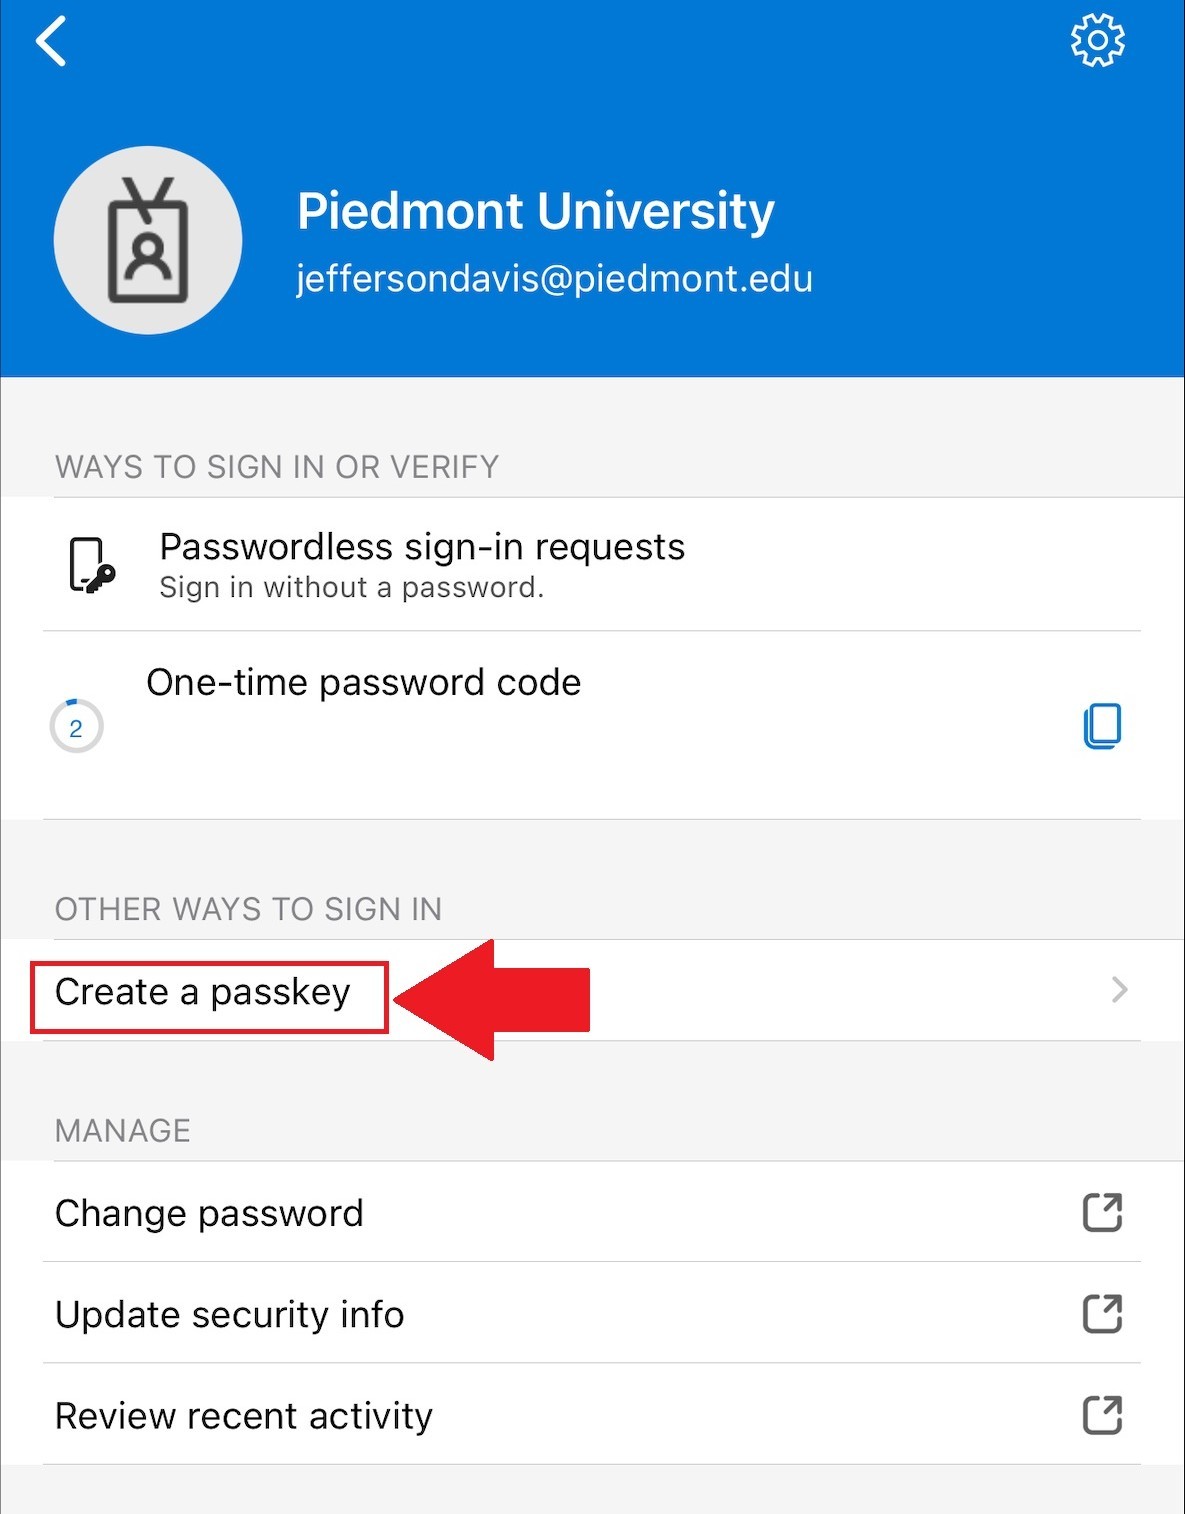
2. Create a Passkey
- Open the Microsoft Authenticator app on your mobile device.
- Select your @Piedmont.edu or @lions.piedmont.edu account.
- Under Other ways to Sign in, select Create a Passkey

-
Select Sign in on the next page.
-
Login using your Piedmont credentials.
-
You will be prompted to complete MFA.
-
Once logged in, your Passkey is created.
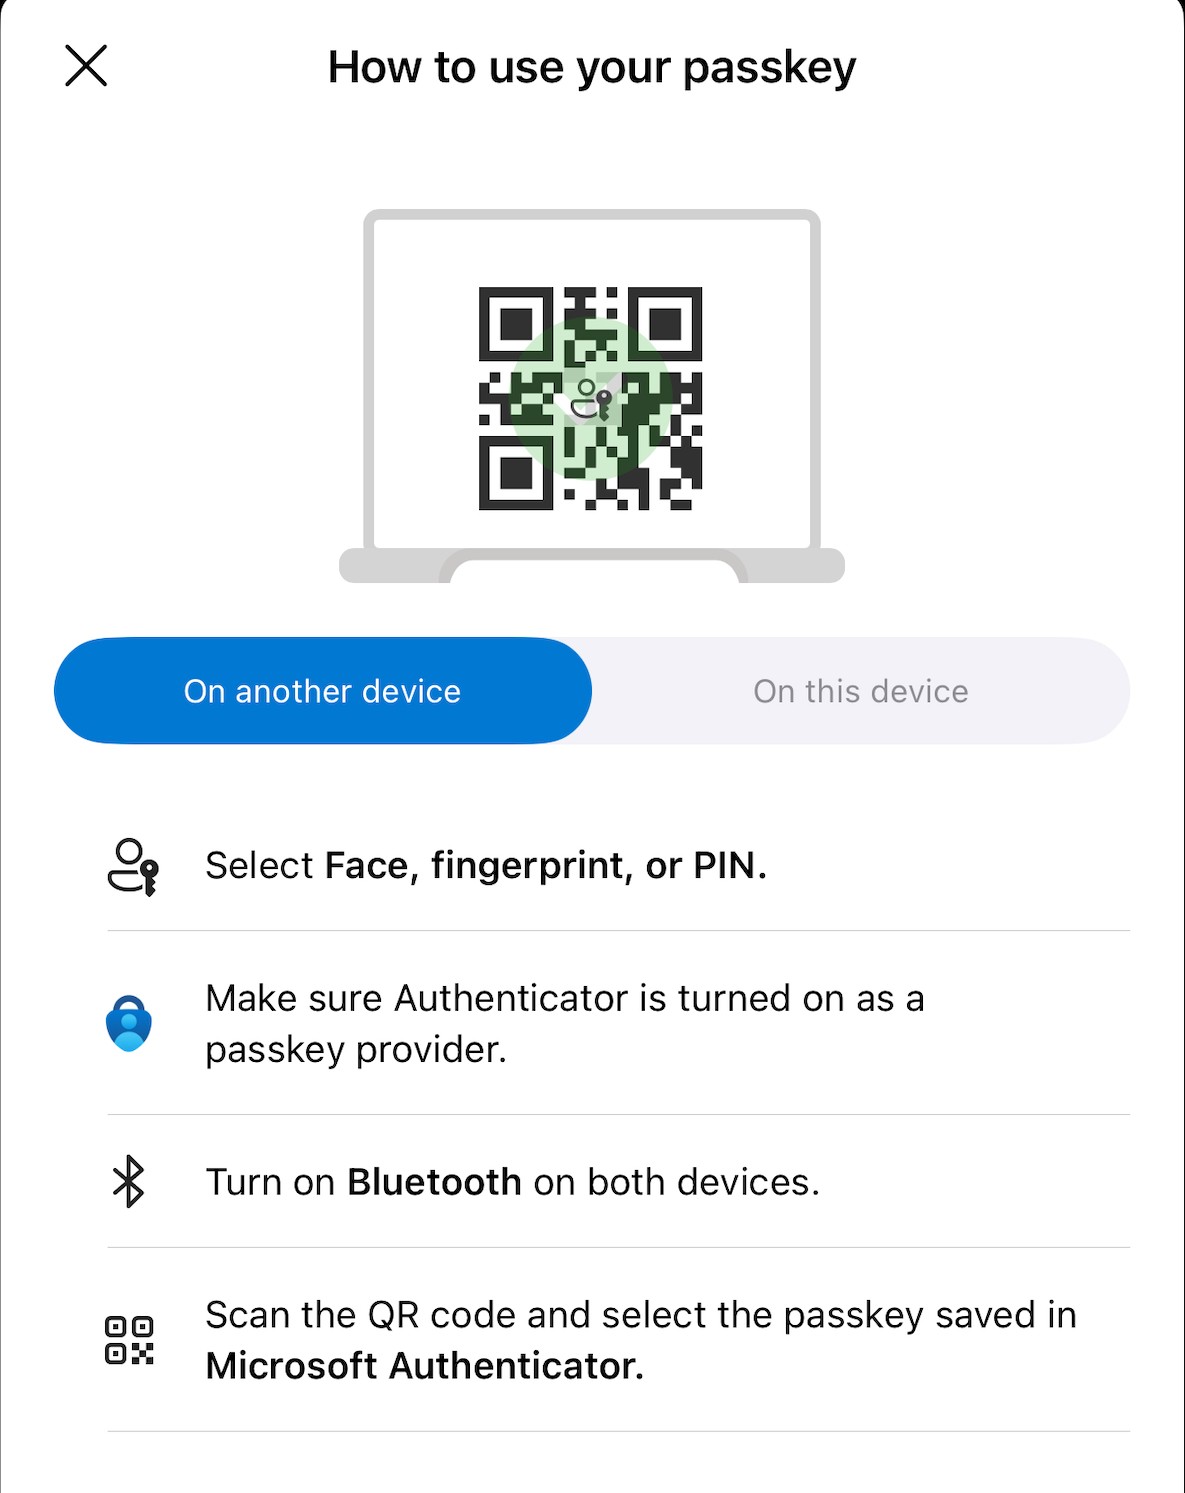
3. Sign in with Passkey
- When you login using your Piedmont credentials, you will receive a new popup window in place of Microsoft Authenticator

- Select iPhone, iPad, or Android device.
- Use your mobile device to scan the QR Code on your computer, select Sign in with Passkey

- On your mobile device, a message will appear "Sign in to login.microsoft.com" on the other device with your passkey for "@piedmont.edu" saved in "Authenticator" ?
- Choose Use Passkey
- Your mobile device will prompt for Face ID or biometrics.

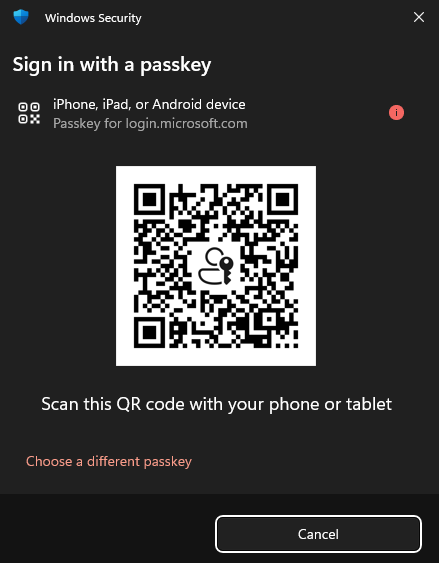
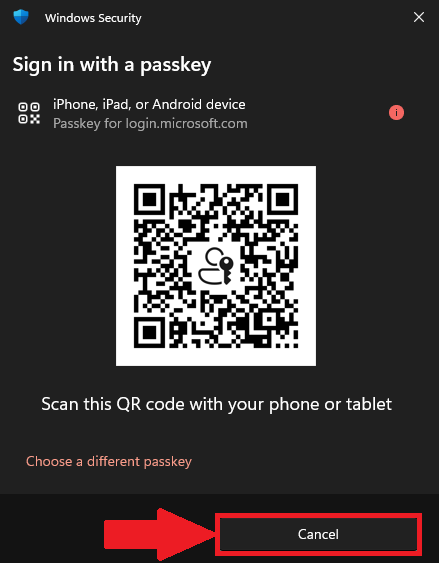
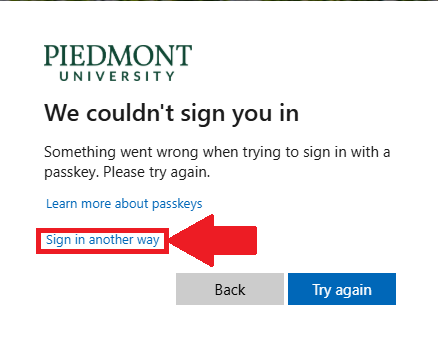
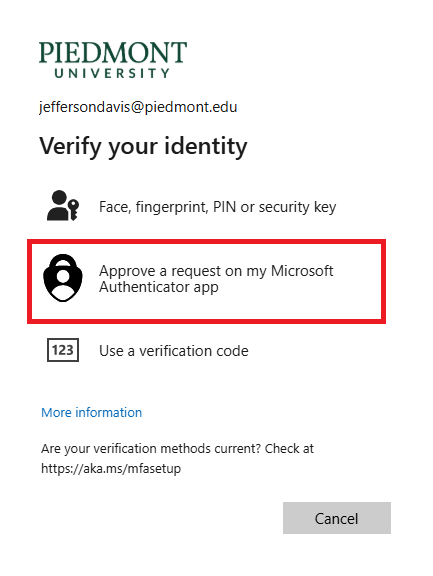
4. Use Original Authentication method
- In some cases you may need to use the original MFA through the Authenticator app, to do so, select the 'X' or 'Cancel' button and select Sign in Another way


- Select Approve a request on my Microsoft Authenticator app to complete original MFA steps.

- Follow the on-screen instructions to approve the Authenticator request.
💬 Department Contact Info
For any issues or questions regarding MFA, please contact IT Helpdesk support
📞 (706) 894-4205
✉️ ITSupport@piedmont.edu
🔗 https://itsupport.piedmont.edu/
Employee Account Activation
A quick-start guide for new faculty/staff at Piedmont University, covering email setup, login instructions, password information, and essential campus resources.
Activating your Piedmont Account
Your Email and Username
All current employees must log in to their SSO before using other Piedmont sites and services.
Your email address is made up of the first initial of your first name followed by your complete last name and @piedmont.edu at the end.
Your Piedmont username is the local part of your email address. That is the part that precedes the @piedmont.edu.
Example:
The user jdoe@piedmont.edu has the username jdoe.
Your Password
Passwords are now synced with Faculty and Staff domain user account passwords — that is, the password used to log in to your office computer.
If you are a new user, your initial password has been set to the last four digits of your SSN, with 'Piedmont' at the end. The 'P' in 'Piedmont' is capitalized.
Example:
If the last four digits of your SSN are 1234, your password is 1234Piedmont
You will be required to change your password upon logging in for the first time.
Password Requirements
Must be at least 12 characters long.
Must have at least one capital letter.
Must have at least one lower case letter.
Must have at least one number.
Special characters are optional. (Example - !, @, #, $, %, ^)
Must have a minimum age of 1 day before it can be changed.
Users cannot use the last 24 passwords they have used.
Passwords are non-expiring.
Logging Into Your Piedmont Device For the First Time (Faculty/Staff)
- Open your Laptop and Select Other User
- If you are a Student Worker or Adjunct Professor, and did not receive a Piedmont-issued laptop, please visit
office.comto log in - Enter your Piedmont Username into the username field
- Enter your Initial Password and select Login
- If you don't have an SSN or your password isn't working, please contact the IT Helpdesk
- You will be prompted to Update your Password
- Follow through the on-screen prompts to create your own password
- Once signed in, visit:
https://myaccount.microsoft.com/in a web browser - Enter your full Piedmont email address and sign in with your new password
- You will be prompted that More information is required
- Select Next and follow through the on-screen prompts to set up Microsoft Authenticator
💬 Support Contact Info
For any issues or questions regarding account activation, please contact IT support by submitting a ticket through our helpdesk system.📞 (706) 894-4205
✉️ ITSupport@piedmont.edu
🔗 https://itsupport.piedmont.edu/
Important Websites
Quick Links – https://www.piedmont.edu/quick-links/
Includes links to:
- Parking Permit
- Rez Life
- Starfish
- Financial Aid
- Clubs and Orgs
Student Printing – https://webprint.piedmont.edu
Canvas – https://piedmont.instructure.com
Self Service – https://selfservice.piedmont.edu
Campus Alerts – https://piedmont.omnilert.net/
Microsoft Teams
Manage Teams Meetings
1. Create a Teams Meeting
- Open a Web Browser and navigate to https://teams.microsoft.com/
- You can also use the Desktop App version of Microsoft Teams
- Login using your @lions.piedmont.edu credentials
- Navigate to the Calendar column

- Select New

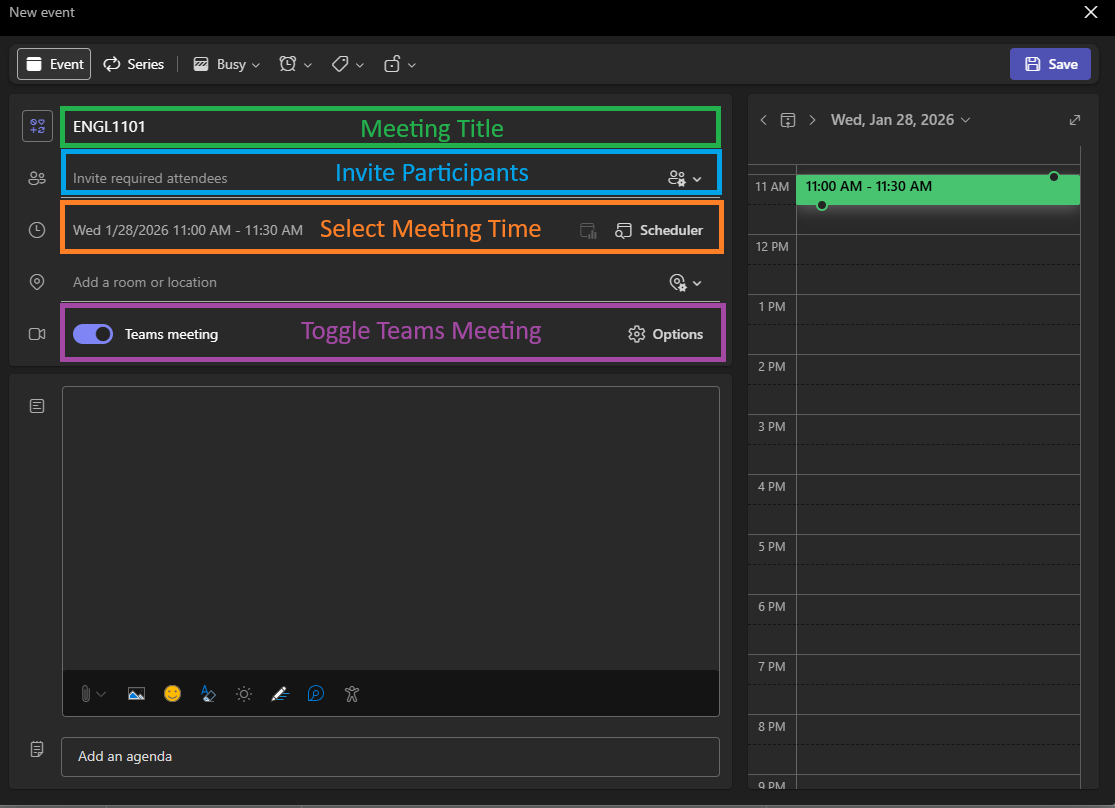
- The New Event popup appears, Fill out the fields for Add Title, Invite Required Attendees, and be sure to Toggle Teams Meeting
- The Event Title will generally be the name of the Class .
- For the Invite Required Attendees field, type in the student's Lions email address to add them to the meeting.
- For the Scheduler Field, select the Date & Time for when the meeting will take place.
- [OPTIONAL]: Add a meeting room/location if you're hosting a hybrid meeting of in-person and online guests. (Example: DanielHall-310)
- Be sure to Toggle Teams Meeting, so that a URL for the meeting is created.
- Finally, select Save in the top-right corner to create the meeting

- A Meeting will be created and invites will be sent to the participants.


2. Join a Teams Meeting
A meeting created with Attendees will send an email invite to the participant's Outlook but you can also view the invite on the Teams Calendar
- Open a Web Browser and navigate to https://teams.microsoft.com/
- You can also use the Desktop App version of Microsoft Teams
- Login using your @lions.piedmont.edu credentials
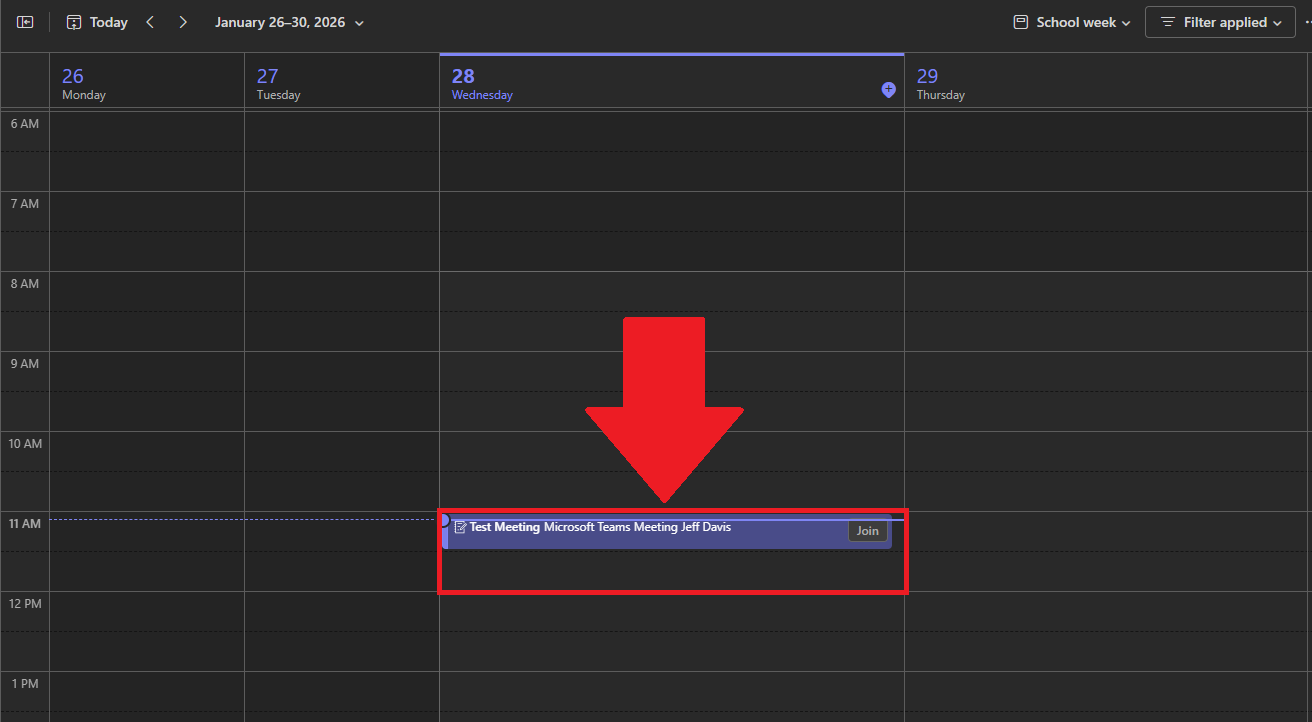
- Navigate to the Calendar column
- Scroll to the Date/Time that the Teams Meeting would take place, you should see the meeting on your Teams Calendar.

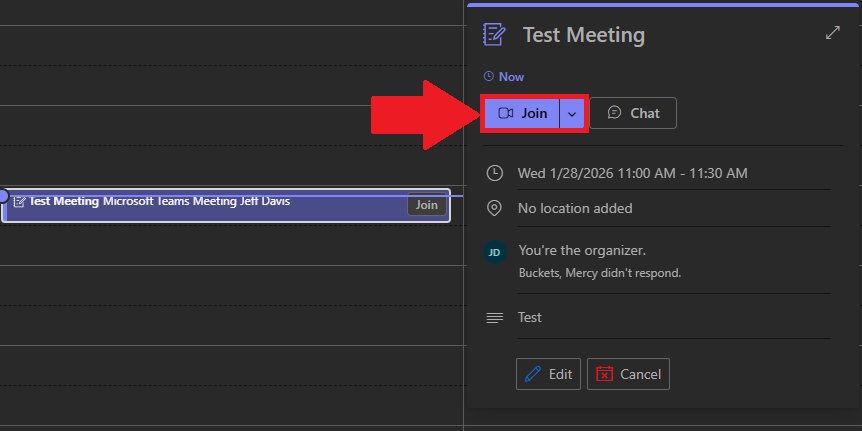
- Select the Meeting, and select Join

- Follow through the on-screen prompts to select your Audio and Video equipment as you would normally do so if you were using Zoom.
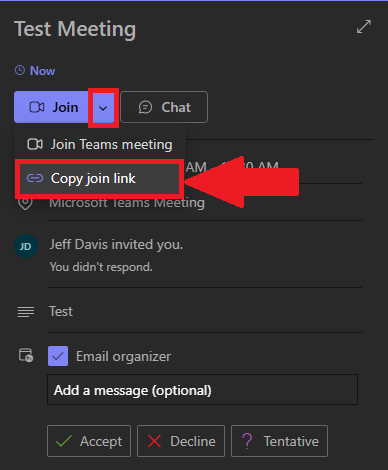
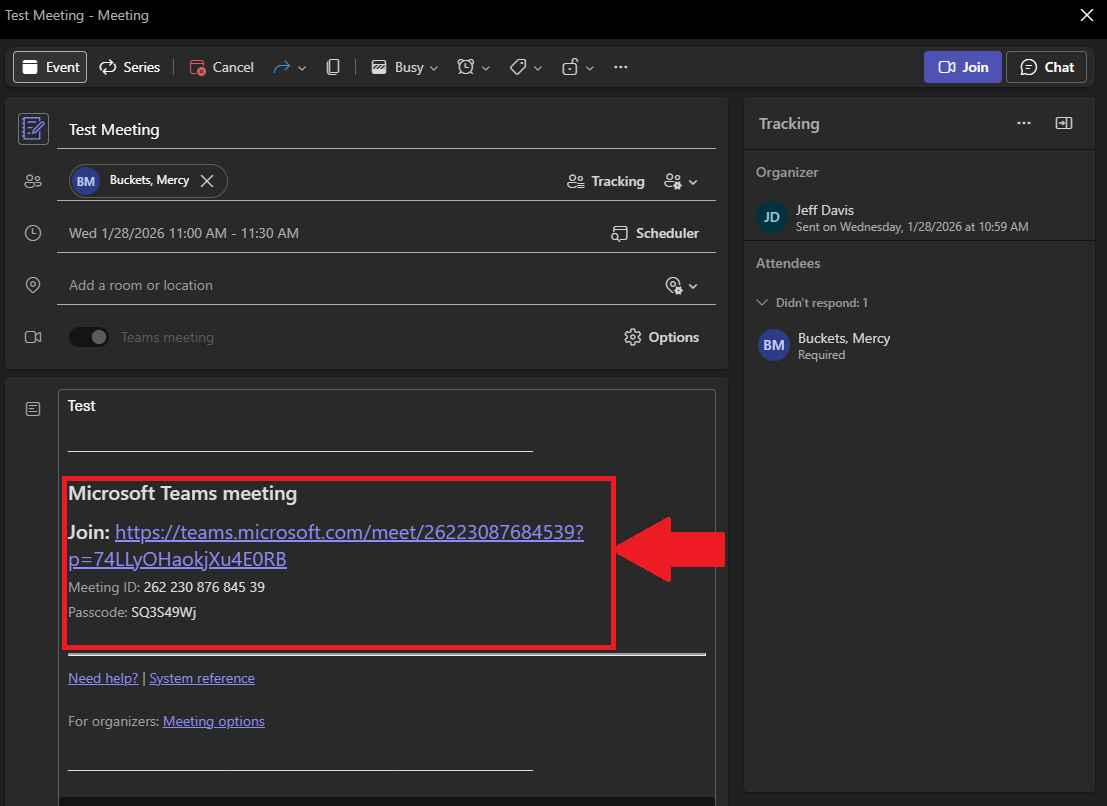
3. Meeting ID and Passcode
You can complete the following as either a host or attendee
- You can obtain the Meeting Link/URL by selecting the Drop-down arrow next to Join Meeting on your Teams Calendar.

- If you Double-Click a meeting on your Calendar, you can see the Meeting ID and Passcode

4. Advanced Options
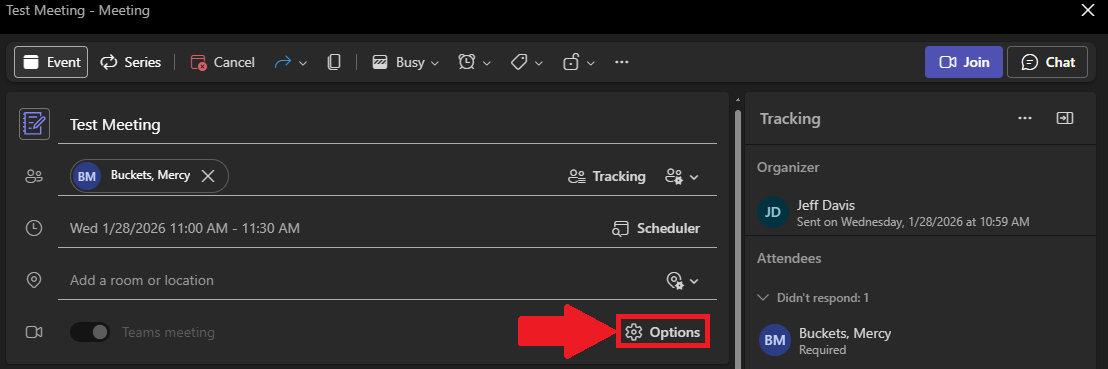
The following section can only be completed by the host or co-hosts of a Teams Meeting
- Navigate to Teams Calendar, the following options can be performed on New Meetings, before they're created, or afterwards for existing Teams Meetings.
- Select the Options button when editing or creating a Team Meeting

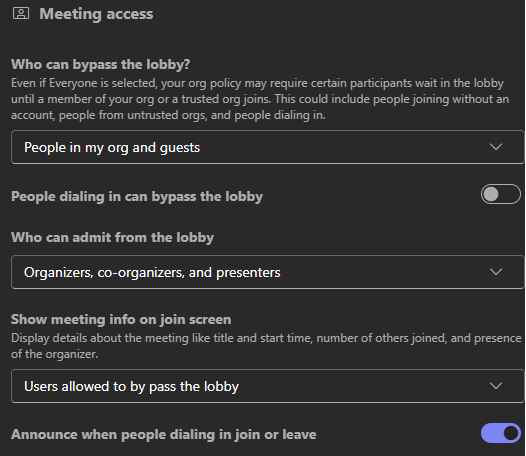
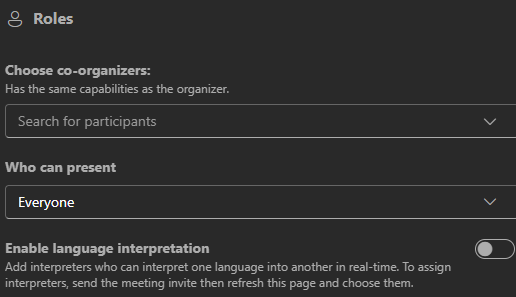
- In this menu, you can manage Meeting Access and Roles
- Meeting Access: Here you can manage the basic permissions of attendees in the meetings.

- Roles: Here you can manage co-hosts and presenting permissions for participants.
- Meeting Access: Here you can manage the basic permissions of attendees in the meetings.
💬 Department Contact Info
For any issues or questions regarding Microsoft Teams, please contact IT Helpdesk support 📞 (706) 894-4205
✉️ ITSupport@piedmont.edu
🔗 https://itsupport.piedmont.edu/
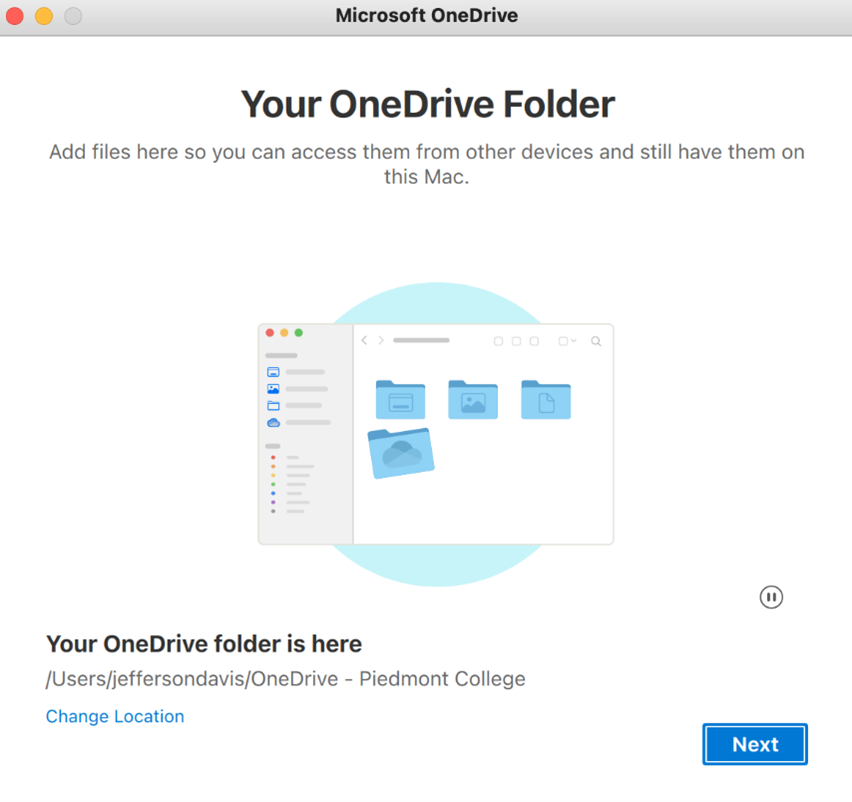
OneDrive
OneDrive is a powerful cloud-based storage service that allows you to access your files and documents from anywhere, making it a vital tool for productivity and collaboration. This document has been prepared to assist you in setting up OneDrive on your PC, ensuring a seamless and efficient experience.
OneDrive Backup (MacOS)

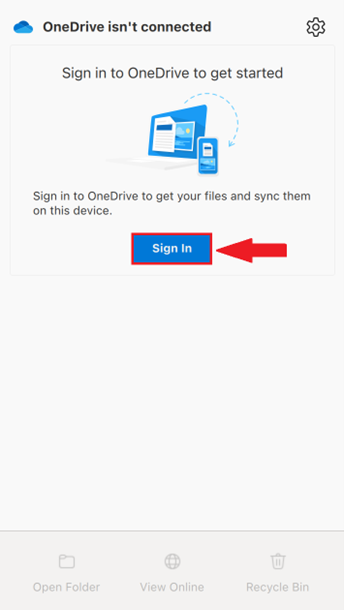
- Open OneDrive from the menu bar, located at the top of the screen

- Select Sign in

- If you are already signed in, you do not need to proceed
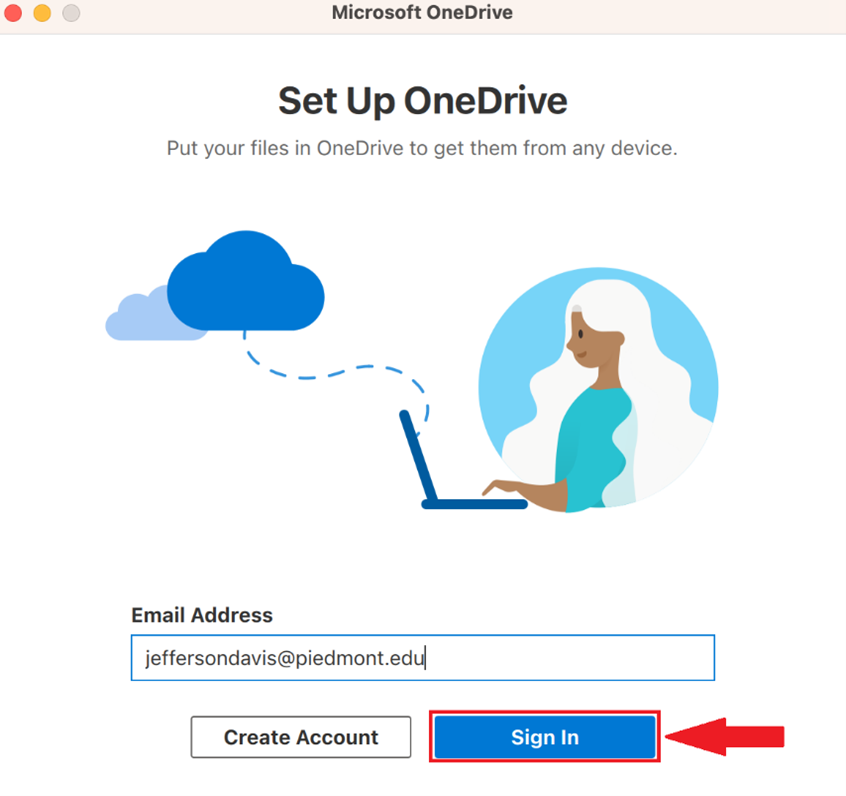
- Enter your full email address and select Sign in

- Follow through the on-screen prompts to finish signing in

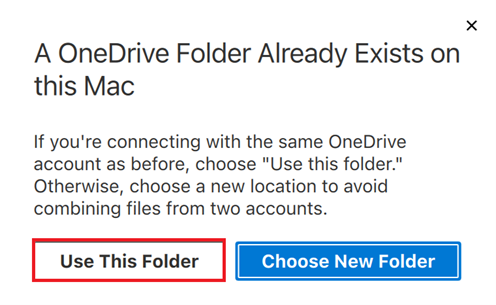
- If prompted that a OneDrive folder already exists, choose ‘Use this Folder’

- You will be prompted that Your IT department wants you to back up your important folders, choose Start Backup

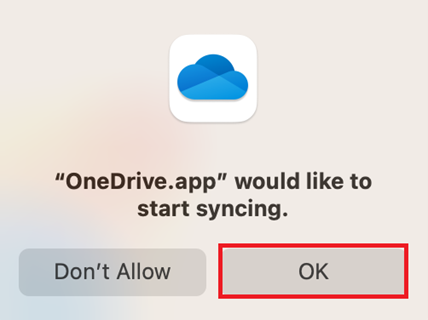
- MacOS may prompt you to allow OneDrive to sync, choose OK

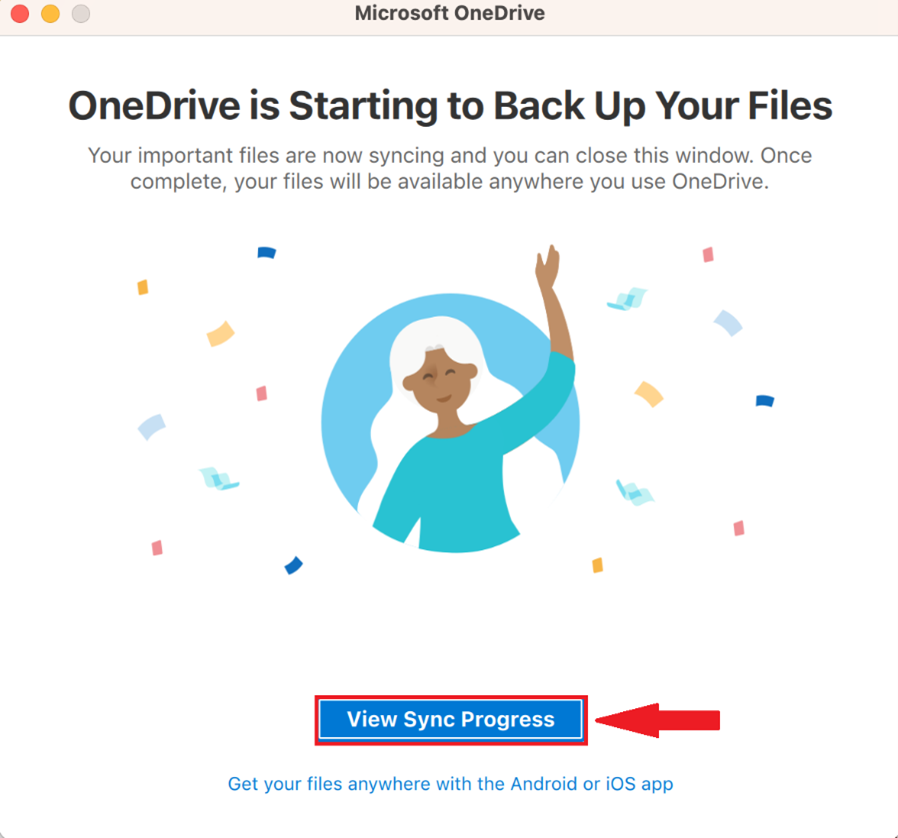
- OneDrive will begin backing up your data, To see the progress select View Sync Progress

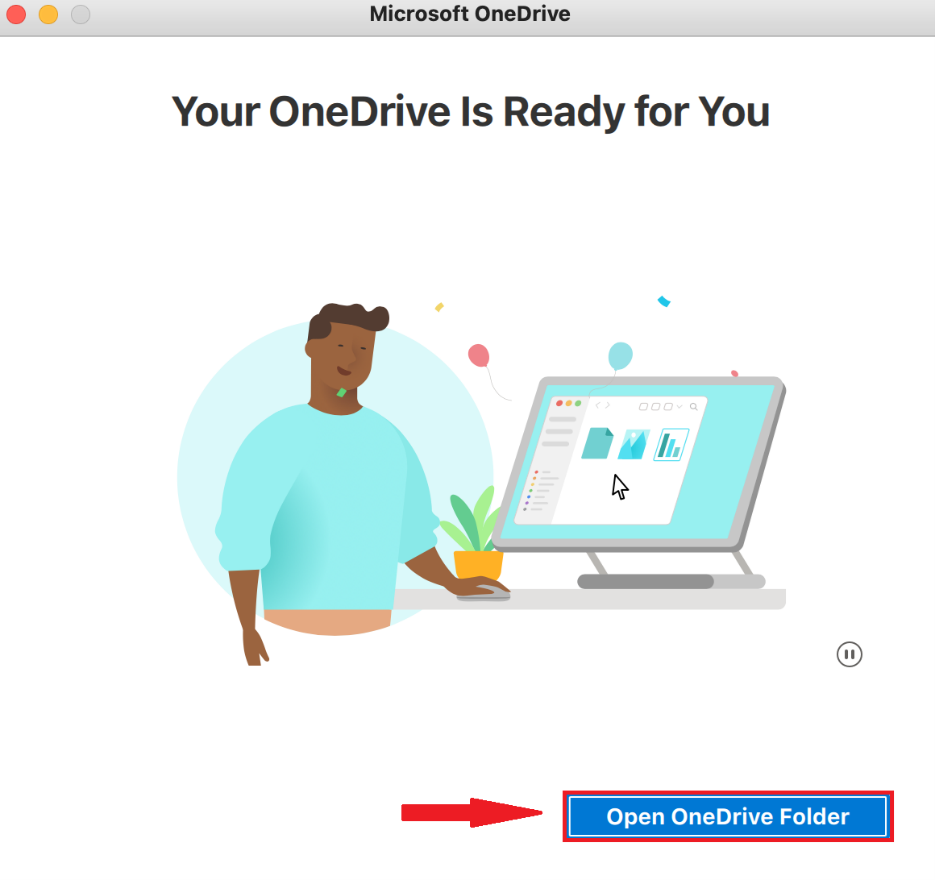
- When OneDrive is ready you will be prompted Your OneDrive is Ready for you, choose Open OneDrive folder to view and manage your files


OneDrive Backup (Windows)
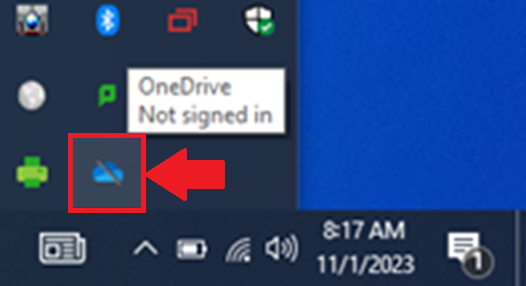
- Open OneDrive from the Shortcuts toolbar, located in the bottom right corner, next to the date & time

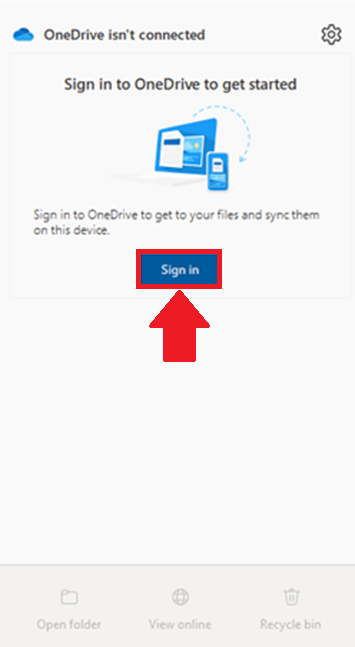
- Select Sign in

- If you are already signed in, please proceed to the next section
- Enter your full email address and select Sign in

- Follow through the on-screen prompts to finish signing in
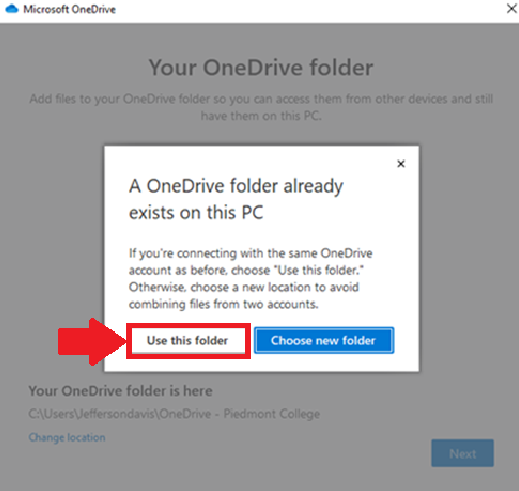
- If prompted that a OneDrive folder already exists, choose ‘Use this folder’ (Figure 5)

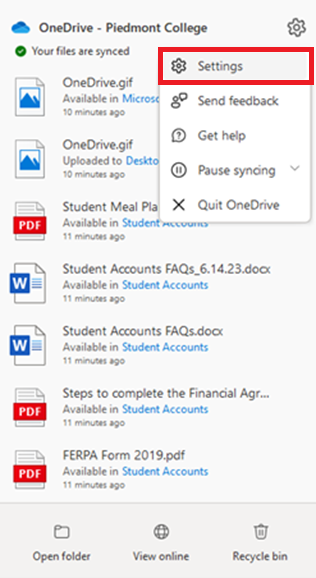
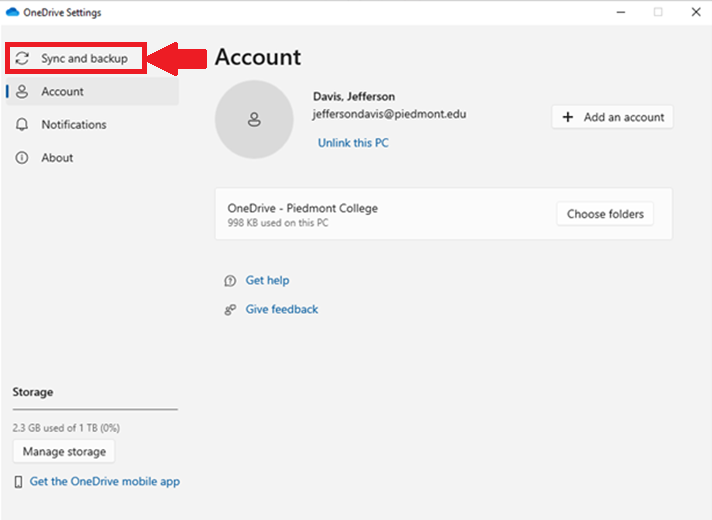
- Open OneDrive from the Shortcuts toolbar
- Select the Gear icon in the top right corner

- Choose Settings from the dropdown menu

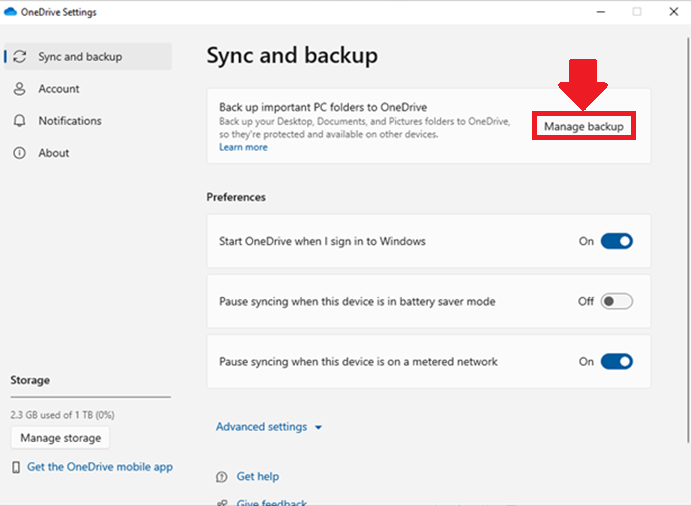
- Choose Sync and Backup

- Select Manage Backup

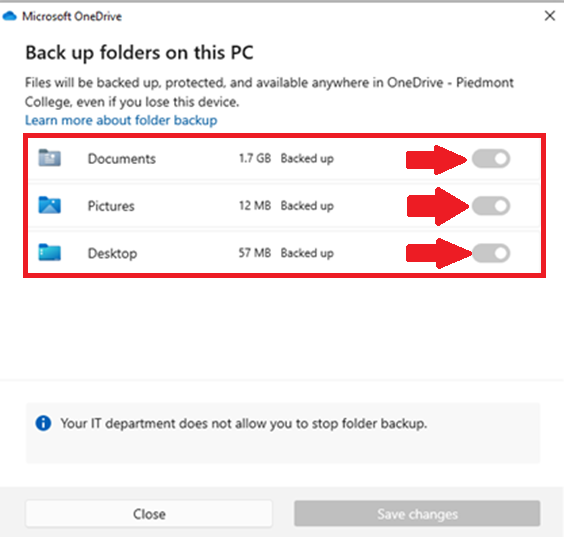
- Toggle the sliders on for Documents, Pictures, and Desktop

- If these options are already enabled, then that data is being backed up — you do not need to proceed
- Select Save Changes
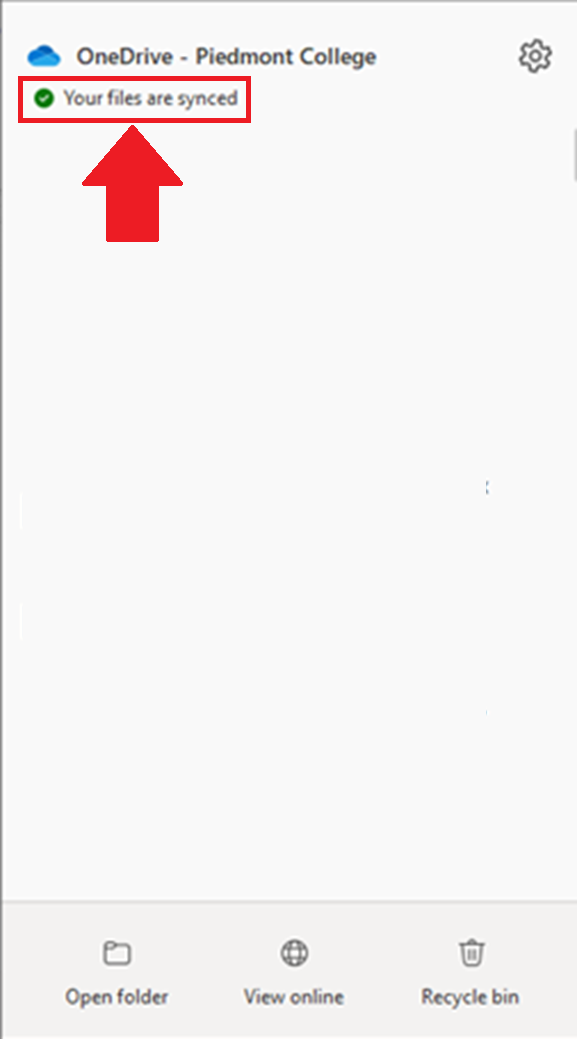
- When OneDrive is finished backing up you will see a green checkmark